I have a new blog!

If you want to see only my creations please come and check out and follow my new blog http://www.tanyah-payne.blogspot.com

Sunday, October 31, 2010

A playful Cosmo Cricket Layout - by Annie Zorzo

The weeks keep coming around faster and faster don't they....or is it just me?  Loads going on in our house at the moment so things have been massively busy...but not to busy that I can't have a bit of fun scrapping.

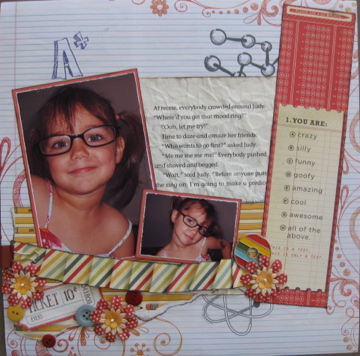
I'm in love with the layout I've done for you this week and I hope you love it too.  For this weeks LO, I've taken a couple of pictures of my eldest daughter playing with her grandmother's glasses, showing a bit of spunk and added abit of everything!  Whilst I've typically used papers that you would associate with 'School', I've done something a little different with them....since she's not at school yet!

I've also used some Boarder Papers.  Now I don't know if you've tried these yet or not, but I absolutely love them.  A double sided 12 x 12 sheet full of strips of cordinated themes ready to add to and embellish your project.  Seriously if there is a boarder piece of paper on offer in a paper range you're looking at - get it, you won't be sorry!
For this LO, I used:
- Doodling paper by Paper House Productions
- Homework paper from Cosmo Crickets Boyfriend Range
- Boarders paper from Cosmo Crickets Boyfriend Range
- Torn page and image from Vintage Book
- Cardstock
- Kelly Panacci Journalling stickers
- Buttons, Gromet & Bulldog clip
- Paper Flowers
- My Mind's Eye Tickets
- Letter stamps
- Various Chipboard Letters
- Versa Colour Ink
- Making Memories Paint
- Watercolour oil pastels

And here's how I did it:
1.  I added all my papers to my base Doodling paper: 
- I tore and crumpled a page from a vintage book, inking the edges in Pinecone Versa Colour ink, attaching it just to the right of centre.
- I tore a piece from Cosmo Cricket Boyfriend - Homework paper, inking the edges in Pinecone Versa Colour Ink and attaching it to the bottom half of the vintage paper and aligning to the left hand side of the page
- I cut a boarder strip from the Cosmo Cricket Boyfriend - Boarders papers, inking the edges and attaching to the right of the vintage papers on a slight angle from the top right of the page.
2.  I added my photos: 
- As I'm going to position my photos overlapping some of the vintage paper, I decided to mat them to ensure that they any acid is not transferred to the photos. 
- My photos are sanded and the mat edges are inked in Versa Colour Pinecone.
- The photos are positioned to the left and bottom of the vintage paper leaving space at the top for my title.
3.  I added my embellishments:
- Piece of pleated paper from the Cosmo Cricket Boyfriend - Boarder paper
- My Mind's Eye Ticket
- Layered paper flowers
- Gromet
- Buttons
- Bulldog clip
4.  The Title
- using the A+ on the doodling paper to form part of my title.
- stamped the first part of my title using Versa Colour Raspberry
- painted my various chip letters in Making Memories Daffodil and once dry inking the edges with Versa Colour Pinecone.  To get into the tricky spots I used a make-up brush that you can pick up from any $2 shop.

5.   Final touches
- from the vintage book I found a drawing that just looked like fun.  As it was in black and white, I used some watersoluable oil pastels to add some colour.
- Once dry I added it to the bottom right hand corner of the layout.
- I wrote out some journalling on a Kelly Panacci sticker and added it next to the main photo
I hope you like it and can see how you can add boarder papers to your next project and even papers that are marketed for a specific purpose, you don't have to use them for it.  Be creative and go have some fun.

Now, one last very important thing....have you submitted your application to become the newest member of our design team?  Entries close TODAY at midnight.  If you can do a project each week (LO, Card or OTP) and can post your creations to this blog....please we want to hear from you.  Send an example of an OTP, 2 x cards and 2 x LO to Tanyah at cardartbytanya@yahoo.com.au.  Do it now so you don't miss out on your chance to join us.

Good luck and see you next week!

Saturday, October 30, 2010

Our Guest Designer - Liz Webber - Card sketch and step by step card.

Today we have a sketch designed by Liz Webber... we would love to see what you can come up with using this sketch and place into the gallery! http://www.scrapncraftwitht.com.au/gallery


Here is the card Liz has created for us to admire!..


Products used:

  1. Trim a Card base 6” x  6” from  White cardstock
  2. Trim a piece of Crate Paper  - Paper Doll Lizzie piece 5 ¾” x 5 ¾” and then use your favourite border punch along the bottom (I have used a Martha Stewart Daisy border punch)
  3. Then attach to card base (red side up)
  4. Trim a piece of Crate Paper – Paper Doll Addi  to 4 ½” x 4 ½”
  5. Trim a piece of Crate Paper – Paper Doll Lizzie to 4 ¼” x 4 ¼” and attach to the Addi piece
  6. Attach  a piece of white lace around these pieces and attach to card base
  7. Trim a piece of White cardstock to 4” x 3”
  8. Trim a piece of Crate Paper  - Paper Doll Addi to 3 ¾” x 2 ¾” and attach to the white cardstock
  9. Attach to card base on a slight angle with 3d foam tape
  10. Make a bow from white lace ribbon and attach to the right hand side of card
  11. Attach 2 Green Tara flowers and a Bling brads to the top left of the card
  12. Apply HOTP rubons sentiments  to the card

Thanks for stopping by to have a peek at Liz beautiful card
have a lovely weekend
till next time
tanXx

Friday, October 29, 2010

Vintage style' - a step-by-step card by Ingeborg Dijkstra

I am still very challenged to do 'vintage style scrapping', but I am determined to give it a go and challenge myself. Tanyah kindly sent me the lovely Ruby Rock It Collection, which works so well with vintage style layouts and cards. So ... after I used a few papers on my layout last week, I decided to create a card with the same collection too!

I first cut a piece of 12" x 12" kraft cardstock in half and folded it to get a 6" x 6" card.

I cut a square out of the 'Mistress' paper. I made the square slightly smaller than the kraft card, because I wanted to still be able to see the kraft border.


I cut a smaller square out of the 'Emily' paper. Using a distresser I distressed all the edges. I also inked all the sides. I punched a scalloped border and inked this border too.

I cut a piece of the Birch Vintage Cotton Lace and put it across the card. I added a bit of brown ink here and there for an 'aged feel'.

I have used a page of the matching journaling pad from the Upstairs/Downstairs Collection. These journaling blocks work so well with the papers!

I borrowed a vintage stamp from a friend. Unfortunately I didn't ask her what the name of this stamp is or which company made it, but this is what it looks like:

I added a little butterfly, which came from the Upstairs/ Downstairs Embellishment Pack. I also punched some swirls out of the 'Emily' paper. I also added a dark blue flower and a vintage frame embellishment.

Finally I stamped the words 'Thank You' on the card. Using clear embossing powder I made it sparkle a bit! This is the finished card:

Thursday, October 28, 2010

Gotta love a boy layout...

I have  three sons  so  am always  looking for inspiration for  creating  boy layouts.  Some papers and some colours  just lend themselves to it perfectly.  I found that with these  fabulous  7Gypsies papers ...ouble  sided papers are  always  a fabulous investment  because you have so many possibilities  with them!
here is a layout I did using  7Gypsies  Ecriture and Orchestra  papers- both available  INSTORE 

1.  Kraft cardstock kis your background
2. Take 7Gypsies "Ecriture" and  cut to  11 inches x 5 inches.
Distress and ink edges
3.  Take 7Gypsies "Orchestra"and cut to 6  inches x  9 inches.
Ink and distress edges .  When adhering this piece dont  place  adhesive down the right side.  We will need access to this later

4.  Take ecriture  and cut to 7 inches across and 8 inches down.  Tear  bottom  edge of paper.
Ink and distress
5.  Take length of brown mesh and  run down left  side of cream script paper.
6. Adhere photo  I have used a 6 x 4 portrait.
7. Take the flourish with a bling  and run along left side of photo.
8. Use BINGO  card on bottom  right side of photo.
9. Take Maya Road envelope and slide in under  brown orchestra paper.  This  can be used to hide your journalling to keep your treasures in  etc.


Wednesday, October 27, 2010

Cosy Christmas with docrafts

This week I am making some Christmas cards using products from the docrafts range.

I have used the Cosy Christmas A4 Decoupage Pack which consists of 4 die-cut sheets (2 different designs) and 4 patterned papers (2 different designs).

Now I have never done any decoupage before so I was a bit daunted by the prospect as it had seemed a bit fiddly in my mind.  I need not have worried because the sheet of decoupage patterns are all die-cut for you so all you have to do is pop the pictures out....they are even numbered in the order they go...very simple and no cutting involved.


Card 1.  I have used a tri-fold card to make this card.  I covered the front with some of the patterned paper in the Decoupage pack.  I made the decoupaged image by overlapping the images and mounting them with foam tape and attached it to some red cardstock.  The title was also found in the decoupage pack.  I inked around the edges with red ink to define the border.

 Here's a close-up of the decoupaged image...


Card 2. I have made this card using a decorative door card blank.  I used patterned paper for the inside paper.  To decorate the front cover, I embossed using a script stamp, inked, assembled the decoupaged image and attached it to the front.
 Close-up of decoupaged image.


Card 3.  I have again used a tri-fold card to make this card.  I embossed some cardstock with the docrafts snowflake embossing folder, assembled the decoupaged image using foam squares in between each layer and added a title to the bottom.


Close-up...


Card 4.  I have made this card using a decorative door card blank.  I used patterned paper for the inside paper.  To decorate the front of the card I glimmer-misted in green then I wrote 'christmas blessings' over and over until the card was covered with a red jounaling pen.  I again assembled the decoupaged image and attached it to the front of the card where the doors open.

 Close-up...

Thanks for looking!

There are many other co-ordinating docrafts products to jazz up your cards even further.  If you are after some inspiration the latest magazine is now out as well which comes with a free stamp set and an embossing folder.  Check out all the docraft range HERE!!

Happy creating...xxxooo

Tuesday, October 26, 2010

NEW Guest Designer - Liz Webber - Card sketch and step by step card.

Hi Everyone

This month we have a new Guest Designer..... LIZ WEBBER. Liz mainly does cards and they are so beautiful and lots of our cardmakers will enjoy checking them out.
To see more of LIZ amazing work... CLICK HERE!


We will share with you  a few Card Sketches  Liz has designed, but I am sure you could use this to create a layout too! Here is the first one!


Products used:


Instructions..
  • Cut the green cardstock  in a square leaving approx .5cm all around the edges and adhere onto the card
  • Cut out of white cardstock covering only 2/3rds of the green card and place to the left side leaving .5 edge around the top and bottom and left side.
  • Cut out of the Crate paper - Paper Doll range paper covering the white card leaving .5cm all around the edges
  • Cut a strip of green card approx 5cm and place at the bottom, if you have a shaped punch you can decorate the bottom edge and then place on your card
  • Cut out a white piece of card that will overlap over the pattern paper towards the right and make a decorative centre piece to place the Crate paper - Paper Doll glittered accents - These are 30% off at the moment!
  • Adhere layers of flowers with a crystal brad in the centre.
  • Create a lovely title 
Isn't this card adorable! .... we will bring you more from Liz to inspire you soon
thanks for reading
TanXx

Monday, October 25, 2010

Who LOVES Cybercrops....

If you haven't done one before it is a fun way to challenge yourself and do a few challenges with prizes to win along the way.

ScrapChat is holding a Cybercrop 12 November 2010 starting at 7pm.This Pic was designed by Kylie Abel and is part of the first challenge... now I wonder what it will be????


Come and have lots of fun with us and Click here to register.

see you their everyone!

Altered Paint Tin - OTP by Sue Smith

Last week I had the pleasure of attending a scrapbooking retreat on the beautiful Gold Coast with some gorgeous and talented scrapbookers, some of whom have been previous members of Tanyah's DT here on this blog and who continue to be great supporters of her wonderful shop. If you haven't yet shopped with Tanyah, I would encourage you to do so, as there is a huge range of goodies to pick from at great prices with many items discounted. Take advantage of Tanyah's latest offer of FREE POSTAGE until midnight tonight (Oct 25th)....how cool is that?

As part of this retreat, we are asked to alter a tin of any sort and fill it with goodies as a swap, so I thought I would share with you my creation.....


I started off with a 'paint' tin that I purchased from a local craft shop...


The inner circumference of this tin was a lucky 29cm which made it very easy to fit with 30cm papers giving a small overlap. So to line the tin from the inside I cut a 10.5cm strip of some spotted Kaisercraft Vagabond 'Gypsy' paper and joined the 2 short ends together to make an insert like this.....


For added detail I cut some thin strips from Kaisercraft Gypsy Sisters Collection 'Sofia', inked the edges with a Burgundy VersaColour Ink Spot, and then joined them at the short edges before inserting everything into the tin.....


I decided to hang an assortment of handmade embellishments from one side of the handle, and I'll show you how I put one of them together....

1. I started off with a plain chipboard shape

2. I coloured all the edges of the chipboard using a felt tip pen (you could also use paint or any ink you like. I then stamped a small piece of transparency with a co-ordinating image and attached with a small amount of adhesive to one side.

3. After cutting a circle the same size as the inner circle of the chipboard from a scrap of paper, I then stuck that to the chipboard. A good gluestick is best for this sort of thing so that there is an even and total coverage of adhesive. You could also use Jac Paper.

4. After the glue dried I turned it over and then cut around the edge with a craft knife.


I then did the same thing for the other side, sanded all the edges with small files which are fantastic for getting into all those intricate spots and re-inked where I needed to. Here's the finished embellishment....


I then made a few more chipboard tags personalising them for the retreat, and attached them to the handle of the tin using wire and ribbon and added some beads and other trinkets which I coloured with Tim Holtz Ranger Alcohol Inks.


HANDY HINTS

* When stamping on transparency or acetate you need to use StazOn Inks as normal stamping inks won't dry on the non-porous surface BUT (and here's the handy hint part) if you don't have the right coloured StazOn inkpad, you can use normal stamping ink on an inkjet printable transparency if you stamp on the 'rough' side. The ink will adhere and dry to that side quite successfully.

* Don't throw out ANY old jewellery....you never know when some little trinket will fit in perfectly with one of your projects. I have a box in my scraproom where I put all those metal bits and bobs and then dress them up with alcohol inks to suit.

Hope you like what I've created and have perhaps picked up a few techniques or ideas from my post. Until next Monday...happy scrapping! xxx

Sunday, October 24, 2010

Using LO Sketches for Cards - By Annie Zorzo

Still considering myself a relative new comer to the world of scrapping, I have dabbled very little into the world of card making.  I'm not sure if this is the norm....are scrappers also card makers and card makers also scrappers or does everyone stick to what they know and very rarely do they cross over?

Well today I'm branching out and I thought I would show the scrappers out there that they too can become a card maker by using a LO sketch.  And for the card-makers among you, here's another little tool in your tool box when your grappling for some new inspiration....using a scrappers LO sketch.

Here we go...and you must know that I'm writing this before I've even started.  I've picked this LO sketch from the Scrap N Craft with T Sketch Gallery.  I've choosen it purely because of the tearing along the bottom and the little bits of stitching, two things I love to do.  I have no idea how it will translate onto a card but that's the fun of it isn't it!  Remember, sketches are a starting point, you don't have to add all the elements and you can adjust the orientation and placement of embellishments so it fits you're project.  Also remember that because you're working on a smaller surface, it's a great time to bring out your scraps and use them up.

For my card I used:
some left over scraps from the Fancy Pants About a Girl paper range.
Paper Flowers
Brads
White Gel Pen
Sam & Lucy Teeny Tiny Letter Stickers.

And here is what I came up with:

It's not the prettiest card, but the Fancy Pants About a Girl range lended itself to be quite bold, a bit funky and something that would suit a pre-teen.  To make the card I started with:
1. A strip of green placed along the bottom edge of the card to show through the tear
2. Cut a rectangle from the main paper I wanted to use and made a teared 'V' towards the bottom.
3. Next with a white gel pen, I made stitch lines across the main paper.  The About a Girl paper range has dark lines that I used as a guide rather than use the circle from the sketch.
4. From the About a Girl boarder strips and cards I cut out two phrases to take the place of the photos on the sketch and then cut the star and saying to take the place of the torn lined paper on the sketch.
5. The final touch on the outside of the card, I attached some layered paper flowers with brads and some cross stitch marks with a white gel pen.
6. And lastly for a sentiment on the inside of the card I used the Sam & Lucy Teeny Tiny Letters.

So there you have it, a card made from a LO sketch.  The pinnacle of card making might still be a little out of reach for this self-proclaimed scrapper, but it's a starting point for other like-minded scrappers out there to dabble in card making.....particularly with christmas coming up.  Now that's an idea....I'm going to challenge all of you out there to use this sketch or another LO sketch from the Scrap n Craft with T Sketch Gallery and make some Christmas Cards.  Have a go and show us what you come up with in the Gallery, we'd love to see it.

So off you go, get card making, scrapping or go and enjoy your Sunday with the family.  I hope it's warm and sunny where-ever you are.

Saturday, October 23, 2010

STORE NEWS & MY MUSINGS...!!!

Good morning everyone.
Shazz here again....Tanyah's "off-sider"
I work most Fridays and give Tan a well earned break from life at the SNCWT store.....not that she ever really takes a break - she likes to keep an eye on things...!!!

We have been busy re-arranging things in the store over the past few weeks as well as adding to, and updating the online store.
So feel free to pop in, either in person, or via the cyber-world and have a look around.

If you have a look at the online store, you will notice some new areas in the sidebar.
We now have several dedicated "specials" areas.
If you are looking for a bargain, this is the place to shop.
We are constantly adding products to these areas and you can grab bargains from
20% up to a whopping 80% off the RRP.
Great place to look if you have little ones who like to create along with you.

Yesterday I spent most of the day putting all of our chipboard alphas on special - up to 30% off.
There are some fantastic bargains to be had so why not grab yourself a set or two.....like chocolate, you can NEVER have too many chipboard alphas.

We have also added a new Christmas section and with Christmas a mere 10 weeks away - yes........10 weeks, I said....!!!!!!
.......there are some great products here to start your Christmas gift making or card making.
Just have a look at what the lovely Nic Amber has created using the new Echo Park Christmas ranges that we have in the store. 

Speaking of gift making and card making, have you booked in for our
Christmas Make and Take Day on November 6...???
It promises to be a great day of fun, friendship, creating and inspiration.
You will get to create lots of wonderful gifts, not only suitable for Christmas gift-giving but all year round too. 
Places are strictly limited.
See here for details and contact Tan if you would like to come along and join the fun.

Have you seen all the new Dusty Attic chipboard we have just received...???
I cannot tell you just how GORGEOUS these products are - the detail in some of the pieces is amazing and,  with the availability of all these lovely mediums to alter products these days, you can get some amazing finishes and add these gorgeous pieces to your work.

Our lovely creative team member, June has just returned from cruising about on a rather big boat with none other than the amazing Tim Holtz, so we are looking forward to hearing all about it and seeing all the amazing new techniques she has to share with us using Tim's products.

Another gorgeous creative team member, the lovely Nic has been busy too expanding her "Nic Creates" line with these simply beautiful rolly-roses.
Suitable for both layouts and OTPs, these little cuties are rushing off the shelf.

On a sad note, we are saying goodbye to Sarah Rickard, one of our lovely creative team members.
Sarah's busy life of being a wife, a Mum to three energetic boys, working and starting a quickly-growing photography business, has caught up with her and she has decided to take a break from being a creative team member for SNCWT.
Thank you for all you have done for us Sarah and we wish you the best of luck in the future.
Don't be a stranger....!!!
So we are on the lookout for a new creative team member.
If you think you have what it takes, please give Tan a call on 0458 217 911 or call into the store 
47 Northcott Drive
Russellton Industrial Estate
Wollongbar
(look for the pink flag flying at the gate) 
and she can fill you in on what we are looking for in a creative team member.
It's a whole heap of fun and you get to play with LOTS of lovely new products.

Well, I hope you have enjoyed this update and we look forward to seeing you in the store very soon.
Have a happy, scrappy weekend

~shazz~
xo

Friday, October 22, 2010

Wanna be part of this Design Team? A layout and DT call by Ingeborg Dijkstra

Since the beginning of this year I have been a Design Team member for both Scrap 'N Craft with T and the Scrappassion Challenge Blog. The Dutch version of the Scrappassion Challenge Blog has been running for over 2 years in The Netherlands, but from January 2011 the blog will go international! Ria, the owner of the blog thought it was time to see some gorgeous entries from international girls. Before we can start of on January 1st 2011,

we are looking for some more talented girls to be part of our Design Team!

We are looking for 4 INTERNATIONAL (a.k.a. outside of the Netherlands and Belgium) designers who love to be on our Design Team. You can be from anywhere around the world; it doesn't matter where you are from. As a Design Team member you will work together with the four Dutch girls who are on the Dutch Scrappassion Challenge Blog. (Feel free to have a look at this Dutch version, which is obviously in Dutch)...
You will find all the details about the DT call and the International Challenge Blog in English HERE !!!! We have received one submission so far and clearly we'd love to have many more! And did you know that Tanyah is our Australian sponsor for this blog too? So come on ... give it a go!

Now back to the layout. The girls in the pictures are all a member of the Scrappassion Blog and a few of them are part of the International Design Team too. We recently had a weekend together full of laughter, fun, food and scrapping; just wonderful!
To create this layout I have used the papers and embellishments from the Ruby Rockit 'Upstairs/ Downstairs' Collection. I first cut two circles (about 15 cm) from two different patterned papers: the dotted paper is called 'Romance' and the black paper is called 'Master'. Using an edge distresser I distressed the sides of the circles and I inked them too.

Instead of using more papers, I decided to take two 'pages' from the 'Upstairs/Downstairs Journaling Pad'. These journaling pages match the papers perfectly and can be used as papers too. I also placed another strip of the Master paper at the top. I distressed and inked all the edges of these papers too.

I wanted to challenge myself to use more than one or two pictures, so I used four smaller photos of our Design Team (with the lovely blog owner, Ria, featured on the picture at the left corner at the bottom of the layout).
I wanted to stamp some swirls on the layout, but I always afraid to stuff that up. Therefore I tend to choose to stamp the swirls on a transparency with Stazon Ink and cut them out. That way I can place the stamped images where I want them! I love flowers, so I added a few here and there and I put black rhinestones in the middle of each flower.


Using Micro Mono Alphabet Stickers from Basic Grey I made my title.
Using a few more flowers, swirls, vintage lace and embellishments from the Upstairs/ Downstairs pack I finished my layout:

Please consider being part of our new International Design Team for the Scrappassion Challenge Blog International! I'd love for you to have a go! You have until December 1, 2010 to send our submissions to Ria. A huge thank you in advance to Tanyah and Scrap'N'Craft for being our sponsor!