I have a new blog!

If you want to see only my creations please come and check out and follow my new blog http://www.tanyah-payne.blogspot.com

Wednesday, May 28, 2008

Another water technique using INKS!

The twinkling techique below can also be done using inks, water crayons, tombow pens etc. Just by following the same instructions for a differnt look every time!

Here is another technique like below where I have used die inks.

1. Spritz with water on your card front (make sure it is wet but not dripping...lol)
2. Ink up your texture stamp... i used a die ink for it bleads more!
3. stamp the wet card.. making sure the stamp dosn't slide
NOTE: If your using a smaller stamp, stamp again without re-inking up your stamp. Just as the instructions for the twinklings...


5. Once dry I had repeat stamped again the dragon flys and decorated with other stamps and embellishments


hope you enjoy!
have fun
luv tanxx

Tuesday, May 27, 2008

Stamping using TWINKLING H2O's

Twinklings have 3 different shades of colour in each pot. They are hard and activiated with water. All you need to do is place a tea spoon of water inside your pot to soften the paint. The longer you leave the water the different shade you will produce.

Wash.... This is after leaving it for a short time and will cover you project easily and very watery
Paint.... This will take a little bit of time but will become a bit darker and smoother texture.
Cream... This is really thick and very dark when placing onto your projects.

Twinklings have a wide range of uses and we will over the next few days discover a few ideas you can do with them.


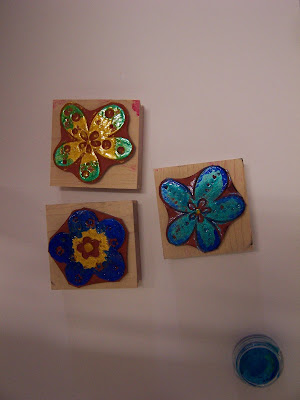
Today I want to share with you all a step by step technique on how to stamp using twinking H2O's.

STEP1

Choose the colours you would like to use
Spray a small amount of water into the pots
Leave to allow the water to soke
May need to respray some more water to get to the paint stage
This could take about 15mins or so.
If you feel the need to stir with a sml paint brush...do so!

STEP2

Choose some stamps to paint/stamp with
Turn your stamps up side down, rubber side is facing you.

STEP3

Paint the lighter colour first
Paint on top of your stamp where you want the first colour to go\
Don't worry if it drys

STEP 4

Add the next colour
Don't worry if it drys


STEP 5


Cover with another colour that you have choosen

STEP 6

Your twinkling paint will be dry on your stamp
Get out your water spritz
Spritz very lightly over the top of the stamps... this will acitvate the twinklings again.

STEP 7

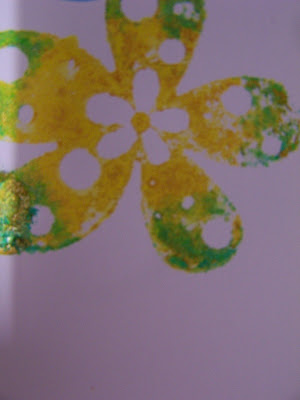
Stamp onto your cardstock
DON'T PUT THE STAMP DOWN YET!!!!

STEP8

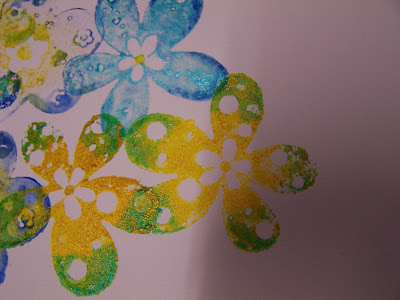
Repeat stamp a few times
This will give a 3D look with light shades every time you stamp

Repeat STEPS 6-8 with every stamp

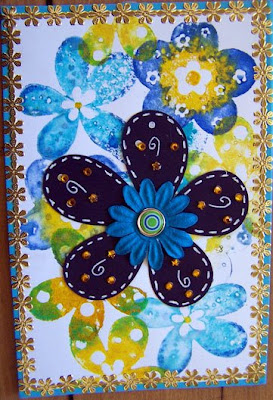
Until you can get something like this. But I have used craft stickers, bling and a cricut flower shape to finish off my card.


Hope you have enjoyed this one! it is tones of fun, I will show you tomorrow what I have done with canvas and twinkling H2O's.

have fun and please feel free to leave a coment or email me if you have any questions
take care
luv tanxx

Twinkling H2O's sets


Monday, May 26, 2008

Other ideas to try using PIGMENT POWDERS!!!!

Thank you for your emails and comments, I do find them really encouraging... Glad you enjoyed seeing what you can do with this awesome powder!

Here are some other ideas to try......

· You can apply polished pigments like paint using paper solutions

· You can use a Fabric solution to apply the polished pigment to fabric. This will mean you will need to leave the wet ink to dry for several hours and Ironing to make it permanent.

· You can use a Wood solution to apply to wood materials.

· Add textures into the gel medium for example, sand or anything gritty or lumpy

· Add glitter when it is wet

· Apply to canvases

Apply to ribbon


Check in tomorrow ..... you never know what subject is next.....
If you have any requests on what products you would like me to work on please email me. I am always happy to play!....lol


have fun
luv tanxx

Sunday, May 25, 2008

SUMMIT YOUR LAYOUTS for FREE PRODUCTS

We are after 3 different projects each month. It can be a layout, card or altered.

My way of saying thankyou, I am offering 3 $10 worth of goodies every month to give away to the winning submissions.

I would like to invite all scrapbookers/artist to email me your layouts, card, altered projects by the end of every month. I will put up on my blog the winners each month.

The following instructions required are;

  • Use 3 or more of the products I have uploaded, each month in my blog on a layout, card, altered project.
  • Email me your attached project, along with a little bit about you that your happy for me to put onto my blog.
  • Open to all ages
  • I am happy to take down any winning pages if it has been accepted by any mags.
  • You can purchase these products where ever you choose.
  • Winnings will be notified by email and I will then require an address to send your goodies.

If anyone has any questions please feel free to email me

Good luck everyone and have fun!

luv tanxx

Saturday, May 24, 2008

CREATING WITH POLLISHED PIGMENTS - STAGE 3

PIGMENT POWDERS AND USING PVA GLUE

For this technqiue you will need:
black gloss card
pigment powders ( couple of colours)
PVA glue (not included in kit)
template/ chipshape


STEP 1

  • Trace your template backwards
  • Trace onto the back of your black gloss card


STEP 2


  • Place PVA glue over the top of the black gloss card
  • Make sure it isn’t too much but more than just a coating
  • Cover the entire letter


STEP 3


  • Using a dry paint brush
  • Sprinkle your pigment powder over the top of the PVA glue
  • You may like to flick your brush occasionally to use all the powder in the brush


STEP 4


  • Using your paint brush
  • Dab the powders using your brush
  • This is so the powders will stay into the PVA glue

STEP 5


  • Turn your heat gun on
  • Heat the powder
  • This will set the powder and also allow the PVA to rise a little and bubble, leaving wrinkles as a texture


Hope you enjoyed this technique. Please feel free to leave a comment or email me.

have fun xx

Friday, May 23, 2008

HOW TO USE PIGMENT POWDERS- STAGE 2

This technque is using your pigment powders and a versamark (watermark) ink pad.
There is enough materials in your kit, for you to be able to do this technique.


Step 1

· Find a medium texture stamp

· Place the stamp on its back

· Using the watermark Versamark pad

Dab the pad on top of the stamp

Step 2


Turn your stamp over
Stamp onto some white cardstock
Press your stamp firmly
Step 3
  • Get a dab of pigment powder using your finger
Place the pigment powder over the top of the watermarked image

Step 4
  • With pigment powder on your finger
  • Rub your finger over the top of the watermarked image
Cover the entire image

Step 5


  • If you use too much pigment powder you won’t see an image
  • So evenly place the powder over the top
  • If you have used too much rub a bit off with your fingers
  • Your fingers may need a cloth to wipe them with, for they will get a bit messy
Step 6
  • Place your letter template over the top of your coloured watermarked image.Trace around the edges

Step 7

  • Take off your template
  • Cut around the edges

NOTE: WHEN CUTTING CUT ON THE


INSIDE OF THE LINE SO YOU WON’T SEE ANY OUTLINE

Step 8

  • You may want to ink around the edges with a dark ink pad

Or another option

  • Place double sided tape on the back of the letter
  • Take off the backing
  • Adhere onto some contrasting coloured cardstock as a background
Then cut out, leaving 3mm edge all the way around


SOMETHING EXTRA

  • IF YOU HAVE ANY PIGMENT POWDER LEFT ON YOUR BRUSH
  • USE IT ON A SPARE CHIPBOARD LETTER OR SHAPE.
  • YOU MAY WANT TO ADD SOME GLITTER TO IT TO ADD SOME MORE SHINE.

This is a really fun yet easy to do!

Please let me know if you have any question xx

SM Magazine Vol 10 No2

I wanted to share my excitiment with a layout I have published in this months scrapbooking Memories Magazine. It is of my good friends of when they were livng out west.


Also being this weeks subject PIGMENT POWDERS.... I have used them on this layout. I have stamped the gel medium and powders onto the title 'Jewels' and in the middle of the 'o, b, a' I have just left all textured. I wonted to give a outback rugged sort of look.


I would also like to congratulate Michelle Jamison for you layout on page34. Your work is fab!

thanks for looking xx

WARANA MAY 2008

What can I say but WOW! was an amazing weekend meeting everyone and puting faces to online names...lol.

Thanks gyps for a top weekend, A lot of work had gone into it and you did a fab job.

It was great to see everyones styles of scrapping and all so different and yet extremly brillant work. Their was so much creativity and fun in one room I will remember this time we had together for a long time.

Thanks binrow for this pic of everyone!


Here are some layouts i created on the weekend.


Thursday, May 22, 2008

HOW TO USE PIGMENT POWDERS- STAGE 1

Over the next week I will be adding another technique using primary elements which is a mica powders. These are very fine and come in many different colours.

Their is 80 different colours and come in packs of 4. The price for the 4 pack is $17+postage


Please email me if you would like to purchase a trial kit @ $9.00 inc postage.

PIGMENT POWDERS AND GEL MEDIUM


Please click over the top of the images to get nice big instructions. Please feel free to comment or email me if you have any questions.

Enjoy :) xx

Wednesday, May 21, 2008

NEW PRODUCTS FOR MAY

I will be updating this section over the next couple of days! we have lots of new stock in store for you! Please email me for requests - payments are through direct deposits.

If you want to see a bigger image please click on top of it .....thanks you!


Back in stock


The overlays are 12" x 12"..........NEW