

I have a new blog!

If you want to see only my creations please come and check out and follow my new blog http://www.tanyah-payne.blogspot.com
Showing posts with label inchies. Show all posts

Friday, August 20, 2010

Different ways to make and use inchies (part 2: Inchies & Scrapbooking) by Ingeborg Dijkstra

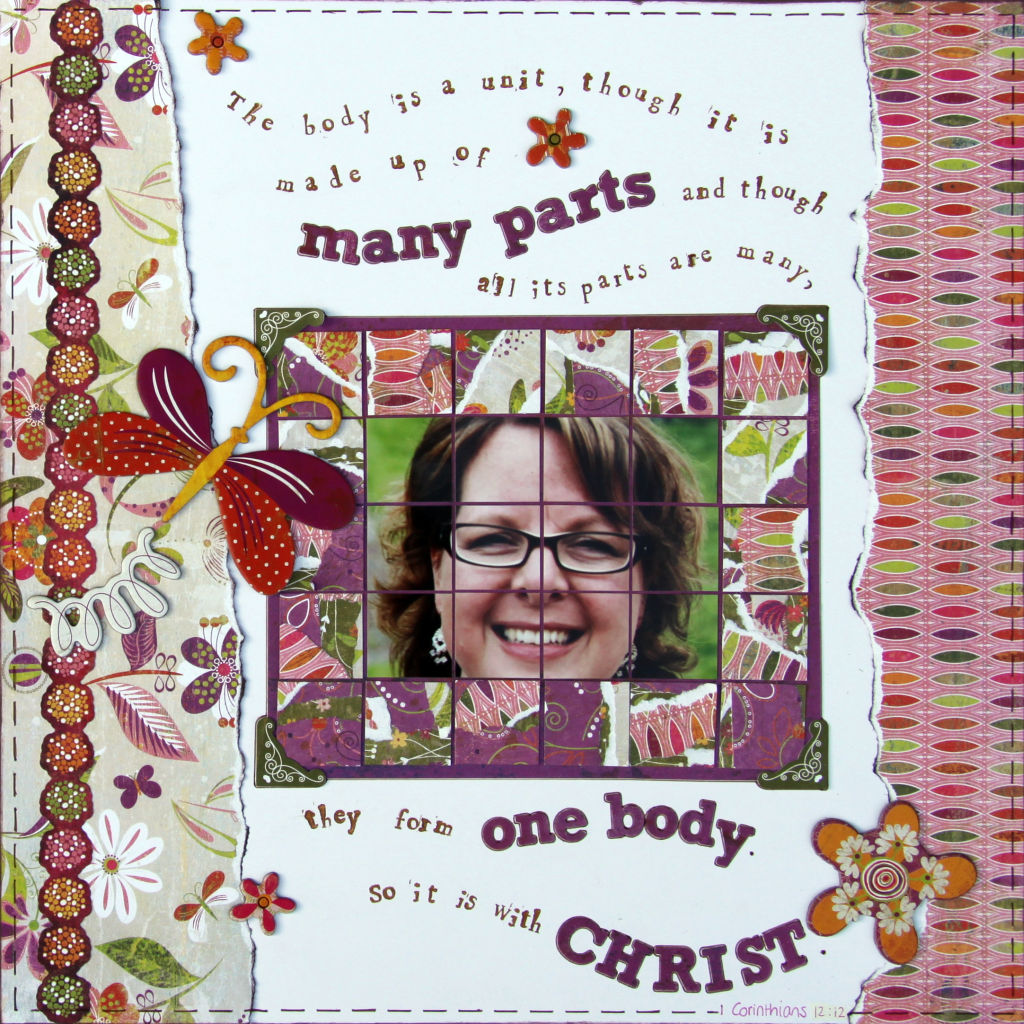
I would like to show you a few different ways to make and use inchies on a layout. Last week I showed some ways to make a use inchies for cards. If you have missed that message, please click HERE to read it. Next week I will show you how to use especially designed inchie stamps on cards. I made two layouts using inchies; a 12" x 12" layout and a layout for a mini album I am making. This is the 'traditional' 12" x 12" layout:

This is the layout for my mini album. The size of each page is approx. 5" by 7":

Let's start with the first one. To create this layout (and a bonus card, see below) I used the gorgeous Green at Heart Collection from Basic Grey. I used the following products:
I took some step-by-step photos. If you'd like to see a larger version of the collage below, please click HERE.
  1. I cut my photo into 12 inchies. I made sure the 'cuts' wouldn't go through the eyes, because that would look a bit weird. So I started in the middle of the photo and the face and made 'the first cut' through the nose.
  2. I tore about a dozen small strips of a few of the patterned papers: Grasshopper, Recycle and Vert.
  3. If you have a toddler at home, she/ he can help you with the next step! But ... if you don't have a toddler, you have to randomly stick the torn paper strips on the 'Seedling' paper yourself. Make sure you use lots of glue, because all the parts have to stick together well!
  4. Cut the paper in inchies.
  5. I used the Veggies paper to stick my photo and paper inchies on. I used the handmade inchies as a frame around my photo.
  6. I used parts of the same papers on each side and added my photo in the middle of the layout.

I created my title/ quote using the Micro Mono Stickers and Alphabet Stamps from Hero Arts. I embellished the page with the coloured chipboard stickers from the same collection. This is the finished result:

I had a few inchies left, so I decided to create a quick and easy card with them. I used a strip from the Elements Sticker Sheet and the little butterfly and owl are from the coloured chipboard shapes from Green at Heart as well.

For the layout of my mini album I have only used white cardstock and Google ... LOL ... I am making a 'Year in Review' mini album with a group of Dutch girls and each week one of the girls chooses a theme. This week's theme is 'Summer Hits'. I live in Europe, so we are in the midst of Summer right now ... I wanted to create a layout using inchies a diferent way. If you search for 'inchies collage sheet' or something like that, you will find lots and lots of printable sheets with ready-made inchies. You will find lots of different styles on Etsy. You can buy those sheets for a dollar or two, download them and print them as many times as you like.
But ... I'd like to make my own 'inchie sheet', because I'd like to personalize my pictures/ inchies. For this week's 'Summer Hits' theme, I thought long and hard about some Summer Hits that I remembered as a child, teenager, young adult and now. I wanted to have a picture of the LP or CD of each song. That's when Google comes in handy! And ... LPs and CDs are square, so perfect for inchies!
I also wanted some 'Summer Hits' CD covers to use as embellishments. My own printed sheet of inchies looked like this:
Cut into inchies the CD covers and LP covers looked like this:

And this is the finished result of the layout:


And ... taking the risk of truly showing my age ...LOL ... these are the songs I wanted to feature on my layout:

1970 - 1980
Summer Nights (1978, John Travolta & Olivia Newton John)
Three Times A Lady (1978, The Commodores)
We Are Family (1979, Sister Sledge)

1980 - 1990
Every Breath You Take (1983, The Police)
Summer of ‘69 (1984, Bryan Adams)
What’s Love Got to Do With It? (1984, Tina Turner)
The Lady In Red (1986, Chris de Burgh)
The Only Way Is Up (1988, Yazz & The Plastic Population)

1990 - 2000
Ice, Ice Baby (1990, Vanilla Ice)
Knockin’ on Heaven’s door (1992, Guns ‘N’ Roses)
All I Wanna Do (1994, Sheryl Crow)
Love Is All Around (1994, WetWetWet)

2000 - 2010
American Pie (2000, Madonna)
Absolutely Everybody ( 2000, Vanessa Amorosi)
Beautiful Day (2000, U2)
You’re Beautiful (2005, James Blunt)
Waka Waka (2010, Shakira)

Friday, August 13, 2010

Different ways to make and use inchies (part 1: Inchies & Cards) by Ingeborg Dijkstra

I am creating a few posts on inchies and this week I will post part 1 (Inchies & Cards) in this message. Part 2 (Inchies & Scrapbooking) will be posted next week and part 3 (Inchies & Inchie Stamps) the week after that. It actually was Nicky Amber and her Week 7 Embellish It challenge, who reminded me of those little pieces of art (measuring 1 inch x inch).

Inchies have been around for ages especially with ATC- and stamping artists. But ... I am neither an ATC- or stamping artist! What I do know though is a few tricks and tips to create and use these little squares on cards and layouts. Obviously a lot of you know this stuff too, because if you check the Embellish It Week 7 gallery, you will find all sorts of beautiful projects featuring at least a few inchies.
But ... there might be some of you, who never made an inchie. Or ... you might have only made them one way or used them the same way over and over again. If any of this sounds like you, please read on ... I have made five different cards with at least one inchie on them. I will give
the step-by-step instructions for the three black/white/ pink cards first. After that I will show you how I made the other two cards. WARNING: long message ahead LOL ! So here we go ...

I have made five inchies and used them on three different cards. I will show and tell you step-by-step how I made the inchies (if you'd like to see larger photos, please click HERE).
  1. I used five chipboard inchies as my base. I cut five slightly larger squares out of pink tissue paper.
  2. I put a little Tacky Glue around each side.
  3. I put the tissue paper squares at the other side and folded the sides onto the glue.
  4. I made sure I folded the corners first and then the sides. Yes, this is a bit sticky, but it is worth it, I promise!
  5. After the glue is dry, I added a bit of shimmering paint. I used the Radiant Rain (Pink Azalea) Paint Dauber.
  6. I let the paint dry completely.
  7. Whilst the paint was drying, I punched some little flowers. Remember, you are making inchies, so if you use punches, make sure they are small!
  8. I stamped some swirls and flowers on the dried pink inchies. I also inked the edges.
  9. I stamped the same images on the punched flowers.
  10. I wanted to outline the punched flowers. Since they are quite small, I used a scrap piece of paper and some non-permanent glue (Pritt) to stick them on temporarily.
  11. After I outlined the little flowers, I carefully peeled them of the scrap sheet of paper.
  12. I stuck the flowers on the inchies and added a little hot pink rhinestone in the middle.
These are three cards that I made with the five inchies:

As promised here are the instructions for the other inchies. If the picture below is too small for you, please click HERE to see the larger version.


  1. I wanted to create my own background. I put some Glimmer Screens (like masks/ stencils) on a piece of white cardstock.
  2. I sprayed Glimmer Mist on the screens and let it dry.
  3. I added a few stamps for more colour and variety.
  4. I cut the piece of cardstock in inchies.
  5. I put 12 inchies in a nice pattern at the front of a white card.
  6. I added some ribbon and a punched circle. Done!
Since I still had quite a few inchies left, I decided to make another card. I used the same Glimmer Screens and Glimmer Mist for a background. I stamped and embossed the words on the card using a heat gun. I used a golden embossing powder. Tan currently has a special price for the heat gun: $ 35.00 instead of $ 55.00, which is over 35% off! Anyway, I also stamped some small script images on the flowers, added some pearls, and of course my three inchies and done!