I have a new blog!

If you want to see only my creations please come and check out and follow my new blog http://www.tanyah-payne.blogspot.com
Showing posts with label cards. Show all posts

Friday, April 22, 2011

A Easter Card for you!

As this is quite a big weekend for lots of us and if your travelling to be with family and friends I hope you all are traveling safely.
I wanted to share with you a quick and easy card I have made and wish you all a happy and Safe Easter.


We are hoping if the weather is good to us to go fishing with the kids. Fishing isn't something i really love but i do enjoy taking the pics....lol!

have a wonderful day everyone
hugs
tanXx

Wednesday, January 19, 2011

Step by step Thank you card for a good cause

Last week I shared a step by step card sketch, so using this sketch I have created a very easy thank you card.

The sketch:

The card:


To begin, I cut cardstock (40% off)  slightly smaller than the card base (card making supplies 40% off).


To that, I cut some 3 Bugs in a Rug paper (patterned paper is 50% off) slightly smaller than the cardstock so that a thin border of cardstock shows around the edge.


I have used a journalling spot (40% off) to give a nice base for the sentiment.  I have used one from the Ruby Rock-it Summerhourse Narrative pad (these are also great to add a quick and easy spot for your scrapbooking pages )

I took one of the journalling spots (there are 24 in each pad)...


I then cut it to size and outlined around the border with a journalling pen.


Attach the journalling spot to the patterned paper and wrap some paper raffia around and tie off.


I then added the title using alpha stickers (which are also 40% off as well).  Then it is finished!!


I have been making cards for Heart Cards which is an organisation set up by our dear Scrap N Craft with T friend Shazz to create hand made cards for those families who have lost so much in the recent floods.  I encourage all of you crafty people to check out the heart cards site and get involved in this fantastic cause - all skill levels are more than welcome.

With all the Scrap N Craft with T   HUGE  specials on right now !!  it is a great time to grab all your cardmaking (and scrapbooking) supplies.

Please Note: Scrap N Craft with T will be reducing their shop operating hours.  You can shop anytime online but the Alstonville shop will be open Tuesday, Wednesday and Thursdays only from 9:30am - 2:00pm.

Thank you and happy creating...xxxooo

Tuesday, January 18, 2011

Fun with Mixed Media - a card by Sue Smith

Here is a card I made using a mixed media background, which I had a lot of fun making (and making do when I didn't have the 'right' products).....


I started off with a piece of glossy paper. With not having any glossy cardstock on hand, I decided to experiment with some old glossy photo paper, which was a little yellowed around the edges and no longer works well with my printer. I cut it down to A5 size.
I also don't have a craft sheet so I folded up some cling-wrap and used that as an ink palette, stamping down with the Tim Holtz Distress Ink (Dusty Concord) numerous times to get a good amount of ink on the plastic...


To thin down the ink and make a light colour wash, I sprayed with water from an atomiser....


I have also made my own ink applicator with a small block of wood with velcro attached and I cut up small pieces of felt which stick right onto the velcro and work just like the real thing....


Starting from the edge, I worked the ink-laden applicator in circular motions and left a small portion of the paper uninked....


Then using the wings stamp (from Tim Holtz Visual Artistry Collection - Regal Flourish), I stamped with VersaMark ink onto the paper. My stamp was a little stained with black ink which gave a bit of an outline to the image (remember there are NO mistakes in art...just happy accidents!).
Working quickly before the VersaMark dried, I covered the stamped image with Opals Franklin Embossing Enamel (an ultra thick one) and also Stampin' Emboss Crystal Clear fine embossing enamel, shaking to make sure the image was well covered.....


Then I shook off the excess....


And applied heat....


Then using a new piece of felt on my applicator I applied some Adirondack Alcohol Ink in Latte over the white area (the embossed image acted as a resist) and overlapping the mauve area....


And then some brighter Terracotta alcohol ink over the top of that....


To clean off the embossed image and to smooth out some of the background, I then applied Blending Solution with the applicator. Here is where another happy accident occurred....in the areas where I worked a little exuberantly the emulsion started to come off the photo paper, leaving this wonderful patchy distressed look....


After working some more with the Blending Solution, and allowing the ink to dry, the colour became a lot more subtle. I then repeated the stamped image using VersaMagic Multi-surface Chalk Ink Pad in Night Sky, and stamped some words in the bottom right-hand corner with black StazOn....


Some more layers of stamps with StazOn...this time music notes....


And blurred and blended a little with Blending Solution....


I then added some scraps of paper and some natural fibre....


Some more paper, fibre and some lace to the top right-hand area....


Next, I mounted it on some natural cardstock, and distressed and ripped the edges, and then mounted that onto some dark blue cardstock, folded into a card.
I added some ink to the paper scraps and the fibre to match the background, and lightly sprayed with GlimmerMist in Antique Brass...


Then I stuck on some lettering which were cheap old 'no-name' letters which I roughly inked with dark blue....


And finally, some more GlimmerMist in Antique Brass and a metal butterfly which I coloured with Alcohol Ink in Purple Twilight and Denim....


A close-up of the butterfly....


I really did have a lot of fun with this one, experimenting with lots of different techniques, and I was really happy with how it all turned out....hope you like it too!

Don't forget to visit Tanyah's store where EVERYTHING is heavily discounted!

Wednesday, January 12, 2011

Card sketch and step-by-step - Nicky Amber

Here's a quick card sketch and easy step-by-step card for you to try...


Scrap N Craft with T still have some AMAZING SPECIALS on at the moment, here are examples of some card making materials and the savings you can make:


CARD STEP-BY-STEP
Step 1.  Take a blank card (or make your own from cardstock).  Cut and attach some patterned paper slightly smaller than your card.


Step 2.  Cut a thin strip of paper (or use ribbon) and attach it along the bottom of the card.


Step 3.  I have added a sentiment to the oval shape.  To do this you could hand write it, use a sentiment stamp or alpha stickers.


Step 4.  Add a small embellishment to the oval shape.


Remember sketches are just a guide so feel free to change it up a bit, it doesn't have to be exactly as shown...eg. flip the sketch around, use different shapes etc...

Happy creating...

nic...xxxooo

Saturday, January 8, 2011

Mixed Media - another attempt by Tanyah Payne

Hello everyone to a New year and hope everyone has enjoyed their holidays and able to do some crafting over your break.

I want to share with you another box I have created using the score pal and have decorated the front having a play with mixed media goodies..


Here is a close up of the box..

Products used are:
Come and Check out these products and more all on SALE at the moment! http://www.scrapncraftwitht.com.au


Here are some very quick cards to share.... hope you find some inspiration and want to create some too!


Hope i have inspired you and want to create lots!....
enjoy and thanks for poping by.
We love it when you comment and say hi so please do...
Have a fab Saturday everyone !
luv tanXx

Wednesday, December 29, 2010

Quick card using Rub n Buff - Nicky Amber

Rub n buff is a wax base metallic finish that can be used for decorating or antiquing wood, plaster, pottery, metal, leather, or gessoed surfaces. All you need to do is rub on and buff to a beautiful luster.

I have used some rub n buff to make a quick card.

I have inked this chipboard shape black and then rubbed some Rub n Buff over the top in some places to simulate a rusted finish.

For the butterflies... I embossed some black cardstock with an embossing folder, punched out with a butterfly punch and then rubbed some Rub n Buff over the top of the raised part. 


This product gives a wonderful metallic shine to your project.  It has many applications (scrapping and non-scrapping)...  I have seen it used for things such as giving picture frames and wooden moulding a nice metallic sheen.    It can also be used on metal, clay and other surfaces and with items including masks and templates.


Don't forget that all items in store have been reduced to clear so go and bag yourself a bargain....or two.

Happy creating...xxxooo

Wednesday, December 8, 2010

Simple card using Ranger 'Distress' products - Nicky Amber

Well this week I thought I'd make a simple card using some of the new (and old)  Ranger 'Distress' products.


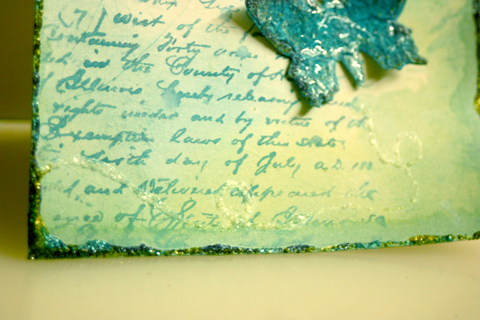
To start, I punched out a butterfly shape and then spread a thin layer of Ranger Distress Stickles.  On this butterfly I used Broken China, Shabby Shutters and Faded Jeans
 

I then used the Ranger Distress Crackle paint over the top of the image.
Once the shape is covered with the crackle paint, leave to dry.  When it dries it should form cracks in the surface to produce....
The size and amount of cracks will be determined by the thickness you apply the paint, thinner application leaves finer cracks while thicker application will leave larger cracks.

For the background of the card I used the Distress Ink watercolour technique I used a couple of weeks ago, for instructions click HERE.  Then I stamped my trusty script stamp using Distress Ink over the top.

I wanted to define the border so I used the Distress stickles around the edge of the page.
and also added a clear butterfly trail using the clear rock candy Stickles.

 So there you have it!  All you need to do is add a sentiment to suit your occasion.

Stickles can be used on your pages, cards and on other embellishments to add that something extra...
Here I've added it to the edges of this flower.

Thanks for looking...hope you enjoy working with the Ranger Distress products as much as I have!

nic...xxxooo