


My name is Sharon Dalton and I have been scrapping for the best part of 8yrs.
I have always been an avid photographer and I found that scrapbooking allowed
me to create family heirlooms with all these beautiful photos I had been taking.
Through Scrapbooking I have met the most wonderful women through the world wide web, and these girls are so much inspiration to me…..So many talented women out there.
My style is very straight up and down and neat and tidy….I don’t very often step out of my style, but when I do I really like the LO’s that I do. But I like my photos to tell the story and these LO’s show that just with a few different pp’s and cardstock and few embellishments you can create beautiful pages. And I love any pp’s with butterflies and these were just perfect for me to work with. Thanks for such beautiful kit Tan.
My Scrapbooking blog is CreativeMe68 http://creativeme68sharondalton.blogspot.com/
My Photography blog is The Focus Is On You
Believe In Me

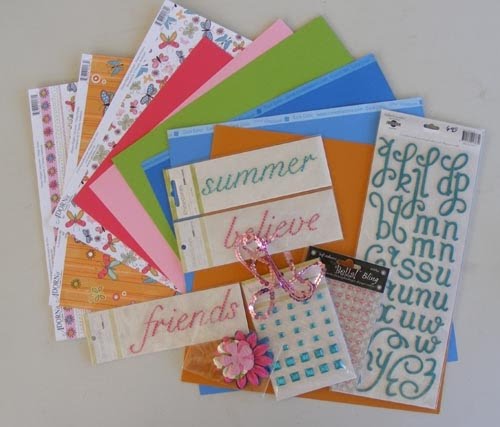
Products
- Adorn-It Carolees Creations Flutter Flight Collection
- Flutter Stripe
- Cardstock - Blue Lightning & Lime
- Kaisercraft – Believe
- Kaisercraft – Teal square bling
- Bella – Pink diamontees
- Bella – Teal font
- 6x4 Landscape Photo + 3 Wallet sized photos
Instructions
Cut a 4 ¼” x out of Flutter Stripe adhere this to the Coredinations Blue Lightning on the left hand side of the page leaving about 2” gap

Now add your 3 mounted wallet sized photos to you LO

Now add your 6 x 4 photo to you LO


Now cut at least 15-20 butterflies from the leftover Flutter Stripe for around your circle


Add square bling to the corner of your 6x4 photo, add your title using the Teal Bella Chipboard Alphabet font and any quotes you wish to add

Here is the completed LO
Thankyou Shazz, this is adorable and I hope to see you all scrapping about you and we would love to see your work in our gallery www.scrapncraftwitht.com.au/gallery
HAVE A WONDERFUL WINTERS DAY
luv tanXx


 I cut thin strips of the
  I used a part of a page from a notebook to write my journaling.
 I used a tag from a pair of jeans I bought for the boys recently to have a 'one of a kind' embellishment. I used staples and some folds (like I did with the paper strips at the top) to adhere the tag to the layout. I finished with a chipboard bird from the
 This is the finished layout:


