I have a new blog!

If you want to see only my creations please come and check out and follow my new blog http://www.tanyah-payne.blogspot.com

Monday, January 31, 2011

Different ways to use masks or templates - by Sue Smith

I have been experimenting with different techniques and mediums with my templates and masks, and thought I would share a couple of them with you.

First of all I started with this template from Prima...


This next picture shows the result of using a sponge dabbed onto a Tim Holtz Distress Inkpad and then dabbed over top of the template onto KaiserCraft patterned paper....


Using the same patterned paper, I then sprayed over the template with GlimmerMist for this effect....


Next I thought I would try paint, and applied some white paint with a dauber for a nice subtle result....


This final one is my absolute favourite. Here I placed the template under the same patterned paper and rubbed over the top with sandpaper. For this technique you need a sanding block, otherwise your fingers might press into the holes of the template, and making the design indistinguishable. I didn't have a sanding block, so I just wrapped some sandpaper around an eraser, and that worked really well. Isn't it a great effect?


I then decided to utilise all the bits and pieces of my experimentation to make a card by chopping them up, inking them around the edges and randomly sticking them across the card. I added some co-ordinating ribbon and a stamped sentiment and....done!


Of course there are many more ways you can make use of your masks and templates, half the fun is experimenting. Try outlining with a gel or fine felt-tip pen; use alcohol inks on glossy cardstock or acetate (blending solution will remove the ink from the template when you've finished); use a background stamp over the top if your mask in thin enough; chalks would make a nice soft effect also.....so many options! But remember to always have fun!

TFL! xxx

Don't forget to visit Tanyah's shop to grab one of the many fabulous bargains before they're all gone!

Sunday, January 30, 2011

Tim Holtz Configuration Boxes.....

They come all shapes and sizes and fantastic to have a go at for your next project.

We were very excited to have June Burtonwood do a class last weekend at Scrap N Craft with T. We all had lots of fun and can't wait to see everyones finished projects.


Here is a box created by Julie Short who completed hers and did it as a memory box of her mum's collection of shells. Isn't it lovely!... Julie decided to use the lid of her box as part of her box side by side... I think this is a very clever and thinking out side the box (so to speak). Their is so many possibilities with these boxes...  your imagination is the limit......


If your wanting some info about the boxes... here it is...


Configurations are dimensional shadow boxes made from 1/8" wrapped paper board (not thin chipboard or paper mache). These sturdy covered boxes are inkable, paintable, and best of all configurable. Available in four sizes, each configuration comes with a framed lid with with removable acetate window so you decide how you want to display it. Measuring approximately 2" deep, each configurations can be used to display your most dimensional elements, mini books, and better yet, they fit the curio knobs and foundation feet like a dream! Stand them up or lay them flat, you decide how to display it. 

 As we get more images of those who complete this class we will show you what they all came up with using the same boxes... they all are looking brilliant...

PLEASE REMEMBER.... SCRAP N CRAFT IS STILL OPEN FOR BUSINESS AND IF YOU WANT A BARGIN OR TWO... COME SHOP ONLINE / OR COME AND VISIT US.......


WE CLOSE LAST DAY OF FEBURARY.......EVERYTHING HAS TO GO!..... including shop fittings if anyone you know would like any....

thanks for stopping by today and hope you all have a wonderful sunday
TanXx

Friday, January 28, 2011

Step-by-step birthday card by Ingeborg Dijkstra

Today I want to show you another step-by-step birthday card, which can be used for the birthday of a a child, a man or a woman. I like having cards ready to go for whenever I need one quickly. I used papers from the Imaginisce collection called Birthday Bash.

Did you know that all these products are now 50% off in Tan's store? You can pick up some great bargains! I started by cutting a 12" x 12" piece of teal cardstock (now only $ 0.48!) in half. This will be my base for two square cards; I made another one two weeks ago, which you can find HERE.

I started by cutting four squares of the different papers. I used: Surprise, Wish Big and Confetti.

I stamped the same image from the 'Humorous Birthday Stamps' (Inkadinkado) twice; once on orange and once on blue paper. I cut around the blue image and stuck it on the orange piece of card to make it more colorful (see picture of the final card).

For a playful touch I rolled thin strips of paper to be added to the card later.
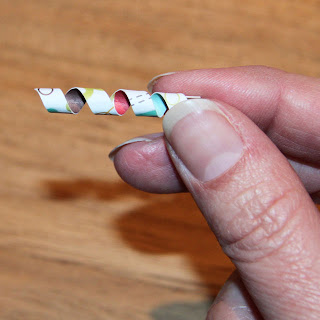
I used the rolled strips of paper as embellishments around some corners of the squares of paper. Done!


Thursday, January 27, 2011

Painted Backgrouds......using Mixed Media by Tanyah Payne

Have you ever wanted to create your own background, play around with some mixed media and get your hands all messy... Believe me it is such a free feeling and the inky mess ... well it will wash off... eventually...lol!

At ScrapChat Chelle Jamison is hosting a background swap and I just couldn't resist having a go... Time hasn't allowed me to get too creative but i had a heap of fun which is the main thing. I can't wait to see what everyone else comes up with.

Here is close up shot of the brights background swap.


 Here is a group shot of all 6 that I have completed.... none are exactly the same which is kinda unique.


Now what products have I used:

Here is the Earthy one... this one I didn't experiment too much with but had a bit of fun which is the main thing hey!...

Here is the Close up

Here is the group shot of them all.


These are very textured and had a ball creating an earthy feel to it...
Thanks Chelle for the inspiration and being part of a fab swap.

Hope this enspires you to create your own backgrounds, play and get messy. You just never know unless you give it a go!....

Thanks for looking and till next time
TanXx

PLEASE REMEMBER EVERYTHING MUST GO @ SCRAP N CRAFT WITH T....
ENJOY OUR MASSIVE CLEARANCE SALE WHILE STOCK LASTS!..............
www.scrapncraftwitht.com.au

The girls paperie......

I just love these papers - its not often I can come back and buy the same papers all over agan but these are so delicious and so versatile its easy......  I love handcutting  and the  look it gives your layout -  always make it a bit unique I think because no-one  uses the same paers the same way.....here is one of my fave layouts  using The Girls paperies  papers........


You can check out  the papers  HERE  !!

Wednesday, January 26, 2011

Layout by Chris Sexton & a sketch for fun!

Hi everyone

Hope you have a wonderful Australia day... have a traditional BBQ with your Lamb..... We are off enjoying some time with some very special friends and have a lovely swim in the pool ....


I want to share with you a beautiful layout created by Chris Sexton of your gorgeous garden...


I have created a sketch for you to have a go at if you would like some inspiration....


have fun day everyone and enjoy celebrating being australian!....
have a wonderful Wednesday
TanXx

Monday, January 24, 2011

Metal Flowers

I have been wanting to play with my alcohol inks for a while but some 'brilliant' or not so brilliant idea grabs me and off I go in a different direction. So todays the day.

I used:

Tim Holtz tattered flowers die cut, Cuttlebug script embossing folder, 3 Adirondack alcohol ink colours (whatever takes your fancy), black paint dabber, a bling brad and embossing foil.

Instructions:

1. Die cut flowers from foil. I used the largest and the daisy flower to make my metal flower. I embossed the large flower in the folder. I used a stylus to do a squiggly pattern on the daisy petals. Do this over a foam pad. The engraved side is the top side. Turn the flowers over to the wrong side and use a paper stump to make a dome in the centre of both flowers. Turn over to the top and define the edges of the dome over an acrylic mat.


2. Paint grooved side of embossed flowers black. Wait about 30 seconds then wipe off the excess paint. The black should stay in the grooves giving a cool antique look.


3. Colour flowers with alcohol ink. You can do a mixture of colour or all one colour.


4. Use a paper stump or ball tool to circle round on the wrong side of petals over the foam pad. This is similar to how most of you will have curled paper flower petals. Shape petal edges as desired. You can glue flower layers together with a hot glue gun but I thought it was effective to use a nice brad instead.


Now you will have to think of how and where you can use your beautiful flower. The left over flowers will make another little flower as well.


Have fun


June


Unlikely Allies - a layout by Sue Smith

Hi again everyone....

Just a quick one from me today with some really cute pics of two of our animals who like to 'cosy' up together.


Here is a list of the scrappy stuff I used...

* Kraft cardstock

* Kaisercraft Cocco 'Periwinkle' - an oldie but a goody

* Kaisercraft Pet's Paradise 'Furry Friends' - another blast from the past

* Charcoal VersaColor Inkspot

* 2Crafty large chipboard cat

* Clear UTEE (ultra thick embossing enamel)

* American Crafts Thickers 'Prancer' white chipboard letters

* Black sharpie pen

* White Gel Pen

* Assorted ribbons

All scrapping items are now heavily discounted at Scrap 'N' Craft With T....you won't find any better bargains ANYWHERE at the moment!

Happy scrapping until next week! xxx

Sunday, January 23, 2011

Trading hours until our shop closing at the end of feb 2011

Hi Everyone

Its been a while since I have been able to post or send out any emails due so a heap of sickness in our family of late. I hope you're all able to stay away from the nasty bugs.

I would like to remind our local customers that our shop hours have now changed to

  • Tuesday - 10.00am to 2.00pm
  • Wednesday - 10.00am to 2.00pm (Australia Day we are closed)
  • Thursday - 10.00am to 2.00pm

Our Saturdays Open days for February are:
  • Sat 5th 10.00 - 2.00pm
  • Sat 18th 10.00 - 2.00pm
Please come and check out what we have left. EVERYTHING HAS TO GO AND AT UNBELEIVABLE CHEAP PRICES FOR YOU TO ENJOY!.... Please put these dates in your diaries and we will see you their. Lots of stock isn't online and as I get more time i will up load what i have left bit by bit.

Our last trading day will be the last day of February!.... be quick before it is gone!......


I want to share with you a layout that was in the scrapbooking memories magazines a few issues back.
  • It is amazing where shapes can lead you....
  • look at your scraps, 
  • turn over your double sided papers and 
  • use both sides on your layout
  • The only full piece was the green cardstock....
  • If you don't like a section of the paper cover it up with embellishments....(as i had done with the butterfly)

Enjoy creating and thanks for looking
luv tanXx
www.scrapncraftwitht.com.au

Thursday, January 20, 2011

Arrrggghhhhhh- me hearties!!!!!

My son Daniel loves to dressup ao I knew this paper  was perfect - available here in Tans shop.

So to start with I  tore all the edges of the Pirate paper  and inked with tea dye ink.  I  then tore a small tear in the bottom of the page and rolled the edges back and inked those.  I used a Pirate rubon  with a treasure chest and tucked this in under the  torn piece.

I then painted the chipboard  pieces black and used Run n Buff on the hsip to give it a bronzed look. 
I also added the rubons to  Daniels head and shoulder and bottom right hand side of the page

You could add a title if you like but  thought the photo  spoke for itself!

Wednesday, January 19, 2011

Step by step Thank you card for a good cause

Last week I shared a step by step card sketch, so using this sketch I have created a very easy thank you card.

The sketch:

The card:


To begin, I cut cardstock (40% off)  slightly smaller than the card base (card making supplies 40% off).


To that, I cut some 3 Bugs in a Rug paper (patterned paper is 50% off) slightly smaller than the cardstock so that a thin border of cardstock shows around the edge.


I have used a journalling spot (40% off) to give a nice base for the sentiment.  I have used one from the Ruby Rock-it Summerhourse Narrative pad (these are also great to add a quick and easy spot for your scrapbooking pages )

I took one of the journalling spots (there are 24 in each pad)...


I then cut it to size and outlined around the border with a journalling pen.


Attach the journalling spot to the patterned paper and wrap some paper raffia around and tie off.


I then added the title using alpha stickers (which are also 40% off as well).  Then it is finished!!


I have been making cards for Heart Cards which is an organisation set up by our dear Scrap N Craft with T friend Shazz to create hand made cards for those families who have lost so much in the recent floods.  I encourage all of you crafty people to check out the heart cards site and get involved in this fantastic cause - all skill levels are more than welcome.

With all the Scrap N Craft with T   HUGE  specials on right now !!  it is a great time to grab all your cardmaking (and scrapbooking) supplies.

Please Note: Scrap N Craft with T will be reducing their shop operating hours.  You can shop anytime online but the Alstonville shop will be open Tuesday, Wednesday and Thursdays only from 9:30am - 2:00pm.

Thank you and happy creating...xxxooo

Tuesday, January 18, 2011

More Than Meets the Eye

Themed papers don't have to be used for the intended purpose. A bit of imagination and they can be used to fit your needs perfectly. Floral papers can be great for male pages, heritage papers can be used for recent photos and Valentine papers can be used for...


Be Mine


Used: Fancy Pants Vintage Valentine papers, red, kraft and cream cardstock, floral ribbon. Memory Mist


I loved this Valentine paper and it was perfect for celebrating my daughters pet bird. It suited my theme because: -the kraft background gave a 'back to nature feel'

- I could cut out appropriate words and images for embellishments

- the colours worked with the photos

- and the journaling card fitted the story perfectly for a title. I loved how it looked a bit like a speech bubble too.


the story:- My daughter raised a Conure from an egg. He was a chirpy, cheeky little fellow but sadly he's gone. She has since been given a baby Indian Ringneck (only a mother could love). He has a very different personality and is "a one person bird" - and she's the one. A good remedy for an injured heart.


So don't restrict yourself - think outside the square! ( what does that really mean? but you know what I mean?)


Cheers June B

Fun with Mixed Media - a card by Sue Smith

Here is a card I made using a mixed media background, which I had a lot of fun making (and making do when I didn't have the 'right' products).....


I started off with a piece of glossy paper. With not having any glossy cardstock on hand, I decided to experiment with some old glossy photo paper, which was a little yellowed around the edges and no longer works well with my printer. I cut it down to A5 size.
I also don't have a craft sheet so I folded up some cling-wrap and used that as an ink palette, stamping down with the Tim Holtz Distress Ink (Dusty Concord) numerous times to get a good amount of ink on the plastic...


To thin down the ink and make a light colour wash, I sprayed with water from an atomiser....


I have also made my own ink applicator with a small block of wood with velcro attached and I cut up small pieces of felt which stick right onto the velcro and work just like the real thing....


Starting from the edge, I worked the ink-laden applicator in circular motions and left a small portion of the paper uninked....


Then using the wings stamp (from Tim Holtz Visual Artistry Collection - Regal Flourish), I stamped with VersaMark ink onto the paper. My stamp was a little stained with black ink which gave a bit of an outline to the image (remember there are NO mistakes in art...just happy accidents!).
Working quickly before the VersaMark dried, I covered the stamped image with Opals Franklin Embossing Enamel (an ultra thick one) and also Stampin' Emboss Crystal Clear fine embossing enamel, shaking to make sure the image was well covered.....


Then I shook off the excess....


And applied heat....


Then using a new piece of felt on my applicator I applied some Adirondack Alcohol Ink in Latte over the white area (the embossed image acted as a resist) and overlapping the mauve area....


And then some brighter Terracotta alcohol ink over the top of that....


To clean off the embossed image and to smooth out some of the background, I then applied Blending Solution with the applicator. Here is where another happy accident occurred....in the areas where I worked a little exuberantly the emulsion started to come off the photo paper, leaving this wonderful patchy distressed look....


After working some more with the Blending Solution, and allowing the ink to dry, the colour became a lot more subtle. I then repeated the stamped image using VersaMagic Multi-surface Chalk Ink Pad in Night Sky, and stamped some words in the bottom right-hand corner with black StazOn....


Some more layers of stamps with StazOn...this time music notes....


And blurred and blended a little with Blending Solution....


I then added some scraps of paper and some natural fibre....


Some more paper, fibre and some lace to the top right-hand area....


Next, I mounted it on some natural cardstock, and distressed and ripped the edges, and then mounted that onto some dark blue cardstock, folded into a card.
I added some ink to the paper scraps and the fibre to match the background, and lightly sprayed with GlimmerMist in Antique Brass...


Then I stuck on some lettering which were cheap old 'no-name' letters which I roughly inked with dark blue....


And finally, some more GlimmerMist in Antique Brass and a metal butterfly which I coloured with Alcohol Ink in Purple Twilight and Denim....


A close-up of the butterfly....


I really did have a lot of fun with this one, experimenting with lots of different techniques, and I was really happy with how it all turned out....hope you like it too!

Don't forget to visit Tanyah's store where EVERYTHING is heavily discounted!