I have a new blog!

If you want to see only my creations please come and check out and follow my new blog http://www.tanyah-payne.blogspot.com
Showing posts with label Step by Step-Single Layout. Show all posts

Wednesday, June 1, 2011

Scrapbooking Challenge and step-by-step tutorial ...

Hello wonderful ladies! It has been a while since I posted here, but I thought I let you know about a Scrapbooking Challenge for the this month: June 2011. The Scrappassion International Blog has chosen this challenge for you:

Take the advertisement shown below as inspiration for your layout.


You can choose to be inspired by certain colours, the design with the 8 rectangles, shapes like the swirls and butterflies, pictures of angels, coke bottles, whatever really. You can also choose to get inspiration of one of the eight pictures, the words (like Love, Play etc.) This challenge really has no limits!

Once you have made your layout, please send an email to Ria before the 30th of June.

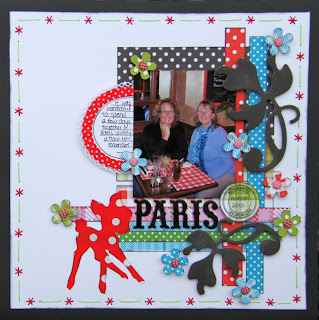
This is the layout that I made. I based it on the colours of the first and third picture. I also used these pictures to look at the design and used lots of swirls.

This month I wanted to create a so called 'hybrid layout', which is a layout with combined traditional (paper) and digital scrapbooking elements. The digital elements are 'freebies' I downloaded in 2008 (yes, three years ago)! They are designed by 'The Ettes' and you can find their blog HERE.

Since I just cannot use Photoshop well, I decided to go back to my all time favourite : Microsoft Publisher. I first added a picture of Emma and placed that in the middle of my document. I added a title across the photo. I used shadow to make the letters stand out more. I added some swirls. I 'picked'some colours from the swirls and changed my font colours to make it match. Then I printed the whole sheet, which looked like this:

I carefully cut around the swirls and letters to make it look like this:

I printed another sheet with swirls, which I wanted to use to further embellish my layout:

Here is a picture of what the printed and cut swirls look like:

Using dark green cardstock as a background, I added two shades of orange and some white to create a colourful page:
I adhered the photo and swirls:

Using three different punches, I punched butterflies and flowers. Did you know that Tan has punches for sale at 45% discount. Click HERE to see what's still available!

I added my punched shapes to my layout, added some more pearls and done!


Happy scrapping! Love,

Ingeborg.

Tuesday, February 22, 2011

Roll Your Own

I just love all the different effects you can get by rolling and curling paper. Must be a left over from all those boring functions with paper tablecloths and wet drink rings. Anyway heare another layout that features edge rolling.


Together
Uses: Ruby Rock-it Upstairs Downstairs papers and ATC cards, pale blue and brown cardstock, two tone red ribbon, Kaisercraft alphabet stickers and mini alphabet.

Instructions:


1. Cut patterned paper to 8 1/2" x 7" . Cut a 1" x 8 1/2" strip off the bottom of this. Cut an 8 1/2" x 1 1/4" strip of matching patterned paper. On top and bottom edges, wet and curl back and forth between your thumb and index finger, tearing a little here and there. distress side edges.

2. In pencil, mark an 8 1/2" x 8 1/2" square in the centre of background paper. Attach largest patterned paper piece at the top, leave a gap and attach matching strip, then 1' wide strip.

3. Double mat photo. Ink and distress edges. Attach 1/2" in from the left and 1 1/4" down from the top of patterned paper.

4. Attach title below photo on matching paper strip.

5. Cut bottom of one ATC card with fancy scissors. Ink edges of both cards. Punch hole through top of card and tie ribbon. Attach cards at side of photo.

6. Attach butterflies in top left corner and around cards.


A quick layout for a quiet evening at home.

Friday, February 11, 2011

'Smile' : a step-by-step layout by Ingeborg Dijkstra

This week I wanted to create a layout about our son Rick, who makes us laugh all the time. The journaling reads:

'If you feel a SMILE begin, don't leave it undetected.
Let's start and epidemic quick and get the world infected!'

The three photos show how he is starting with a 'neutral look' (trying not to laugh), but with a gorgeous smile on the third photo! How I love that boy! Anyway, let's quickly show you how I made this layout. I started with three strips of paper and place them on the right side of the cardstock. I used papers and embellishments from the SummerHouse Collection from Ruby Rock'It. The two papers I used are called 'Tropic' and 'Journal'.

I placed a photo on each strip of paper:

I added a journaling card from the same collection (Summerhouse Narrrative Pad, now only $ 3.90 for 24 sheets!) on the left. I added my title and journaling. I added some orange rhinestones, punched a few stars and added a bit of embroidery thread and done!

Have a wonderful weekend!

x Ingeborg.

Tuesday, February 8, 2011

Step by step layout


Cedric


Photo: one 4" x 6" landscape photo


Uses: Creative Imaginations - Old Guys Rule


Black, white and red cardstock


adhesive backed embossing foil


red mesh ribbon or 2" wide sequin waste


brads, cog, wire


title stickers


Instructions:


1. Cut foil to the size of embossing plate. Emboss and lightly swipe Staz On ink over raised bits. Attach to white cardstock 1" in on the left 4 3/4" down from the top sideways.


2. Cut patterned paper to 7" wide and tear the bottom edge so it is 7 1/2" to 8 3/4" long. Ink and curl edges. Attach 1/2" in from right edge 2" down from the top of white cardstock.


3. Attach mesh across layout 5 1/2" down from the top. I used staples and tape to secure.


4. Double mat phot with cream then black cardstock. Distress edges. attach 3 1/2" in from the left edge and 3 1/2" down from the top.


5. Attach title to 1 1/4" wide strip of red cardstock and attach to piece of chipboard for dimension. Ink edges and attach overlapping bottom corner of photo.


6. Cut 3" x 1" piece of red cardstock and chipboard. Attach and ink edges. Cut out car from patterned paper and attach with tape and 3D dots where it overhangs block. Embellish block with brads, cog, wire and attach to top corner of layout.


7. Cut narrow strips of red cardstock for journalling. Ink edges and attach 7" in from the left under patterned paper. Ink edges aof layout.

Monday, February 7, 2011

Ruby Rock-It Summerhouse Range - A Layout by Sue Smith

Today's layout uses the bright modern Ruby Rock-It Summerhouse range and really is perfect for those summertime layouts. These patterned papers are 200gsm cardstock and are double-sided.....


Here is a list of the goodies I used to make this....

* Cardstock

* Ruby Rock-It - Summerhouse "Hot Hot Hot"

* Ruby Rock-It - Summerhouse "Streak"

* VersaColor Inkspot - Bark

* Ultra Thick Embossing Enamel (UTEE) in Zinnia and Blue Iris

* Judkins Embossing Powder - Aquamarine twinkle

* Words or Whatever (WOW) Chipboard Flourish 2 (Linda Baldock Design)

* Mesh ribbon

* Trim Curls Self-adhesive scroll ribbon

* Kaisercraft Fozz Fonts - Fonzo Alpha (white)

* American Craft Thickers - Rockabye and Sprinkles

* Docrafts Anita's Calendar Tabs

To make the layout, I took the RR Hot Hot Hot paper

and cut a large square, and then made some random triangular cuts and stuck it to the cardstock moving every second strip out a couple of cms to give that 'ray' effect.

I cut the blue portion from the RR Streak paper

and then cut a large scallop along one edge, then inked the edges and outlined with black gel pen, sticking it down so that it sat half below where the photo was going.

I stuck the white scallopy ribbon along the left hand side and added some slightly crumpled mesh over that before securing the photo in place.

I added a title using the 3 different alphas and outlined them with black gel pen, and then attached the cute little calendar tab after colouring the edges slightly.

To finish off I found this chippy diecut from WOW that kind of looks like bubbles, and thought it would go well to embellish the layout. Here it is in it's raw state...


If I have plenty of time, I love playing around with raw chippy...it's so much fun.
With this one I covered the shape with lots of Versamark...you really do need to dab all over it numerous times to get it sticky enough as the chippy is so porous in it's raw state (alternatively you could cover it first with a paint like Gesso and you wouldn't need so much ink then). I then sprinkled it with the sparkly Judkins embossing powder, and applied heat. Then I applied more Versamark to the 'bubbles' on the shape, and sprinkled with the zinnia (green) UTEE and applied heat. I then decided I didn't like the sparkly bits, so I Versamarked over them and sprinkled with the blue iris UTEE and applied heat. Then while the UTEE was still melted I sprinkled a little bit of green over the blue in places and applied heat once again.

It's a pity I didn't think to take progress photos of all the stages because all of that probably doesn't make much sense. But here are some close-ups of the finished embellishment...


Thanks for looking at my contribution this week...hope you like it!

Don't forget that Tanyah's store is still on sale, and still open for another couple of weeks for scrapping bargains like you wouldn't believe!

See you next Monday! xxx

Monday, January 24, 2011

Unlikely Allies - a layout by Sue Smith

Hi again everyone....

Just a quick one from me today with some really cute pics of two of our animals who like to 'cosy' up together.


Here is a list of the scrappy stuff I used...

* Kraft cardstock

* Kaisercraft Cocco 'Periwinkle' - an oldie but a goody

* Kaisercraft Pet's Paradise 'Furry Friends' - another blast from the past

* Charcoal VersaColor Inkspot

* 2Crafty large chipboard cat

* Clear UTEE (ultra thick embossing enamel)

* American Crafts Thickers 'Prancer' white chipboard letters

* Black sharpie pen

* White Gel Pen

* Assorted ribbons

All scrapping items are now heavily discounted at Scrap 'N' Craft With T....you won't find any better bargains ANYWHERE at the moment!

Happy scrapping until next week! xxx

Monday, January 3, 2011

Ruby Rockit Paper - A layout by Sue Smith

Happy 2011 everyone! May you all be mega-productive and creative with your scrapping this year!

Today's layout is one I made with Ruby Rockit - The Summerhouse Range 'Journal'. This range of papers (as are ALL papers) are currently 50% off at Tanyah's store so make sure you jump in a grab a bargain while you can!


With this layout I worked with the pattern that was on the paper, and found some plain papers which matched and toned with the colours already on the paper to create mats for the photos, and also different-width strips which I arranged vertically behind the photos, edging each strip with a black Sharpie pen.

The photo mats edges were inked with VersaColor Ink in 'Pacific'.

The title was done with American Crafts Thickers Rockabye Foam Stickers which I outlined and inlined with a black pen and then inked from the bottom edge with Versa Color Ink in 'Bark'.


I used this same ink on the edges of the whole layout as well.

The mesh ribbon used is May Arts Mesh ribbon in 'Teal'.

Until next Monday, happy scrapping everyone! xxx

Friday, December 17, 2010

Step-by-step layout using a sketch by Ingeborg Dijkstra

I have started to use sketches to create layouts a few years ago and in the last few months I have started to create my own sketches too. I made this sketch a while ago, but never made a layout with it, so this week I'd like to show you a step-by-step layout that I made based on this sketch:
The sowing machine and I don't get along, so if I want stitching on my layouts it will have to be by hand. I love using Bazzil's templates to create borders and shapes. I wanted to create a very colourful layout and therefore I used two bright colours for my stitching:

Using scraps of paper I cut quite a few strips of paper and added them to my layout:

I added the photo, a handmade journaling tag, a date stamp and some chipboard embellishments:
I punched some flowers, added colourful brads in the middle of each flower and added my title using Thickers. Done!

Wednesday, December 15, 2010

Step by step layout by Tanyah Payne

Hi Everyone...


How are we all going with only 9 days to Christmas... how are we all going with organisation? For me....its not happening very fast....lol!

In my time out lately I have created a layout that was a challenge on the Scraplounge a couple of weeks ago. We were to base our layout on a music lyric and
only allowed to use 3 embellishments...yep for those who know me that is imposible!.... well accually i did it and surprised myself what you can do with very little supplies.


Products Used:

  • Bo Bunny Gypsy Range of pattern papers
  • Making Memories Paint
  • Carolee Creations Sleek Alphas
  • paper string - for the sewing
  • very small amount of red cardstock
  • Gelly
  • journal pen
  • crafters workshop template


 My 3 embellishments were...

  • Chipboard
  • Rubons
  • Sizzix ladybug die cut.

Instructions

  1. Place your template over the top of your paper
  2. Using a brush, cover the paint over the top of your template
  3. Lift template off and wash the paint off
  4. Wait to dry
  5. Cut a co ordinating patten paper and distress around the edges. Place at the left hand side of the photo. 
  6. Cut a shape from the gypsy range of papers and placed on the right hand side of the photo
  7. Tear a small part of the base paper approx 1.5".
  8. Find a co ordinated paper and place under the teared edges, this will give a different dimention and colour to your page.
  9. Roll the edges and place cardstock underneath
  10. Punch holes using a hole reamer or thick needle where you want to sew
  11. than using your paper string sew in and out to where you want to go.
  12. I placed the ladybug  at the top left of the pealed back edges.
  13. Typed my lyrics on the computer and matted with red cardstock and placed on the left side of my photo.
  14. title your layout
  15. sewing my corner on the right hand side.
  16. Using a journal pen i doodled a frame around the bottom of my photo.

EMBELLISHED CHIPBOARD SHAPE...
  1. I am sure i have put this on here before but here it is again....
  2. paint your surface
  3. place gelly over parts of your chip shape
  4. Carefully paint over the top of the gelly and entire chip shape
  5. Wait to dry
  6. Using a paper towel, wipe off the gelly to get this amazing effect!... cool hey!
  7. Embellish with rubons!...and all is done!

Hope my layout enspires you to create and have some time out at this crazy time of year....
take care and till next time
TanXx

Monday, December 13, 2010

A Step by Step Layout - by Sue Smith

I have recently gotten my hands a lot of photos from my Mum's youth, so a lot of my layouts are tending to be vintage style lately....


Here are the products I used for this layout...

* Cardstock (Mint)
* Cosmo Cricket - Earth Love - 'Relive'
* Crate Paper - Prudence Collection - Charity Die-cut Sheet
* Flower Tag
* Prima Marketing - Holiday Lights Birds
* Chelleybean Designs Flowers
* Foof-A-La - foof-a-bets
* Zva Creative - self-adhesive pearls* Fiskars Word & Border Rub-ons - Nature's Flora
* Washi Tape

Starting with the basic cardstock, I ran a strip of washi tape across the bottom and the top, just in from the edge...


Next, I cut an edge from the Crate Paper circle die-cut and attached with DST to the layout....


Then added the floral tag and a strip from the Cosmo Cricket paper overlapping the elements...


Then the placement of the photo...


....and added the self-adhesive pearls over the top....


To finish, I added a heading, journalling around the edge of the photo, rub-ons across the top, the flowers and the gorgeous little Prima bird and inked around the entire edge of the cardstock.....


Thanks for looking and happy scrapping! xxx

Sunday, December 12, 2010

Simple Layouts with Paperhouse - by Annie Zorzo

Tanyah took me right out of my comfort zone this week by giving me some picture paper from Paperhouse to use.  Now my normal style is to mix and match papers but with a paper that has a picture on it, it seemed a real shame to put anything over the top or to over-embellish.  So I've kept it simple...and at this crazy time of year, who couldn't do with something simple, that's quite cheap to make and extremely quick to knock up!

To make this simple layout, you'll need:
* PaperHouse Production picture paper
* Cardstock
* Alpha letter stickers
* Zig Pen
* Chip Letters
* Making Memories Paint
* Paper Flowers

And simple steps to make this:
1. Matt your photo leaving a larger space at the top.
2. Using a zig pen and alpha stickers, create a subtitle/journalling in the larger matted space
3. Re-matt your matted photo twice more in contrasting colours

4. Using a zig pen, doodle around the edges of the matts and around the PaperHouse paper.

5. Fix the triple matted photo to the Paper House Paper
6. Dispense some paint on a scrap paper, swirl it together.
7. Using chip alphas for your title, take one letter at a time and press it into the wet paint.  Set aside to dry.

8. Fix title and some paper flowers at embellishment....and finished!!!


And sadly, if you don't already know, Tanyah, due to family circumstances, has to close Scrap n Craft with T.  Everything in the shop must go and there are massive savings on everything.  Make sure you don't miss you and give yourself a nice little Christmas present - head over to the Scrap n Craft with T online shop now.  Even if your local - do it on-line to make sure you don't miss out and just walk in to pick it up (plus you can always add to it if you find something else you like)! 

See you next week.

Friday, December 10, 2010

Quick and easy layout by Ingeborg Dijkstra

I made this layout using embellishments and papers from the White Out Nonsense collection (We R Memory Keepers). I love bright and bold colours and this collections surely has lots of colours and busy patterns! I first cut a few rectangles and placed the on my layout:

I added my picture in the middle:

I finished the layout with a few chipboard embellishments from the collection. I also cut some cute little birds and swirls out of a few scraps of matching papers. The title 'Friends' is from a ready made chipboard piece too! Quick and easy, but still bright and bold; just the way I like it ... LOL!