

I have a new blog!

If you want to see only my creations please come and check out and follow my new blog http://www.tanyah-payne.blogspot.com
Showing posts with label Green at Heart. Show all posts

Friday, August 20, 2010

Different ways to make and use inchies (part 2: Inchies & Scrapbooking) by Ingeborg Dijkstra

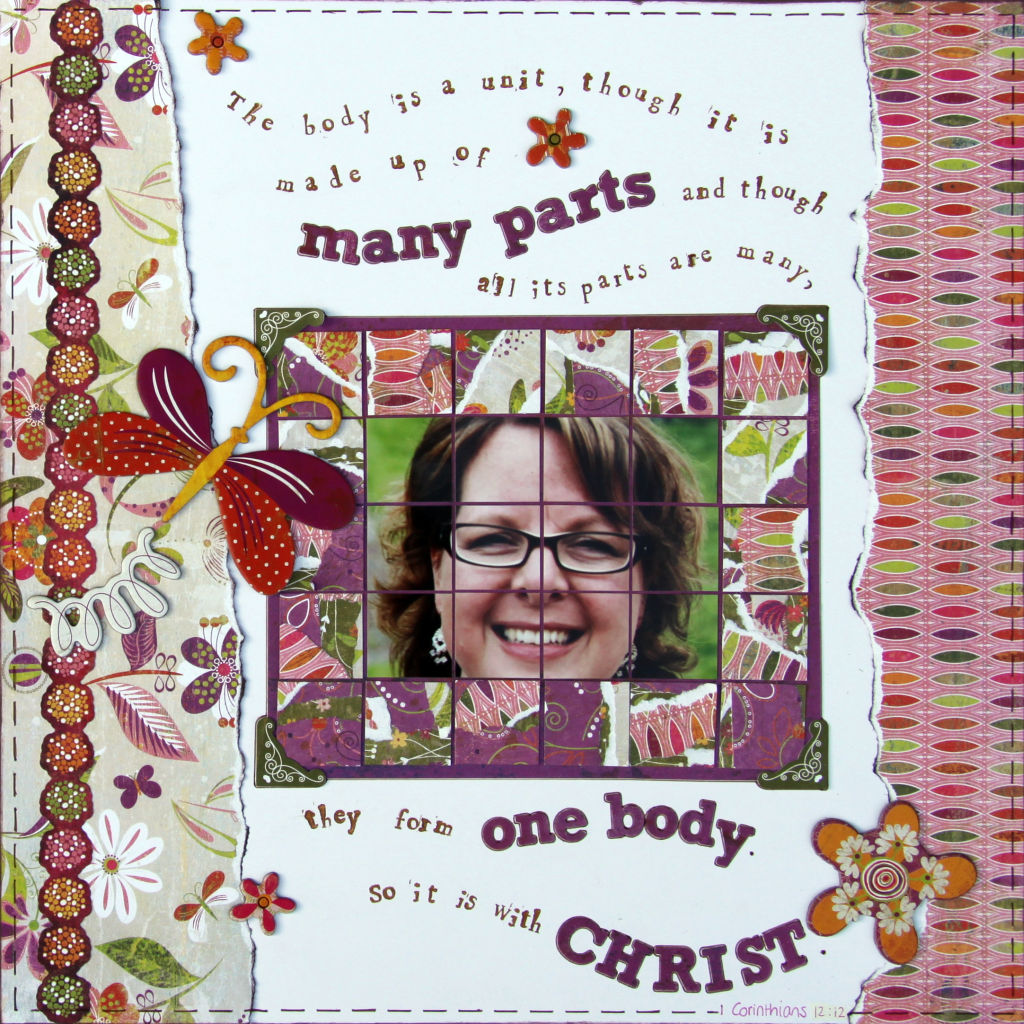
I would like to show you a few different ways to make and use inchies on a layout. Last week I showed some ways to make a use inchies for cards. If you have missed that message, please click HERE to read it. Next week I will show you how to use especially designed inchie stamps on cards. I made two layouts using inchies; a 12" x 12" layout and a layout for a mini album I am making. This is the 'traditional' 12" x 12" layout:

This is the layout for my mini album. The size of each page is approx. 5" by 7":

Let's start with the first one. To create this layout (and a bonus card, see below) I used the gorgeous Green at Heart Collection from Basic Grey. I used the following products:
I took some step-by-step photos. If you'd like to see a larger version of the collage below, please click HERE.
  1. I cut my photo into 12 inchies. I made sure the 'cuts' wouldn't go through the eyes, because that would look a bit weird. So I started in the middle of the photo and the face and made 'the first cut' through the nose.
  2. I tore about a dozen small strips of a few of the patterned papers: Grasshopper, Recycle and Vert.
  3. If you have a toddler at home, she/ he can help you with the next step! But ... if you don't have a toddler, you have to randomly stick the torn paper strips on the 'Seedling' paper yourself. Make sure you use lots of glue, because all the parts have to stick together well!
  4. Cut the paper in inchies.
  5. I used the Veggies paper to stick my photo and paper inchies on. I used the handmade inchies as a frame around my photo.
  6. I used parts of the same papers on each side and added my photo in the middle of the layout.

I created my title/ quote using the Micro Mono Stickers and Alphabet Stamps from Hero Arts. I embellished the page with the coloured chipboard stickers from the same collection. This is the finished result:

I had a few inchies left, so I decided to create a quick and easy card with them. I used a strip from the Elements Sticker Sheet and the little butterfly and owl are from the coloured chipboard shapes from Green at Heart as well.

For the layout of my mini album I have only used white cardstock and Google ... LOL ... I am making a 'Year in Review' mini album with a group of Dutch girls and each week one of the girls chooses a theme. This week's theme is 'Summer Hits'. I live in Europe, so we are in the midst of Summer right now ... I wanted to create a layout using inchies a diferent way. If you search for 'inchies collage sheet' or something like that, you will find lots and lots of printable sheets with ready-made inchies. You will find lots of different styles on Etsy. You can buy those sheets for a dollar or two, download them and print them as many times as you like.
But ... I'd like to make my own 'inchie sheet', because I'd like to personalize my pictures/ inchies. For this week's 'Summer Hits' theme, I thought long and hard about some Summer Hits that I remembered as a child, teenager, young adult and now. I wanted to have a picture of the LP or CD of each song. That's when Google comes in handy! And ... LPs and CDs are square, so perfect for inchies!
I also wanted some 'Summer Hits' CD covers to use as embellishments. My own printed sheet of inchies looked like this:
Cut into inchies the CD covers and LP covers looked like this:

And this is the finished result of the layout:


And ... taking the risk of truly showing my age ...LOL ... these are the songs I wanted to feature on my layout:

1970 - 1980
Summer Nights (1978, John Travolta & Olivia Newton John)
Three Times A Lady (1978, The Commodores)
We Are Family (1979, Sister Sledge)

1980 - 1990
Every Breath You Take (1983, The Police)
Summer of ‘69 (1984, Bryan Adams)
What’s Love Got to Do With It? (1984, Tina Turner)
The Lady In Red (1986, Chris de Burgh)
The Only Way Is Up (1988, Yazz & The Plastic Population)

1990 - 2000
Ice, Ice Baby (1990, Vanilla Ice)
Knockin’ on Heaven’s door (1992, Guns ‘N’ Roses)
All I Wanna Do (1994, Sheryl Crow)
Love Is All Around (1994, WetWetWet)

2000 - 2010
American Pie (2000, Madonna)
Absolutely Everybody ( 2000, Vanessa Amorosi)
Beautiful Day (2000, U2)
You’re Beautiful (2005, James Blunt)
Waka Waka (2010, Shakira)

Friday, May 7, 2010

'You & Me' - a step by step layout by Ingeborg Dijkstra


Here is a list of materials that I have used for this layout:

Mother's Day is just around the corner and we normally do a 'Mother's Day Photo Shoot'. I encourage you to do the same! Obviously most of us take pictures regularly, but if you take pictures around the same time every year, it is fun to watch how the kids have grown (and yes, how much 'older' we mums are too) ... Anyway ... these photos were made by our son Tom (10 years old) of our daughter Emma and myself.


The new Basic Grey collection 'Green at Heart' fits perfectly if you look at the pink and green colours of the photo. I wanted to create a layout with quite a few photos, since there were so many nice pictures to choose from and I wanted to use more than one!

I started with the pink paper as my base colour. My daughter and I were both wearing pink (we both just love pink) and therefore I just had to use the gorgeous pink paper to match our clothes. I added a large strip of the patterned paper at the bottom of the page.

I added some more colour by using another sheet of patterned paper. I used a border punch to create a fun border at the bottom of this piece of paper. Click HERE to see some of the border punches that Tanyah has in her shop.

I cut my four photos to the same size, because I didn't want to make the layout too busy. I put them in a rectangle shape with a 'gap' in the middle. I already knew which of the cute embellishments I wanted to use and wanted to leave some space for those ...

Using the cute new mono stickers I stuck my title on one of the die cut shapes. I used another die cut shape for my journaling. I added some stickers, a chipboard sticker and a cute felt flower and done!

By the way .... I made this layout at night as you can see from the 'yellowy glow' at the photos above. I took a photo of my finished layout during the day and you can see quite a change in the colours. The colours are more like the colours on the picture below ...

Friday, April 23, 2010

'Note to Self' - a step-by-step layout by Ingeborg Dijkstra

I made this layout about a book I read recently. The title of the book is: 'Beautiful in God's eyes' by Elizabeth George. The book is about a chapter of the Bible; Proverbs 31. For as long as I can remember I have been challenged by that part, since it always tend to make me feel inferior (in my eyes the woman described in that part seemed like a mega super woman)! Reading Elizabeth's book changed my perspective and I am so grateful for that! I added a picture of myself with a smile on my face, since I truly am happier after reading that book!

In the last few years I have started to make layouts about books that are special to me. I love reading and I think it is important to let our children and future generations know about who we are, what we believe, what we like etc. Too many times I create layouts about my children, my husband, friends, holidays, but I encourage you to create more layouts about yourself too!

Anyway ... here is a list of materials that I have used for this layout:

Using another piece of scallop cardstock, I traced the shape on the back of the pink patterned paper.

I cut it out and stuck it onto the green paper.

I have torn a rectangle shape out of the 'Recycle' patterned paper to create a border around my photo. I rounded the corners of my photo with a punch.

I decided to use one of the die cut shapes to create my title. The words 'note to self' were already printed on it, so all I had to do was add the rest in my own handwriting. I used a small sticker strip to stick from left to right. The stem and petals of the flower were made with the chipboard stickers. I used the journaling block for the additional text. This journaling block is like a
note pad and has quite a few pages.

I added some buttons in the middle of each scalloped shape for a final touch. Done! This is the finished result:

Friday, April 9, 2010

Step-by-Step layout by Ingeborg Dijkstra using 'Green at Heart' from Basic Grey

Tanyah asked me if I'd like to create a few layouts and/ or cards with the brand new 'Green at Heart' collection from Basic Grey. Looking at the gorgeous green, purple and pink colours of this collection I only needed a second to say 'yes' to that idea! In the next few weeks I will show you cards and layouts made with this wonderful range. Basic Grey also released some great new embellishments that I will use as well!

Here is a list of materials that I have used for this layout:

I started this layout with a green background. The 'Moss' paper fitted well with the colours of the photo I was going to use.

I cut a large rectangle of the 'Grass' paper. Don't let the name fool you ... this paper is not green, but purple and it has the cutest butterflies and swirls on it (see picture below):

I wanted to keep this layout fairly plain to really showcase the photo and the lovely Basic Grey products, but I still wanted to add a bit of a personal touch to it with some handstitching. I used a Bazzil Stitching template with swirls to create a border on the right side of the paper. You will see the template on the picture below.

I used wool to create this border to make it a bit 'fuzzy'.
Using some of the gorgeous embellishments of the Green at Heart collection I finished of my layout. I used a chipboard tree from the Chipboard Coloured Stickers pack, a felt butterfly and heart from the 'Woolies' package, two die cut shapes from the 'Die Cuts Pieces' pack and a little journaling spot from the journaling set 'Writer's Block'. This journaling set actually contains heaps and heaps of journaling tags ... they are stacked in the package, so even though you only see a few on the photo, there are many in the package!

Click HERE to see the whole 'Green at Heart' collection that is available in the shop! I'd love to see you create a card or a layout with this collection too. If you do, make sure you upload it in the gallery for all of us to enjoy!