


Well, I can honestly say that the 'silly season' is here and it seems that I can almost barely keep up with the list of jobs I have to do each day - buying presents, putting the tree up, organising a Xmas party ... the list goes on.
And so, this week I want to challenge all of us 'time deprived, list loving scrappers' to create a layout - with or without photos - with a list of all the jobs you need to do right now. Whether that be just the list of jobs for today, or maybe the list of jobs for the month of December. Don't fuss over this layout ... just put pen to paper and in January when you have your feet up sipping on an ice cold drink, you can reminisce about that crazy month called December!
Sunday, November 29, 2009
Sunday Gallery Spotlight

This week Shazz's Layout took me by surprise... I love her interpretation of my sketch. Also the yo yo's she has made.
If you would like to check out shazz's amazing creations check out her blog HERE!
I have the templates in my shop at the moment. You can get many different templates and sizes /shapes. Soon i will have more shapes for you to try too! to check out the templates CLICK HERE!
Hope you like and enjoy this layout as much as i have and thanks shazz for sharing
luv tanXx
Saturday, November 28, 2009
Satuday Scrapping Stimulus
Hi all, it's Kylie here again for yet another installment of the Saturday Scrapping Stimulus...
I have been computer-less and car-less for way too long now (long stories - it involves hard disk drive controllers and head gaskets), but luckily I have a mother with 4 computers in her house, so I've stolen one of heres so I can still write my Saturday fun on here!
So, because I have been computer obsessed this week, my quote is of course related to that...
"I think there is a world market for maybe five computers."
~ Thomas Watson, chairman of IBM, 1943.
Well, my mum has 4 of them, my one (obviously the 5th) is on it's way to Melbourne to be fixed right now, so I'm not entirely sure how you guys are reading this post! :D
Hope you enjoy your weekend, whether you're scrapping and creating or just spending some time with your favourite computer...
Bella NEW Release.....EVERY AFTER.....

This is a beautiful range and much nicer IRL. Again a wonderful thick double sided cardstock. I love the very soft blue and was like nothing else i had ever worked with but found it very versatile and able to use on many different layouts eg...
- boy
- romantic
- wedding
- family
- kids
- girls
- baby boy
- Flocked transparencies
- Rubons alphas, shapes
- Glittered Alphas - self adhesive (like thickers to use) very nice!
- Glittered Chipboard shapes... these are deli sh and adored working with these
- Flower - self adhesive
- Words - self adhesive
- Journaling spots , one set is flocked
- Ribbons and paper trims
- etc!
I am unable to show you my layouts but you will see them featured in Bella advertising and Spotlight flyer's.
WE NOW HAVE THEM THESE PRODUCTS IN OUR SHOP TO ORDER!.. CLICK HERE!!! to go to our shop!... Be quick to secure your own. They are due to arrive within the next 2 weeks.
LOVE to hear what you think of this range
till next time
luv tanXx
Friday, November 27, 2009
EMBELLISH THIS WINNER!....
It has come sadly to an end but we are also extremely excited too!......
I would like to thank my Design Team for all your hard work in more ways one can know!


 Amanda Moran...
 No blog yet to check out...
***************************************************
I would like to thank my Design Team for all your hard work in more ways one can know!
- Michelle Jamieson
- Leanne stamatellos
- Alison Callcott
- Karen Calcutt
- Tracey Thorne
- Kylie Abel
We would like to congratulate
our 'EMBELLISH THIS QUEEN'........
Who has won a $150 voucher from
Scrap N Craft with T...
http://www.scrapncraftwitht.com.au/
our 'EMBELLISH THIS QUEEN'........
Who has won a $150 voucher from
Scrap N Craft with T...
http://www.scrapncraftwitht.com.au/

The winner is... Melinda Spinks...

If you would like to check out more of Melinda's work on her blog ... CLICK HERE!!!
***************************************************
We have 2
'EMBELLISH THIS PRINCESS'S'
this year who have received the same scores
and won a $20 voucher each.
this year who have received the same scores
and won a $20 voucher each.
 Amanda Moran...
Nic Amber...
 No blog yet to check out...
***************************************************
We would like to thank EVERYONE for entering. I enjoyed the amount of effort and work that went into every single project that everyone put in and am thrilled my gallery is bursting now with inspiration.
This is our first ever competition and their has been some feedback but mostly all good. If anyone has any ideas they would like to express or share, for us to consider and help have a better competitions next year.
Please email us at admin@scrapncraftwitht.com.au
We will be sending out a little gift to everyone that attended the competition in the next week. Please don't feel discouraged if you did get eliminated for every ones work is amazing and I adored it all..
I would love to see more of your projects in our gallery to share. We have our Sunday spotlight where we will see a layout in the gallery and place it on our blog.
Thank you everyone for being part of a really fun competition
lots of luv to all
luv tanXx
We're making a list and checking it twice!
The WINNER of the Embellish This competition will be announced around 1-2pm this afternoon.
Good luck!
I know, I know, we're keeping you waiting, but we have to make sure the results are all accurate. We're like Santa - making a list and checking it twice (or 3 times, and maybe a 4th just to be sure!). You guys have done such a great job, we'd hate to get anything wrong!
Good luck!
Thursday, November 26, 2009
Single Layout by Alison Callcott and a sketch .....
Today Alison Has kindly designed a layout using the Gyspy Range of Pattern papers from Bo Bunny. These are really delightful and lovely to work with....
Here is Alisons Layout
 Products used....
- Lace (reverse)
- Saffron
- Cut Outs (including reverse)
Here is a sketch if you would like to have a go!
 Hope you have enjoyed this and if you would like to see what we have in our store, Check us out at http://www.scrapncraftwitht.com.au
till next time
luv tanXx
Here is Alisons Layout
 Products used....
- Lace (reverse)
- Saffron
- Cut Outs (including reverse)
- Prima felt stems
- Prima Holiday Lights Birds
- Exotic Trims Sequin Flowers – Soft Red
- Exotic Trims Twin Cord Leaves - Teal
- TCW Trendy Bracket
- Carolee’s Creations Adornit – Tiny Whoopsy Teal
- Kaiser Penny Royale Collection clear stamps (on special at the moment)
- Kaiser rhinestones
- Tim Holtz Distress Ink – Spiced Marmalade
- Tim Holtz Distress Ink – Fired Brick
- Glossy Accents
- Sizzix border die – Swirly
- Colop date stamp
- Embroidery thread
Here is a sketch if you would like to have a go!
 Hope you have enjoyed this and if you would like to see what we have in our store, Check us out at http://www.scrapncraftwitht.com.au
till next time
luv tanXx
Wednesday, November 25, 2009
Single Layout by Lisa Kamphuis
This Month Lisa Kamphuis is doing a Guest Design Team spot and will bring to you each week either a Step by Step Layout or a card. We thank you for the time and effort you have put into these Lisa.
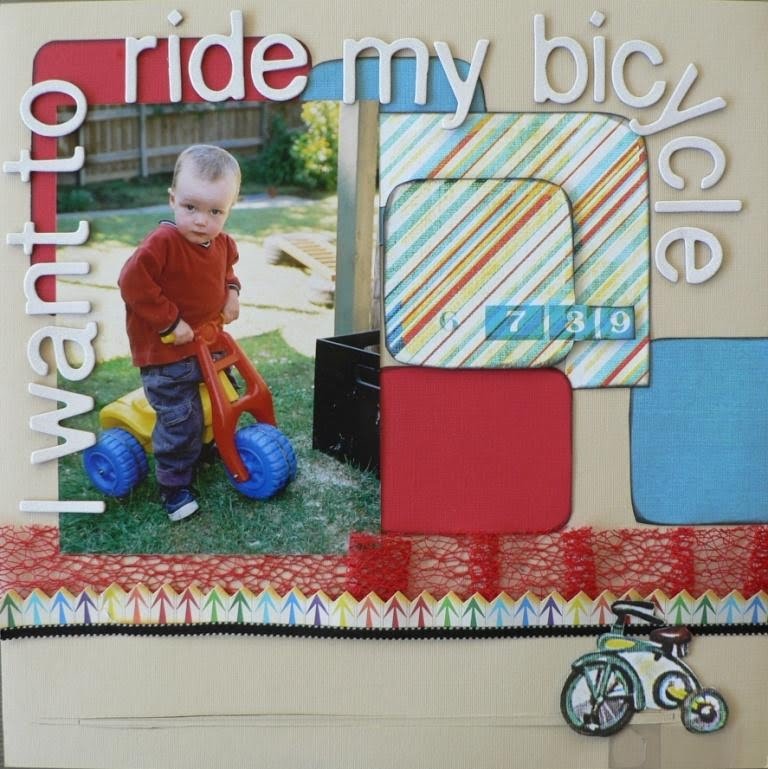
Here is Lisa's First Single Layout ...... 'I want to ride my bicycle'.

Products Used:
1. Use the beige coloured cardstock as your base 2. Cut a variety of sized squares from the Sassafras Lass paper. Also cut out the little bicycle.
3. Ink edges of all cutouts
4. Cut out 2 red squares of cardstock using the cutouts from the Sassafras lass paper so the shape is the same. Cut out one large and one small.

5. Inkedges
6. Place squares and dont adhere yet
7. One of the smaller striped squares we will mount on foam and pop over photo
8. Take red mesh and lay underneath the pictures approximately 3 and a half inches from the bottom of the page. Fold mesh on itself as you go - laying it on the double sided tape.

9. Take the bicycle cut out
10. Measure a thin stripe about 2 cm up from the bottom of your page. It will sit about 3 cm in from the left side of page and 4 cm in from right side of page.You need to use your craft knife to cut along both pencil lines.
11. Cut a 2 cm strip of transparency and attach bike.

12. Adhere cut out squares
13. Adhere photo slightly overlapping the mesh
14. At bottom of mesh attach arrow stripe and a row of black ribbon

15. Slide bike on the transparent stick and slip in under slit cut of cardstock. Trim and attach a glider so this will be what you hold to slide your bicycle across the page.


16. Attach title and journalling..
17. Go for a ride!!!!
We would like to thank you lisa for creating this layout, I really love how the bicycle really moves, very cool idea!
thanks for looking
luv tanXx
Here is Lisa's First Single Layout ...... 'I want to ride my bicycle'.
Products Used:
1. Use the beige coloured cardstock as your base 2. Cut a variety of sized squares from the Sassafras Lass paper. Also cut out the little bicycle.
3. Ink edges of all cutouts
4. Cut out 2 red squares of cardstock using the cutouts from the Sassafras lass paper so the shape is the same. Cut out one large and one small.


5. Inkedges
6. Place squares and dont adhere yet
7. One of the smaller striped squares we will mount on foam and pop over photo

8. Take red mesh and lay underneath the pictures approximately 3 and a half inches from the bottom of the page. Fold mesh on itself as you go - laying it on the double sided tape.

9. Take the bicycle cut out
10. Measure a thin stripe about 2 cm up from the bottom of your page. It will sit about 3 cm in from the left side of page and 4 cm in from right side of page.You need to use your craft knife to cut along both pencil lines.
11. Cut a 2 cm strip of transparency and attach bike.

12. Adhere cut out squares
13. Adhere photo slightly overlapping the mesh

14. At bottom of mesh attach arrow stripe and a row of black ribbon

15. Slide bike on the transparent stick and slip in under slit cut of cardstock. Trim and attach a glider so this will be what you hold to slide your bicycle across the page.


16. Attach title and journalling..
17. Go for a ride!!!!
We would like to thank you lisa for creating this layout, I really love how the bicycle really moves, very cool idea!
thanks for looking
luv tanXx
Tuesday, November 24, 2009
Layout by Michelle Jamieson
Thankyou Michelle for sharing this wonderful layout using the crate paper - season's Collection.
This is a very sweet range and I am sure you will love it!
Here is the paper collection...... CLICK HERE to go to papers at http://www.scrapncraftwitht.com.au

Here Is Chelles Layout....
 Other Products used...

Hope you like and enjoy
luv tanxx
This is a very sweet range and I am sure you will love it!
Here is the paper collection...... CLICK HERE to go to papers at http://www.scrapncraftwitht.com.au
Here Is Chelles Layout....
 Other Products used...
- Sleek Alphas from Adornit
- Kraft cardstock
Hope you like and enjoy
luv tanxx
Monday, November 23, 2009
Sketch & a Step by Step......by Tanyah Payne...
Today I wanted to give you a little more than just a sketch. So I have created a step by step Sketch of my Layout so if you would like to have a go, it maybe a little eaiser for you... Love to know what you think.
Here is my Layout...LITTLE DUDE!.....
 Products used...
Here is the step by step sketch....
Step 1
Step 2
Step 4......FINISHED SKETCH...
ALL FINISHED!!!!!
Hope you liked this idea.....
till next time
luv tanXx
Here is my Layout...LITTLE DUDE!.....
 Products used...
- Adornit (carolee's creations) what a hoot pattern papers
- Cardstock
- Fancy Pants patten paper
- 7 gypsy patten paper
- Chatterbox flocked pattern paper
- Making memories pattern paper
- Prima journalling spots
- foam adheasive
- paper string
- Hole ribbon
- Distresser
- Journalling pen and Gel pen
- Sewing
- Crafters Workshop Template - orchid
Here is the step by step sketch....
Step 1
 Use the crafters template (orchid) and draw/cut out the carolee patten paper
- Place a strip of the Chatterbox pattern paper over the top

Step 2
 Using the crafters work shop draw/cut the inside bracket shape from the template.
 - Place the 2nd bracket inside the larger bracket
- Place some tabs under the smaller bracket at the top left.
- Using the template again, draw and cut a circle and place at the bottom right of your layout.

 Place a large photo over the circle shape
- Place/staple the mesh/hole ribbon over the bottom of the photo
- Place a journalling spot to the right side fo the photo
- Cut and place an arrow at the top of the photo

Step 4......FINISHED SKETCH...
 Place 3 small photos to the right side of your layout
- place a group of circle shapes at the bottom right
- Place a couple circles about the arrow
- Title and journal your layout....

ALL FINISHED!!!!!
Hope you liked this idea.....
till next time
luv tanXx
Sunday, November 22, 2009
Sunday Gallery Spotlight
Today I wanted to share with you all a cute layout done by Alyssa Vollmann. You can check out Lys's creations and more on her blog... CLICK HERE!
If you would like to share your work and would like us to spotlight it please place your project in our gallery... http://www.scrapncraftwitht.com.au
Lots of us are getting or about to get your Santa pics and thought this layout that Alyssa has placed in our gallery was appropriate for this week.
You have done an amazing job of this Alyssa and thank you for sharing.
 Hope you enjoy this layout
till next time
luv tan Xx
Saturday, November 21, 2009
Saturday Scrapping Stimulus...
YAY! It's Saturday again, and Kylie's here with another little quote to brighten your day...
"I can resist everything except temptation."
~ Oscar Wilde
I hope you enjoy whatever temptation you give in to today!
"I can resist everything except temptation."
~ Oscar Wilde
I hope you enjoy whatever temptation you give in to today!
Friday, November 20, 2009
Embellish This - Alter it!.... Week 6
Welcome to week six, the final week, of the Scrap N Chat with T 'Embellish It' competition. Karen's challenge had you CREATE items with beads, felt and fabric; whilst Leanne's challenge saw you using wire and the colours red, white and green to DECORATE a gift package. Chelle's week saw you designing a fashion statement worthy of the Melbourne Cup with BLING. With the help of previous crafts and UFOs, Kylie's challenge saw you MIXing things up; and last week Tracey's pushed your boundaries further (and to your recycling bin!) as she asked you to use your ingenuity to RECYCLE items like toilet paper rolls on your project. Hooley dooley!! To those still standing, a mighty congratulations. The work produced over the last five weeks has been nothing short of breath-taking, at times jaw dropping, and always inspiring.
So now its time for our ALTER IT challenge. A challenge that epitomises the essence of Scrap N Chat with T ... a blog, a store, a gallery for paper (and other) crafters ... a source of inspiration as we admire the the many and various products in store, browse the blog for techniques and updates, and sit down with a cuppa to admire and be inspired by the work in the gallery. Then we sit at our PCs and wonder how we can incorporate all that we have seen into our own projects, how we can use them (can we use them?) in our preferred crafts, and 'can we ALTER them to suit our own styles?'.
This week we are asking you to return to the grass roots of scrapbooking and create a single or double page layout. You will need to use three or more photos; the theme is 'let the love shine through'; the required colours are the 'cool shades' of summer; your primary handmade embellishment must be made from sequin strands; and finally you must use at least ten different techniques to ALTER the products/items you use to create a harmonious layout where the photos remain the focus of the layout, not the techniques.
* I hand-stitched around selected circles (or 'dots') on the Bazzill embossed cardstock "Dots"
* I used a template (TCW Trendy Bracket) to cut a shape out of my patterned paper (from the Prima Tropics collection)
* I doodled on various parts of the layout for definition and interest
* I used a Cuttlebug embossing folder (Swiss Dots) to emboss a piece of patterned paper and then inked the raised image
* I sanded the edges of my photos and added Kaiser pearl bling
* I used PhotoShop to alter my photos by increasing their brightness and contrast levels before printing
* I added layers to the Bella Journaling Tagz tag with a strip of patterned paper and a die-cut from the Crate Paper Little Sprout Collection
* I dusted the back of the small, self-adhesive, die-cut cardstock flowers and butterflies by Ruby Rock-It with talcum powder to remove the adhesive, moulded their shapes by hand, added bling, and in the case of the butterflies stapled their centres to create definition
* I free-hand cut a funky scallop border from patterned paper
* I cut a scalloped circle image out of a larger circle Bella Journaling Tagz tag
* I used a Kaiser quote rub-on to create my title within the extra journaling (the quote) by die-cutting plain acetate, cutting the rub-on into sections, applying the rub-on and adding Carolees Creations Adornit tiny alphas to form the words "love and", and then using Kaiser seabreeze paint, highlighted the word 'laughter' from the back of the acetate
The judging criteria this week are ...
* unique use of title
* journaling
* handmade embellishment
* best use of material
* overall design
* craftsmanship
* meet weekly criteria
* most inspiring
At first glance this challenge may seem fairly simple. The challenge is to use many and varied techniques (perhaps more complicated than those I have used) and at the same time keeping a delicate balance between what becomes the focus of your LO ... in this instance the photos must be your focal point. Further, this week, never have the judging criteria such as unique use of title and journaling been more important. How can you make your title individually unique? Mine is within a quote on a handmade journaling block. We want to see your journaling (not just a date or name or year) ... tell us a story ... and if we cannot actually read the journaling because you have used hidden journaling then we want to see the evidence of that hidden journaling. As previously mentioned your handmade embellishment must be made from sequin strands. What does best use of material mean? Have you used your materials to their maximum potential, in more than one way, or innovatively? When considering your overall design, ask yourself whether you have successfully created the balance we are looking for. Craftsmanship ... is your hand-stitching even, can we see the glue you have used to adhere an item, have you paid particular attention to detail? Then of course you need to meet the weekly criteria, and finally, 'most inspiring' ... well that's a personal choice.
Good luck this week girls ... I can't wait to see the no doubt spectacular layouts you come up with and like everyone else, I wait with bated breath to find out finally who the winner of Scrap N Craft with T's Embellish It competition's winner is.
Alz :)
So now its time for our ALTER IT challenge. A challenge that epitomises the essence of Scrap N Chat with T ... a blog, a store, a gallery for paper (and other) crafters ... a source of inspiration as we admire the the many and various products in store, browse the blog for techniques and updates, and sit down with a cuppa to admire and be inspired by the work in the gallery. Then we sit at our PCs and wonder how we can incorporate all that we have seen into our own projects, how we can use them (can we use them?) in our preferred crafts, and 'can we ALTER them to suit our own styles?'.
This week we are asking you to return to the grass roots of scrapbooking and create a single or double page layout. You will need to use three or more photos; the theme is 'let the love shine through'; the required colours are the 'cool shades' of summer; your primary handmade embellishment must be made from sequin strands; and finally you must use at least ten different techniques to ALTER the products/items you use to create a harmonious layout where the photos remain the focus of the layout, not the techniques.


* I hand-stitched around selected circles (or 'dots') on the Bazzill embossed cardstock "Dots"
* I used a template (TCW Trendy Bracket) to cut a shape out of my patterned paper (from the Prima Tropics collection)
* I doodled on various parts of the layout for definition and interest
* I used a Cuttlebug embossing folder (Swiss Dots) to emboss a piece of patterned paper and then inked the raised image
* I sanded the edges of my photos and added Kaiser pearl bling
* I used PhotoShop to alter my photos by increasing their brightness and contrast levels before printing
* I added layers to the Bella Journaling Tagz tag with a strip of patterned paper and a die-cut from the Crate Paper Little Sprout Collection
* I dusted the back of the small, self-adhesive, die-cut cardstock flowers and butterflies by Ruby Rock-It with talcum powder to remove the adhesive, moulded their shapes by hand, added bling, and in the case of the butterflies stapled their centres to create definition
* I free-hand cut a funky scallop border from patterned paper
* I cut a scalloped circle image out of a larger circle Bella Journaling Tagz tag
* I used a Kaiser quote rub-on to create my title within the extra journaling (the quote) by die-cutting plain acetate, cutting the rub-on into sections, applying the rub-on and adding Carolees Creations Adornit tiny alphas to form the words "love and", and then using Kaiser seabreeze paint, highlighted the word 'laughter' from the back of the acetate
The judging criteria this week are ...
* unique use of title
* journaling
* handmade embellishment
* best use of material
* overall design
* craftsmanship
* meet weekly criteria
* most inspiring
At first glance this challenge may seem fairly simple. The challenge is to use many and varied techniques (perhaps more complicated than those I have used) and at the same time keeping a delicate balance between what becomes the focus of your LO ... in this instance the photos must be your focal point. Further, this week, never have the judging criteria such as unique use of title and journaling been more important. How can you make your title individually unique? Mine is within a quote on a handmade journaling block. We want to see your journaling (not just a date or name or year) ... tell us a story ... and if we cannot actually read the journaling because you have used hidden journaling then we want to see the evidence of that hidden journaling. As previously mentioned your handmade embellishment must be made from sequin strands. What does best use of material mean? Have you used your materials to their maximum potential, in more than one way, or innovatively? When considering your overall design, ask yourself whether you have successfully created the balance we are looking for. Craftsmanship ... is your hand-stitching even, can we see the glue you have used to adhere an item, have you paid particular attention to detail? Then of course you need to meet the weekly criteria, and finally, 'most inspiring' ... well that's a personal choice.
Good luck this week girls ... I can't wait to see the no doubt spectacular layouts you come up with and like everyone else, I wait with bated breath to find out finally who the winner of Scrap N Craft with T's Embellish It competition's winner is.
Alz :)
Embellish This - who is going to round 6!

WOW you all made it so hard for the judges and we loved all your projects and how creative you all are! it is very impressive and inspiring to see such beautiful projects.
We would like to thank you and a huge congrats to all of you that have completed WEEK 5.
Thank you to thoughs that are commenting in the gallery too, I am sure our competitors appreciate it heaps.
If you want to check out our talented WEEK 5 entrants...CLICK HERE! to go to the gallery
Being a competition, we need to eliminate people every week, or this type of compeition won't work. It is a tough job for the Design Team and we thankyou all for your understanding.
We do ask you only put in one project per person in the gallery please to keep it all fair.
Those that are eliminated are welcome to still do the challenges, but need to upload them in the general members gallery please.
We would like to congratulate the below names of who have made it to week 5 challenge.
Login names will be used
- Ingeborg
- Lindab
- melinda
- Nic
- Scrapmanda
NIC
I will send you a voucher shortly well done and a big congrats! xoxo
You are our last five and in line for the $150 voucher from our shop!.... good luck girls and a huge congrats to everyone!...
luv tanXx
Thursday, November 19, 2009
LO and sketch from Tanyah Payne
Hello everyone!....
Our 'Embellish this' comp is going really well. The projects this week are WOW and totally amazing and you all have made it very h ard for the judges.... It would be worth while checking them out and making a comment.... www.scrapncraftwitht.com.au/gallery
To day I wanted to show you a layout i did on the retreat and made a sketch if you would like to have a go...


Products used are:...
have fun
till next time
luv tanXx
Our 'Embellish this' comp is going really well. The projects this week are WOW and totally amazing and you all have made it very h ard for the judges.... It would be worth while checking them out and making a comment.... www.scrapncraftwitht.com.au/gallery
To day I wanted to show you a layout i did on the retreat and made a sketch if you would like to have a go...


Products used are:...
- Rosa Moka -Envoutante
- Rosa Moka -Coquette
- Lime Green Cardstock
- Bead Gel medium
- Purple making memories paint
- Adornit tiny stickers
- EK glitter foam stickers (these are beautiful)
- Tracey Thornes Buttons
- Mesh Ribbon
- Black and White Pens
have fun
till next time
luv tanXx
Wednesday, November 18, 2009
Inspiration comes from the strangest places by Alison (Alz) Callcott
A few days ago I was making some Christmas recipe cards for a swap I am in at ScrapChat. I had recently been to Tan’s and seen the gorgeous Bo-Bunny’s Tis The Season range and fallen in love instantly ... so I was working with those papers. As these were Christmas recipe cards I wanted to add that ‘something extra’. That ‘something extra’ turned out to be my all time favourite Christmas photo ... one of my mum and my niece from a looong time ago. Whilst making the recipe cards I was really enjoying the way they were coming together; with the photo on them, and using the sublime Tis The Season papers I started thinking about doing a LO with the same photo and papers. When the recipe cards were finished and I was checking them (back and front) the thought occurred to me ... I wonder if I could make a sketch for my LO from the recipe cards? I’ve not done something like that before. Ordinarily my inspiration comes from either the products or the photos. So I gave it a go and created a sketch.


Like most scrappers I’ve worked from sketches before but my friends often laugh at how I ‘interpret’ a sketch. Sometimes my end result looks nothing like the original sketch. This time I was determined to stick to the sketch ... LOL it was after all my own! This is the result ...

Products include...
* Bo Bunny’s Back to Basics Tis The Season pp
- Yuletide (including reverse)
- Stripe (including reverse)
- Deck The Halls (including reverse)
* Zva Creative self-adhesive Pearl – Flourish II Lime
* Kaiser Pearls – Lush
* Carolee’s Creations Adornit Alphas – Sleek Red
* A4 Acetate
* Brads – medium round cream
* Hambly Screen Prints rub-ons
To check out out these products come and visit us at http://www.scrapncraftwitht.com.au/
No doubt my friends are having a chuckle but I’m dead set certain that I can see the ‘bones’ of the sketch in my LO!! Okay (LOL) so maybe if you squint really hard! If you too have received inspiration from odd places I would love to see your finished projects and read your stories in the gallery. Please let me know I’m not the only one!!!
Alison (Alz) Callcott :)
Tuesday, November 17, 2009
Single Layout Sketch by Tanyah Payne
Hello everyone
Today I bring you a single layout sketch i have designed using images from Pickleberrypop
hope you like..
Please remember we will be looking for wonderful layouts to feature for sunday..

If you want to shop for any product check out our shop.... www.scrapncraftwitht.com.au
Please place your layouts in our gallery, we love to see what you have created... http://www.scrapncraftwitht.com.au/gallery
enjoy
luv tanXx
Monday, November 16, 2009
ScrapChat Retreat - Ohana Nov 2009
Sorry todays post is a bit late.....
We all had a ball and I know I have come home very tired. Just now i am unpacking the car and setting up my shop again! Man it is a huge job...lol!
But I enjoy everyones company and had so much fun as we all do... dressing up, singstar, challenges and more!
Here are some pics to show you all....
My Wonderful Design Team,....
yep we have leanne and Allison missing..... may need to photo shop them in i think...hehe!!!
 Where we all scrapped...
 Our Group Pic..
 And of cause our fun dress up night.... you will have a little giggle at these....


 Thanks for looking....
luv tanXx
Sunday, November 15, 2009
Gallery SPOTLIGHT
Every Sunday from now on we are going to find someone who has uploaded a layout or project in the gallery and put them in the spotlight for that week....
So Please we encourage you to share your beautiful work in our members gallery! http://scrapncraftwitht.com/gallery
This week is Vicki Bailey.
Check out her blog and beautiful work CLICK HERE!!!
Here is Vic's Off the Page that caught my attention this week.

I love how Vic has used
- the boy colours us
- How edges have been inked
- coloured the thickers foam stickers
- the title is very cute too!
A very sweet Layout and thanks for sharing Vic
Luv tanXx
Saturday, November 14, 2009
Saturday Scrapping Stimulus...
It's Saturday, and it's Kylie here again. I'm lucky enough to be on a wonderful retreat with my wonderful scrappy friends! I just wanted to share the friendship vibe with all of you with a friendly quote...


I hope you're enjoying this weekend, and fingers crossed you get to do some creating today!
Kylie
Friday, November 13, 2009
Week 5 - Embellish It Competition -- Recycle It!
Hi Everyone
It’s getting closer to the end of the comp so the stakes have been raised. The field is getting smaller and the quality of work is fantastic. Congratulations to you all who have made it to this round of the competition. I have been astounded to the quality and the ingenuity of the entries each week.
The Recycle It Challenge week is all about using your ingenuity.
There are so many items that we can incorporate into our scrapping, and every time we create, we make ourselves an item of pure brilliance.
This week’s challenge will find you testing the boundaries if you have not already done so. So here are the rules:
• Use toilet rolls – you can prepare these by microwaving for approximately 20-50 seconds
• Use something metallic tin foil or silver patty pans on your project
• Use 3 types of visible ‘paper clipping’ – staples, a variety of paperclips, safety pins, pins, brads etc
• Use a handle on your project – you can create this or buy a readymade handle. It does not need to be functional it can be purely for an aesthetic look
• Use tags in your project
• Distress your project – help age it by 'roughing up the paper & inking
• Bind your project – you can do this with various methods but there should be some form of binding shown on your project
• Use stamping
• Use stitching
• You are to use NO flowers on your project
My example shown below is a mini album made out of toilet rolls. I have included silver patty pans that I have altered using alcohol inks. Stitching to adhere my paper twist ribbon. There is some stamping, a little distressing with the Heidi swap edge distresser and Adirondack alcohol inks, lots of ‘paperclipping’, and I have bound it all together to make a mini album – there is even a handle to add a feature to the front page.


The judging criteria this week is...
- Hand made embellishment
- Best use of materials
- Overall Design
- Craftsmanship
- Met the weekly criteria
- Most punctual
- Most inspiring
Enjoy the challenge and good luck with your entries we look forward to seeing what you create for Week 5.
ciao
tracey
Subscribe to:
Posts (Atom)