


This is the not-so-fun part... Pull all the bits of the kit apart and spend some time cutting the extra tabs off. Be sure you lightly sand the corners once you're done to make sure it's all smooth. This can take a little while - I did it while watching the TV...

Using the red paint, paint all the pieces (including the edges). I used a red paint with some glitter in it - just a little bit extra Chrsitmassy! Don't go too overboard on the paint, particularly on the tabs. They're already pretty tight to fit together, and adding paint can make it very hard to fit the tabs together.
STEP 3:
Assemble the calendar. I found I had to use a hammer for most of the assembly. To protect the soft wood from the hammer I used the scrap piece of wood that came in the kit over the top.
STEP 4:

Decide which paper you want to use for the centre of your calendar, and cut a 22cm square out of it. Cut the remaining papers into strips 5cm wide and 20cm long.
STEP 5:

I used double-sided tape to cover my boxes, but you can use mod-podge or something similar if you prefer. Wrap the tap around a little box and position it so the top of the box lines up wth the long edge of the paper.
STEP 6:
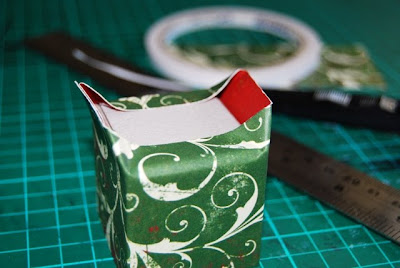

Fold the bottom of the paper over the bottom of the box, and use a 4.5x4cm piece of matching paper on the bottom to cover the edges.
STEP 7:
Cut the notch out of the fronts of the boxes.
Now repeat this process 23 more times to cover all of the boxes. Alternate between the fronts and backs of the papers to add variety in the boxes.
STEP 8:


Using some wide ribbon, wrap it around the outside of the calendar, and tie it into a bow at the top left. I held mine down with some double-sided tape, just to make sure it stayed where I wanted it to...
STEP 9: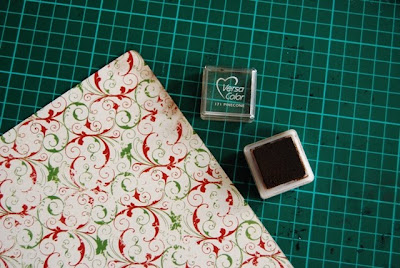
Round the corners and ink the edges of he 22cm square you cut out before. Use some strong glue to stick it to the inside square of the calendar, and stick a small clip with the strong glue to the top middle (this is so you can add a different photo each year if you want to...).
STEP 10:

Paint the letters and chipboard frame (cut in half at the corners) with the off-white paint, and ink the edges with red ink. Stick them to the calendar with strong glue (I used Glossy Accents - LOVE that stuff). Then use Kindyglitz to make them sparkle. I also used kindyglitz on all of the dividers between the boxes.
So that's it - a beautiful keep-sake that you can use again and again each year. Much better than those chocolate calendars you can buy at the shops, PLUS you can put whatever you want in the boxes - even decorations or small presents!
I considered getting 2 of these kits from Scrap N Craft With T - one as a traditional Advent Calendar, and one to use for storage in my scrap area. I can just picture it painted to match my scrapping area and filled with brads, buttons and small flowers...
I hope you enjoy your start to the festive season!
Kylie
5 comments:
I really love that advent Calendar!!!
Like you said, would even make great Storage for small findings!
Very Cool Indeed!
Nice post! Love your blog.And now following it. Please check out my blog here too...
http://dreamchymecindy.blogspot.com/
Nice post! Love your blog.
Very cool - I love it!
Wow K ... your advent calendar looks awesome. Kinda vintage, kinda shabby chic, kinda VERY COOL!!! Thanks for the tip about not being too heavy handed with the paint. Oh and I love your idea about using it for storage! You could even attach some wee little hooks to hang something not too heavy like ribbon! Oh man ... LOL now you've got me thinking!!! Alz :)
Post a Comment