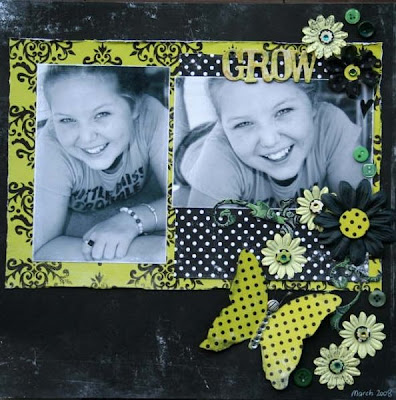
GROW - by Lisa Oxley
PRODUCTS:
CLASS
Step 1
Cut a 19.5.x 28.5cm rectanle piece of paper from the green/black flourish kaiser pattern paper
Step 2
Using your sander, sand & distress the edge of this piece of pattern paper, to finish use our finger nails to scuff and distress edge a little more
Step 3
Step4
Cut piece of black/white spot paper measuring 15 x 17cm. Distress edge and scuff also
Step 5
distress & sand photo edges
Step 6
Ink chipboard flourish
Step 7
Cut buttefly from green black spotted paper using class template
Step 8
Stamp paper flowers with scripted stamp
Step 9
Arrange all layout elements and commence securing items to base sheet of kaiser double sided black/striped pattern paper
Step 10
Add title using your chipboard lettes
Step 11
hidden journaling also can be added
Step 12
Detail flowers using bling and circle punches, detail butterfly using bling and brads
Step 13
Wind wire around brad to make "feelers", curl with a small set of pliers.
We would like to thank you lisa for this beautiful layout! It is awesome and hope you all enjoy!
Xx

PRODUCTS:
- Kaiser sublime range
- ( Please email us if you would like us to get this paper range in for you - paper kits cost $3.95 for 4 sheets of doublesided paper)
- Chipboard words
- Green paper flowers
- Green buttons
- Chipboard flourish
- Black ink
- Kaiser bling
- Brads
- Butterfly shape
- Wire
- Scrapted stamp (we can order one in if your wanting one)
- Sandpaper
- Stazon ink
- Foam mount
- White gel pen
- Double sided tape
CLASS
Step 1
Cut a 19.5.x 28.5cm rectanle piece of paper from the green/black flourish kaiser pattern paper
Step 2
Using your sander, sand & distress the edge of this piece of pattern paper, to finish use our finger nails to scuff and distress edge a little more
Step 3
Step4
Cut piece of black/white spot paper measuring 15 x 17cm. Distress edge and scuff also
Step 5
distress & sand photo edges
Step 6
Ink chipboard flourish
Step 7
Cut buttefly from green black spotted paper using class template
Step 8
Stamp paper flowers with scripted stamp
Step 9
Arrange all layout elements and commence securing items to base sheet of kaiser double sided black/striped pattern paper
Step 10
Add title using your chipboard lettes
Step 11
hidden journaling also can be added
Step 12
Detail flowers using bling and circle punches, detail butterfly using bling and brads
Step 13
Wind wire around brad to make "feelers", curl with a small set of pliers.
We would like to thank you lisa for this beautiful layout! It is awesome and hope you all enjoy!
Xx


3 comments:
Lisa's work is always amazing AND inspiring! This is a beauty too!
thanks for the show case tan
I love this one, loving the lime and black atm. Looks great Witch.
You are doing a fabulous job Tan with having guests appearances.
Hugs
Gypsy
Post a Comment