I have a new blog!

If you want to see only my creations please come and check out and follow my new blog http://www.tanyah-payne.blogspot.com
Showing posts with label KaiserCraft. Show all posts

Monday, February 7, 2011

Ruby Rock-It Summerhouse Range - A Layout by Sue Smith

Today's layout uses the bright modern Ruby Rock-It Summerhouse range and really is perfect for those summertime layouts. These patterned papers are 200gsm cardstock and are double-sided.....


Here is a list of the goodies I used to make this....

* Cardstock

* Ruby Rock-It - Summerhouse "Hot Hot Hot"

* Ruby Rock-It - Summerhouse "Streak"

* VersaColor Inkspot - Bark

* Ultra Thick Embossing Enamel (UTEE) in Zinnia and Blue Iris

* Judkins Embossing Powder - Aquamarine twinkle

* Words or Whatever (WOW) Chipboard Flourish 2 (Linda Baldock Design)

* Mesh ribbon

* Trim Curls Self-adhesive scroll ribbon

* Kaisercraft Fozz Fonts - Fonzo Alpha (white)

* American Craft Thickers - Rockabye and Sprinkles

* Docrafts Anita's Calendar Tabs

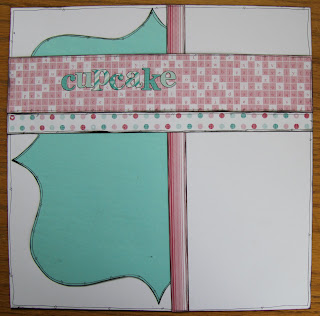
To make the layout, I took the RR Hot Hot Hot paper

and cut a large square, and then made some random triangular cuts and stuck it to the cardstock moving every second strip out a couple of cms to give that 'ray' effect.

I cut the blue portion from the RR Streak paper

and then cut a large scallop along one edge, then inked the edges and outlined with black gel pen, sticking it down so that it sat half below where the photo was going.

I stuck the white scallopy ribbon along the left hand side and added some slightly crumpled mesh over that before securing the photo in place.

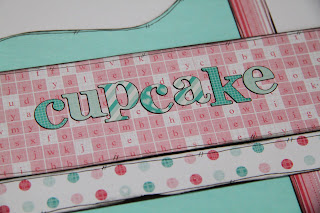
I added a title using the 3 different alphas and outlined them with black gel pen, and then attached the cute little calendar tab after colouring the edges slightly.

To finish off I found this chippy diecut from WOW that kind of looks like bubbles, and thought it would go well to embellish the layout. Here it is in it's raw state...


If I have plenty of time, I love playing around with raw chippy...it's so much fun.
With this one I covered the shape with lots of Versamark...you really do need to dab all over it numerous times to get it sticky enough as the chippy is so porous in it's raw state (alternatively you could cover it first with a paint like Gesso and you wouldn't need so much ink then). I then sprinkled it with the sparkly Judkins embossing powder, and applied heat. Then I applied more Versamark to the 'bubbles' on the shape, and sprinkled with the zinnia (green) UTEE and applied heat. I then decided I didn't like the sparkly bits, so I Versamarked over them and sprinkled with the blue iris UTEE and applied heat. Then while the UTEE was still melted I sprinkled a little bit of green over the blue in places and applied heat once again.

It's a pity I didn't think to take progress photos of all the stages because all of that probably doesn't make much sense. But here are some close-ups of the finished embellishment...


Thanks for looking at my contribution this week...hope you like it!

Don't forget that Tanyah's store is still on sale, and still open for another couple of weeks for scrapping bargains like you wouldn't believe!

See you next Monday! xxx

Monday, January 24, 2011

Unlikely Allies - a layout by Sue Smith

Hi again everyone....

Just a quick one from me today with some really cute pics of two of our animals who like to 'cosy' up together.


Here is a list of the scrappy stuff I used...

* Kraft cardstock

* Kaisercraft Cocco 'Periwinkle' - an oldie but a goody

* Kaisercraft Pet's Paradise 'Furry Friends' - another blast from the past

* Charcoal VersaColor Inkspot

* 2Crafty large chipboard cat

* Clear UTEE (ultra thick embossing enamel)

* American Crafts Thickers 'Prancer' white chipboard letters

* Black sharpie pen

* White Gel Pen

* Assorted ribbons

All scrapping items are now heavily discounted at Scrap 'N' Craft With T....you won't find any better bargains ANYWHERE at the moment!

Happy scrapping until next week! xxx

Wednesday, December 15, 2010

Guest book - Nic Amber

This week I thought I'd share a guest book I've made for my nan's 70th birthday party this weekend.  These are a great gift idea for those special occasions where a lot of friends and family are getting together...people can simply sign their name or leave a special message.


Along with messages and well wishes, I've also featured photos throughout to showcase Nan's life.


To make the album:

I've used a Kaisercraft chipboard album as the base for the guest book.

I have used the Jazmyne range of papers from Bo Bunny but you can pick any papers that will suit the occasion - choosing papers from the same range will help you co-ordinate much easier.  I have used patterned paper for the front cover and then cardstock for the other covers.


To get the right shape, I just laid the chipboard shape over the paper, traced around the shape and cut it out with scissors.


I have embellished the front cover using:
 I chose a quote to be the focus on the front cover, but you could put a photo, name or the occasion instead.

 I cut out flower and leaf shapes from the patterned paper and incorporated them into the embellishment cluster.

I added '70' with alpha stickers and blinged it up a bit using some rhinestones.

For the inside pages, I inked around the edges with some Distress ink to help it all blend in.

To attach it all together, I've used some album rings and then added some ricrac, ribbon and lace.

Well I hope she likes it....thanks for looking.

Happy creating!
nic...xxxooo

    Friday, October 8, 2010

    'Strong'; a step-by-step single layout by Ingeborg Dijkstra

    I took this picture of my husband recently. When I saw the KaiserCraft Offshore Collection, I knew the colours would look perfect together! I have loved KaiserCraft papers for years now, because of the versatily and the fact that they are double-sided too! I started with a sheet of 'White Cap' paper (see below).
    On the back of this paper was a wavy pattern, which I decided to cut out. I also added a strip of the striped 'Tide' paper.

    I placed my photo a bit under the light blue curve and I also stamped some flourishes in the corners (sorry I didn't take a picture of this).
    I wanted to add a personal touch to the layout and decided to grab one of my favourite products: the Bazzil In Stitch Template Formal Flourish:
    I wanted to keep the wavy pattern going, so I chose this template:

    I first pierced the holes and then I handstitched the flourish in blue.

    The layout looked like this at this stage:

    I used another sheet of the Offshore Collection ('Breaker') to further embellish the layout. I cut a journaling tag from the sheet. I cut some of the orange and blue 'splashes' out of the paper too.
    Using foam dots I stuck the splashes on the layout. I also inked the edges to make them stand out a bit more.
    I wrote the following Scripture on the tag:"That’s why I take pleasure in my weaknesses, and in the insults, hardships, persecutions, and troubles that I suffer for Christ. For when I am weak, then I am strong." 2 Corinthians 12:10
    Done!

    Friday, February 19, 2010

    Step By Step Layout 'Cupcake' by Ingeborg Dijkstra


    Materials used:

    Instructions:

    • I doodled a frame all around the white cardstock.


    • Using my 'Orchid' template I traced and cut a shape out of the teal cardstock.
    • I doodled around the shape to give it some more dimension. I placed the shape to the left of my page.
    • I placed a thin strip of paper on the right side of the shape (slightly off centre).

    • I cut a thin and a thicker strip out of the patterned papers and placed them across the page.
    • I added a title 'Cupcake' with the Alpha Stickers. I outlined the stickers with black pen.


    • I used three vertical photos. I cropped two of them to make them fit vertically.
    • I added some journaling and two die cuts (the scalloped strip is one of the die cuts).
    • I doodled all around the papers and shapes to make them stand out.

    • I decided to add 'something handmade' to the page. I made flowers out of tissue paper (the kind that you can get anywhere in the gift wrapping department).
    • I folded the paper a few times and punched a few dozen 1" circles ( see picture 1 below).
    • PLEASE NOTE: if you try to punch though only one or two layers of tissue paper, it will most likely not work and you could damage your punch! I punched 8 layers at the time and that worked fine!
    • I put about 20 punched circles on top of each other (picture 2).
    • Using a hole piercer I pierced a hole through the punched circles (picture 3).

    • I put a piece of wire through the bead and twisted the wire a few times (picture 4).


    • I put the wire through the punched hole (picture 5, 6 and 7).

    • I cut a bit of the wire so it won't stick out (picture 8).


    • I 'separated' the wires to make it 'stick' (picture 9 and 10).
    • The pearl is nicely centred in the middle (picture 11).

    • Using my fingers I crinkled the paper to make a flower shape (picture 12).


    • Using my 'Jewel Templates' I added the final touch with some bling swirls and a cute bird.
    • I also punched some branches and added them under the tissue paper flowers.

    • Done!