I have a new blog!

If you want to see only my creations please come and check out and follow my new blog http://www.tanyah-payne.blogspot.com
Showing posts with label Bling. Show all posts

Monday, November 15, 2010

Cutie In Clover - a layout by Sue Smith


For today's layout, I have used lots of different bits and pieces from lots of different brands, but featuring a gorgeous patterned paper from the Jillibean Soup Old World Cabbage Stew range. This particular paper from the range is called 'Brown Rice'.

Using this paper, I cut a large square (approx 20cm x 20cm) to use as a mat for the photo. Because the paper is quite a busy pattern, I decided to help the photo stand out by painting the area immediately around the photo. For this I used a small square of packaging material and lightly dabbed on some Making Memories Paint in the colour Manila....


I then cut a clover shaped pattern into a strip of the paper, and then inked the shapes with Versa Color Ink Spots in the colours of 'Evergreen' and 'Indigo' and then placed these shapes behind the inked large square of paper.

The butterfly embellishments are A2Z Scraplets Li'l Range - Butterflies which I embossed with Suze Weinberg UTEE Brightz (ultra thick embossing enamel) in the colour Zinnia. While the UTEE was still hot and melted I sprinkled with glitter and applied heat again to set the glitter....


Here is a list of the rest of the items I have used on this layout...

* Chromatics Cardstock - Cream

* Japanese Washi Tape

* Chelleybean Designs Paper Lollipops which I scrunched up and inked with Versa Color Ink Spot in Burgundy

* AC Thickers Rockabye Foam Letters in Leaf

* Crate Paper 'Restoration' Self-adhesive Chipboard

* Ruby Rockit- Upstairs/Downstairs - Felt Frame - Cream decorated with Kaisercraft Rhinestones in 'Lippy Red' and 'Split Pea'

* Sam & Lucy - Weave Extras - Teeny tiny letters - 4mm black

Happy scrapping everyone and see you for something new next Monday! xx

Saturday, November 6, 2010

Hi there!


Hi there, fans of Scrap N Craft with T!


It's Sarah here - the newest Dt member. Some of you may know me from Scrapbooking Memories magazine, some of you may not know me at all, lol.


I hope I can bring along some inspirational Tips and Techniques to share with you here. I got my first Kit from Tan only a day ago and I couldn't wait to get my hands on this wonderful paper from Fancy Pants! It simply cried out to be turned into a Shabby Chic card...


Here I used Fancy Pants "Wishful Thinking" paper range, with some Sam and Lucy Weave Pink gems strips to help scallop the bottom edge of the card. I used both the front and back of the Fancy Pants paper as well as some extra embellishments and paint to create a feeling of depth without the whole card looking "overdone" (I hope). I also painted some Tattered Angels Glimmer Mist in Lipstick Pink around the journaling spot to make it sparkle. Last but not least, I added a few different sized flowers to the top and bottom of the card greeting.


So, here are a few tips for you to take from this little card:

* Bring out the fancy edged scissors again. When you use them repeatedly with a plain white cardstock the effect can be both textured and unfussy.

* Layer your papers and embellishments for depth and dimension.

* Don't be afraid of colour - you can always tone it down by introducing white or black cardstock into the card or page.


So there you go - a very quick and easy card, made with literally 10cm of patterned paper, some card and some embellishments. By simply adding a touch of texture, it looks more exotic.

Have fun creating everyone!

Sares x

Monday, October 18, 2010

Step by step layout by Tanyah Payne

Hope the weekend was a wonderful one for lots of you out their, Thankyou to so many of you that pop in here and check out what everyone is up to. We get a buzz when you comment, for your feedback  makes it all worth while.

With all this new product coming into the shop lately I had to have a play. As some of you may know texture & mess is my world within scrapping. Getting  your hands a bit dirty is heaps of fun!...

So I have decided to use the Dark Room Door NEW products Viva range - Ferro. Man alive this is like a moose like texture to apply you can almost eat it....lol. BUT when it drys the colours are so vibrant, with a sand paper like texture.... it is a fun product to work with and would recommend it to anyone that LOVES TEXTURE......


Here is my creation from friday night... early morning....lol!

Products used:

Check out Nic Creates NEW COLOURS of Rolly Roses... they are divine and beautiful to work with.

  
  1. Using a place and white patterned paper like Bella Melrose Vintage pattered cardstock your then able to colour your paper any way you need to match your photos.
  2. Place your paper on a mat or inside a box and spray your Glimmer mist: key lime, yellow across the page. Change over to other colours you require
  3. Leave to dry
  4. Find your Crafters Workshop Templates - Swirls and place over your page as desired
  5. Using your finger or a pallet knife use the Dark Room Door - Viva Decor - Ferro - Silver quite generously and lay it over your template. When covered areas are finished take your template off and wait for it to dry. I did use a heat gun to speed this process up a bit.
  6. Using one 5x7" photo and 2 smaller 4x3" photos I sanded the edges and places where i wanted them to go
  7. At the top left corner i cut out a shape and placed Felt in the missing hole
  8. Using a scallop ruler/ using your corner rounder punch and make a template. I then made a scallop border out of Felt and placed at the bottom of the photo.
  9. Lay  Lace over the top of the Felt
  10. Using  Nic Creates, - Rolly Roses - Purple mix  I created my flower cluster along with adding the pearly bling flower from Prima Swirls/flower blings flourishes.
  11. Placed a raw 2 Crafty chipboard swirls under the  Nic Creates, - Rolly Roses - Purple mix  flowers 
  12. Using the Prima Swirls/flower blings   cut a small amount and placed it at the top left of the page.
  13. Then using the Bella - Fundamentals - felt butterflies  and placed these on the swirls.
  14.  


Thankyou for reading and hope I have inspired you to create your own paper beyond what it originally was.
If your after any of these products please click on the links or go to our shop
www.scrapncraftwitht.com.au. We will do our very best to help you.

Till next time
have a wonderful Monday
TanXx
Tanyah Payne.

Sunday, October 17, 2010

Using Layout Kits - by Annie Zorzo

Have you ever tried using a layout kit?  You'll find that everything you need is there in the kit already cordinated, and not necessarily with papers from the same range, so you don't have to go matching things up.  You can use it to make more than one layout and with the leftovers, and there generally are left overs, you can make up some cards!  So this week, I've used a monthly kit of Tanyah's to make a layout.

In the kit, I had (the ones with an asterisk are the ones I used on this layout):
And this is what I come up with:


To make a layout like this:
1.  Trim the Floral Lace Paper to the shape I wanted. 
2.  Peel the self adhesive backing off the lace paper and carefully put the lace paper down somewhere with the sticky side up.
3.  OPTIONAL STEP...I used the pale blue cardstock, but I wanted it even lighter, so with the back of the lace paper that I peeled off, I used some blue tack and stick it to my cardstock where I wanted the lace paper to eventually go.  I then used white paint and a dry brush to daub some white paint on the cardstock.  In hindsight I didn't really need to use the backing paper to do this as I could have just daubed stright onto the cardstock, but I thought I'd let you know incase you want to use the same masking technique on another project!!!  Here's how it turned out anyway!

4.  Stick your lace paper down onto the card stock.  I defined the straight edges of the lace paper with white painted dots.
5. Pleat some mesh ribbon along the bottom edge and top this with twisted lace. You may have to secure it in places with some staples

6. From the Savannah - Fairy Dust paper, cut around the flowers and the fairies, ink the edges and slide behind the upper edge of the pleated mesh ribbon

7. Cut a 5 inch circle from the Little Sprout - Baby's Breath paper, ink the edges and place on the right hand side about a third of the way from the top.
8. Sand the edges of your photo and slide behind the flowers and the faires and over the left edge of the circle
9.  Finish with the Kaisercraft Rhinetone word, teeny tiny letters and flower sprays.   I also added some pearl scrolls that were not in the original kit but I just like them and wanted too!!
So if you want to take a bit of the guess work about which papers and embellishments to use, go for a kit.  You'll be surprised by what...and how much...you can come up with from just one kit. 

Enjoy your day.

Monday, September 27, 2010

A Patterned Background Technique - layout by Sue Smith

My layout this week features a technique to create an original background for your layout or card using ribbons, lace and fabric (or whatever else you choose to use).


For this wedding photo I wanted to use the Bella Diecut as a shaped layout rather than the traditional square. Sometimes finding the right patterned papers for wedding photos can be a bit of a challenge, so I came up with the idea of attaching strips of texture as an all-over background. I love the combination of white and cream, flowers and lace, for wedding photos, and this layout indulges all of that.

First of all I raided my stash and found lots of white lace, ribbon and fabric and started to lay it across the diecut background. I swapped lots of bits and pieces before I came up with the final configuration.


Once I was happy with how it looked, I stuck down each of the different strips with Pritt Power Gel, using little blobs in places that couldn't be seen, and when the glue was dry, I then stitched around the edge to secure all the layers.


Then I trimmed the excess from around the edge, so that it looked like this....


After that, I attached the photo which was sanded around the edge and mounted using foam double-sided tape to raise it up over the lumpy bumpy background. I then added lots of flowers in cream and white, plus pearl and rhinestone bling.


Here is a list of the items I used for this layout....

* Bella Damsel Paperz in cream

* Weave Extras tiny teeny stickers

* Yillup Designs Beaded Crocheted Centre in silver

* Kaisercraft Pearl Bling

* Kaisercraft Rhinestones

* Kaisercraft Rhinestone Words - Cherish

* Assorted flowers

* Upstairs Downstairs - Felt Frame Oval

* Birch Pearl Trimming in white

* Green Tara - Organza Flower Glitter Design

* Assorted lace and other trim

Hope you like this technique...it's a great way to use up bits and pieces of lace and ribbon (or an excuse to buy some beautiful new ones). Until next Monday...happy scrapping everyone! xxx

....and go the St George-Illawarra Dragons!! :) (my home team)

Wednesday, August 18, 2010

Double layout by Tanyah Payne along with a sketch to try...

Today I wanted to show you a double layout I (Tanyah Payne) created using the Ruby Rock-it- Summerhouse range. It is bright with all the oranges, teal/blues, limes and is fantastic for many different themed projects. If you want to see more projects that I  have created for BELLA click here! you can also create my mini album I am honoured to be able to teach at SIA (scrapbooking Industry Australia) using this lovely range...

If you would like to create this project remember we have till the end of the month our 25% off all papers, kits and cardstock for you to enjoy!


Product List.

 Here are some Tips to try....
  •  Using your cuttlebug emboss your chipboard, ink and go over the top with a lighter coloured ink
  •  Using raw chipboard can be fun along with painting them too. 
  • Creating textured leaves on the tree, i have used maya resist and left it on then painting it.
  • Templates are my friend...lol! why not use the negitive and positive of your cut out shapes, tear/distress the edges 
  • Use sequin ribbon as a title
  • Cut circles under the chipboard tree shape to give the tree a different look.
Note: the circles on the tree was inspired by Alison Callcott... thanks heaps alz xoxox
and the sequined title was inspired by Melinda Spinks... thanks so much Melinda xoxox


Here is a sketch for those who would like to have a go, no limit of time it has to be done by but if you want some inspiration and have a go. We would love to see in our gallery..
www.scrapncraftwitht.com.au/gallery


Have a wonderful creative Wednesday everyone
thankyou for stopping by and please feel free to comment
enjoy
luv tanXx

Wednesday, May 5, 2010

Using up your stash with tips & Techniques - By Alison Callcott

Today Alison Callcott has designed a beautiful layout of a forum friend and using up her stash. Alz has included some tips and techniques that she used on this layout..

Perfect Moment
*   Crate Paper Blue Hill Collection
*   Fancy Pants DTC Creative Cards Notecard Journaling Prompts
*   ScrapFX Wordlets – Moments
*   Collections Elements B&W Letter Tiles - Medium
*   Green Tara flowers
*   Prima Got Daisies flowers 

*   Prima Artful Collage flowers 
*   Prima Voila die cut art strips (white)
*   Prima Say It In Studs
*   Kaiser Pearls – Bliss and Champagne
*   Making Memories metal brads
*   FolkArt Papier Glass Finish – 1764 Antique
*   Inkssentials Glossy Accents


Tips/Techniques
*   If the colours or papers you want to work with for a particular photo don’t actually match your photo, print it in black or white or sepia.  Printing this photo in sepia enabled me to scrap it with lovely, warm, coppery tones.


*   Applying Glossy Accents (or Dimensional Magic) to raw chipboard helps to draw attention to the chipboard without it overpowering the LO.


*   Lightly sanding the edges of your patterned papers and photo can give your LO a lovely rustic look.


*   Don’t forget your bling!  The tiniest bits of bling can turn something ‘okay’ into something really special.


*   When working with Prima bling swirls (in this case the copper studs) don’t forget that you can alter the shape of the swirl by gently manipulating the swirl or by cutting it where needed.


Thankyou Alz for this gorgeous layout and tips and techniques.


hope your all have a wonderful day
thanks for stopping by
luv TanXx

Sunday, April 11, 2010

Score Pal with Susan Luke

Here is our first layout by Susan Luke. 
Materials:
First choose your photo and mat.


Now cut a wide strip of paper for the middle of your layout from the Coordinations cardstock. Crumple it up and smooth it out again.


Use the Rose Red ink to highlight the crumpled folds and add interest to the piece. I also sanded the edges of it and scuffed it up a little


I wanted to use some of the other side of the paper, so I 'stole' it from the middle. I laid my 12" x 12" scrapbook paper out and measured how long it was, then flipped it over and took the middle pieces I wanted. 


When I was done taking the pieces out, I lined up the 12" x 12" paper again on the original measuring points so I could add my own centre and have it wind up measuring 12" x 12" again.
I then brought my harvested bits around to the front of the page and taped them where I wanted them to be.


Next I taped the red cardstock to the front of the layout as shown.


And then I sewed a double line of black stitching around it with my sewing machine. I took the black netting and pleated it up on either side of where the photo would be, then sewed it to the layout as well.


I thought the photo mat I chose was too bright so I inked the edges with Taken with Teal ink.


To make a little flower I rolled some sheer ribbon into a circle


And stitched it in the middle.


Then I spread out the 'petals' and stitched them in place. After that I added a flower and a button to the top. I added in some more flowers and buttons, some bling, my journaling tag and a title, and I was done!


Thank you susan for this lovely layout... 
Hope everyone has a lovely sunday

luv tanXX

Friday, March 5, 2010

'You're the coolest' - Quick and easy layout by Ingeborg Dijkstra

Materials:
Instructions:

Sometimes I really like making quick and easy, no fuss layouts. If you use paper and stickers from one collection, this is easily done, because you know it always matches! I used a plain sheet of cardstock as a base and punched 10 squares (2" each) out of the patterned paper.

The 'Element Stickers sheet' already had the title 'You're the coolest', so to keep this layout quick and easy, I used those for the title of my layout. I also added my photo.
The sticker sheet also has a few circles and flowers on it. I placed a few at the top left corner and some at the bottom. I used the arrow sticker to point to our daughter, since this layout is all about her. The stickers are so easy to work with and are strong, so they don't tear easily !

I used some Prima flowers and some punched flowers to have a nice 'flow' of flowers at the top and bottom. I added some bling in the centres of the flowers. Done!
Friday, February 26, 2010

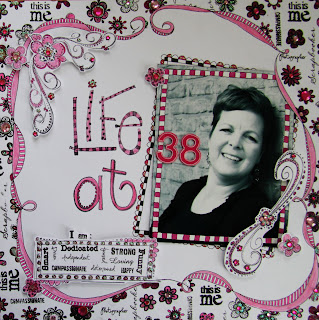
'Life at 38' Step by Step layout by Ingeborg Dijkstra


List of materials:

Techniques and instructions (click on the picture above to see more details):


  1. To create a white border I used correction tape on all four sides.

  2. I outlined the white strip with black pen.

  3. I coloured a pattern of pink onto the correction tape and added the number ‘38’ with stickers. I outlined the stickers in white.

  4. I stamped the word ‘life’ onto a white sheet of cardstock.

  5. I doodled a ‘funky border’ in pencil (hard to see on the picture, sorry). I also stamped the word ‘at’.

  6. I drew random curls on each side of the paper.

  7. I added a ‘double line’ around my doodled border to create more dimension.

  8. A close up look at the double doodled border.

  9. I traced the outside doodled border on a thin sheet of 12x12 paper.

  10. I cut around the lines to create a mask.

  11. I used different stamps with suitable words and images to create a unique background.

  12. Using the hand cut mask I stamped all around the page.

  13. I removed the mask to reveal the background.

  14. I used pencils, markers and pens to colour the images.

  15. Using a craft knife I cut a slit in one of the corners.

  16. The slit is only a few centimetres long.

  17. I tucked one of the corners of my photo under the slit.

  18. I used different stamps for my journaling block.

  19. I added some more stamped images to embellish the page.

  20. I added rhinestones to finish the page.

Tuesday, February 9, 2010

Single Step by Step single Layout by Marnie Sanford

WALK WITH ME


Materials needed


1. Choose 1 4x6 portrait photo. Gather matching papers and embellishments.

2. Cut the green patterned paper down to 11x11inches and distress the edges before adhering to the black patterned paper.
3. From the patterned papers (Palm Beach, Sugar Syrup and Coconut Cream) cut out the patterns, including the flamingo in circle and several of the coloured spots.
4. Cut the branch strip from the Palm Beach Paper and ink the edges. Layer this with the photo, and handcut embellishments as shown. Attach using foam tape for added dimension. Distress the edges of the small coloured spots first.


5. Ink or paint the chipboard letters for your title and arrange it around the curves of the handcut images, attaching bling as shown to make them stand out.

6. Staple a strip of the sequined ribbon across the bottom of the branch strip. Layer mesh ribbon, flowers and leaves across the bottom left hand corner of the photo.

7. Attach a rubon to the right hand side of the title and use foam tape to attach a butterfly as shown.

Thankyou Maz for this gorgeous layout!, I really love how you have used the heart shape for your centre of the flowers and stapled your sequin ribbon... love it!

thanks again for looking
luv tanXx