I have a new blog!

If you want to see only my creations please come and check out and follow my new blog http://www.tanyah-payne.blogspot.com

Sunday, June 6, 2010

Last Day for Registering for Comp.Winners & Pics of the Opening Day


After a very scary week and news of the tonnato at Lennex Head and the rain just wouldn't stop we were extreamly blessed to have perfect weather for our opening day!

Thankyou to so so many people that made our opening day so successful! Quite a few Brissy and Gold Coast girls made a special trip to see my shop. Also So so many locals that were able to join in the fun and pick up lots of bargains that were only available on the day. We were unable to do any make and takes until later in the afternoon for we had all hands on deck serving and helping so many of you! These were the only pictures i took of the day for after this it got so crazy their was not time for anything but serving. I hope your all able to pop in again  and have a chat and answer any questions i didn't get to do on the day.


We would like to thank Manda for donating a ‘Made X Manda’ bag and camera strap for the lucky door prize. This was extremely generous of you. And I am very sure the winner will love it too! Anyone that would like a strap are welcome to send me an email and I can help them get the desired strap/bag they would love to have.

There are so many thankyous that need to be said…

  • My family who put up with my late nights preparing for this event and helping me with bits and pieces.
  • My Mum who made the signs so everyone can see where to go! And helped with baby sitting little Reis So sar could work hard helping me.
  • Shazz Pratten, Nicky Amber and Sarah Rickard, my very dear friends who slaved and worked so hard before and on this amazing event. THANKYOU and mwah!
  • Also Shazz’s Daughter Katelyn, thankyou for looking after all the tickets and guessing competitions for us, you did a fab job! Xx


  • Thankyou to the Wollongbar Public School P & C. for the bbq and orgaising the lamitons and real coffee it was wonderful of you to do this and very much appreciated.


Now that everyone knows where I am we hope to see you all regularly for classes, pop in to say hi, or even our FREE Friday night crop & technique nights.

The winners of our opening day is...
Lucky Door prize - Dayle Mornson

1st prize  - Wendy Flanigan
2nd prize - Jane Davenport
3rd prize - Wendy (from spotlight)

Ribbon guessing  - Their was 88 metres of ribbon and the winner is Kate Easton with a guess of 90 meters. You will get a phone call soon for you have won a $10 voucher to spend at our shop

Flower Guessing - Their was 484 flowers in the jar and the winner is Marnie Sanford with a guess of 494. You will get a phone call soon for you have won a $10 voucher to spend at our shop.

*******************************************

NOW LAST CHANCE TO REGISTER FOR OUR COMP IS


TODAY…..


Click here for more details……CLICK HERE!

Anyone that has registered will receive an email from me by tuesday, if you haven't received one please email me!
****************************************

Hope everyone has a wonderful sunday
take care
luv tanXx

Friday, June 4, 2010

Scrap N Craft with T's Shop Opening Celebrations. Saturday 5 June 2010

Firstly I would like to thank my dear husband and kiddies being so patient with me while I get all this done, putting up with me staying up and away past midnight most nights. Also my amazing and very kind dear friends Shazz Pratten , Nicky Amber and Sarah Rickard for all your help and hard work in getting everything together and helping me out.

The feedback I have received has been amazing and thankyou for your kind facebook and email messages and good luck wishes. I appreciate it heaps and can't thankyou enough!

I can't wait to see so many of you on Saturday and I know some of you are coming from Brisbane and the Gold Coast and am sure you will enjoying a bargain or two and have so much fun!

We will have a few of our Design Team Girls here as well so if you want to meet them this is a fantastic oportunity! can't promise which times they will be here though.

  • Massive SALE and celebrations - This saturday 5 June 2010
  • Shop address is 47 Northcott Cre Alstonville 2477. Russleton Industrial Estate.
      Directions...
  • Turn into Russleton Industrial Estate from the Bruxner Hwy
  • First Right
  • Go to end of the street
  • Turn Right
  • Opposite a vacant block and Agimac Macadamias
  • Next to Sailfish Marine(boat factory)
  • Look for the signs and ballons on the day!
  • Phone if needed is 0458217911

We are extremely grateful for all the suppliers that have come on board to help out with giving away such a wonderful goodie bags and prizes...
and Floursh with bling! 
and Celebrations of Australia


Your all so kind and I am sure we will all love what is inside the goodie bags and create amazing things with it. THANKYOU!!!!!!

I better be going, have lollies to purchase and make and takes or organise for everyone to enjoy!
see you their
luv tanXx

'Scrapping on a budget' layout by Ingeborg Dijkstra


A couple of weeks ago I created a layout for less than $ 1.00 and I have had so many wonderful responses that I thought I'd do it again! This layout was made using one sheet of cardstock and a piece of Prima packaging and other stuff I had in my stash. I do love buying new products, but with this layout I want to show you that you can still make a funky, colourful and balanced layout without spending too much!

List of materials I used:

I started by distressing a sheet of slightly textured pink cardstock. Using a ruler and pencil, I marked a square on my layout (about an 1.5 inch / 4 cm from the border, see picture 1). I used die cut letters for my title. If you don't have a die cut machine, you can also use a chipboard alphabet (or whatever you have left). I placed my title on the left (see picture 2 and 3).

I removed the die cut letters and traced the pencil lines with a black marker. I wanted to make the letters stand out, so I stamped dots on them. I cannot remember the brand name of the dotted stamp, sorry.

I used the 'negatives' from the die cuts to define the area I wanted to stamp. I used them like a mask or stencil (see pictures below). If you want to skip this step, you can also choose to doodle in your letters ...
I have a package of 'Say It In Crystal Flourishes' by Prima. These bling flourishes are gorgeous, but I didn't want to use them, since I wanted to make this a BUDGET layout. So ... I opened the package and carefully cut out one of the swirls. Using my scanner (see pictures below) I printed the swirl. I put the cardstock on top of the printed swirl (yes, I held it against the window when the sun was shining to create my FREE light box ) and used my black marker to make 'dots' following the printed shape. I still have the original bling flourish to use on another layout!

Whilst opening the package of bling swirls, I couldn't help but noticing the super cute black and white dots. So ... I used the packaging instead of patterned paper. You can see the barcode on the picture below. I chose to cover the barcode and product name with ribbon and a picture, but it is quite funky to even have that shown on your layout too!

I went through my stash to find a matching piece of ribbon. I also had some leftover paper from the Bella Grace collection. I used the black and white paper to cut out three flowers.
I added some lime flowers from my stash and punched three little white flowers and finished off with a pink rhinestone in the middle of each flower. Done!

Thursday, June 3, 2010

Fancy Pants - Rusted Sun Paper Collection, Layout by Sarah Rickard

Just check out the new Rusted Sun Collection from Fancy Pants!  It is nice, bright, funky and just gorgeous! 

It is such a versatile range.

Here is the layout that I have done using some of the papers.


The products I have used for this layout are:-

*  cardstock, fabric, machine sewing, staples

I would love to see your layouts in the gallery.

Happy scrapping,

Sarah xoxo

Wednesday, June 2, 2010

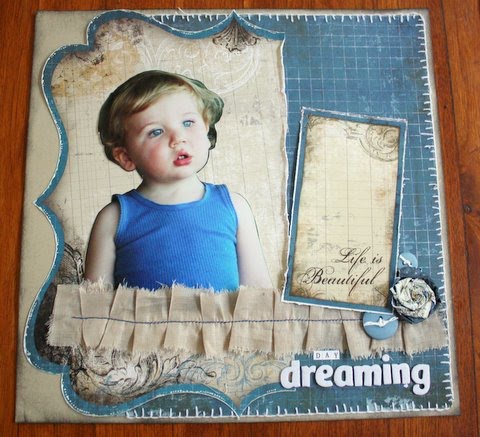
"Day dreaming" Step by step and handmade flower by Nicky Amber

I have used the Bo Bunny 'Mama Razzi' range for this step by step.  I've found this range is really versatile. The obvious themes include photography, male, vintage, heritage, graduation but can be used for many more...

Materials used:
               -  Mama Razzi Cut-outs            
               -  Mama Razzi Shutter
               -  Panorami die cut
               -  Mama Razzi Tabloid                             

Step 1.  I used the kraft cardstock as a base and inked around the edges with black ink.


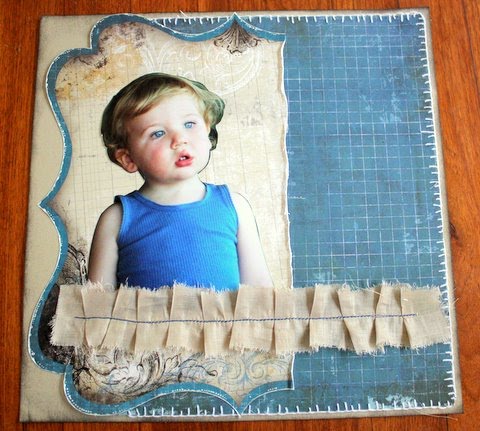
Step 2.  I cut the 'Shutter' patterned paper to 9 inches wide by 11 and a half inches.  I then blanket stitched around the edges of the paper (alternatively you can ink, paint or doodle a border around the edge).  I only stitched around three edges because the fourth won't be seen.   

 I then attached it to the right-hand side of the kraft base.

Step 3.  I cut the 'Panorami die cut' paper at around the two thirds mark.  
(Tip:  I love the die cut papers but they are a little bit more expensive than regular patterned paper so I usually cut them this way so I can get two layouts out of the one die cut paper).

I wanted to define the edge of the die cut paper a bit more so I outlined it with some liquid pearls to make it stand out. I then attached it to the left-hand side of the layout.

Step 4.  I cut my photo out as a silhouette and then placed that on top of the die cut paper and then placed a pleated fabric strip over the top to hide the bottom of the photo.


Step 5.   From the 'Mama Razzi Cut outs' paper I cut out the 'Life is Beautiful' frame and attached it to the layout.  For the title I used the Carolee Creations tiny milk chocolate alpha stickers and some fabric thickers.


Step 6.  Making the handmade flower.
 
To make the handmade flower, I cut a circle from some scrap paper the size I wanted the flower to be.  I cut a three quarters of an inch strip (by 12 inches) from the 'Mama Razzi Tabloid' paper and then crumpled it up...


then twisted it.............


Spiral the paper around as you twist the paper.
For the outside layer I just twisted the paper so that the opposite side of the paper was showing.  I glued it onto the circle and attached it to the layout.

Step 7.  I tied some paper string ribbon through two buttons and attached them next to the handmade flower.
And that's it!  Happy creating...

Please feel free to put your layouts into the Scrap N Craft with T gallery.  We love to see them and welcome projects of all levels and abilities. 


Don't forget...

Tuesday, June 1, 2010

Step by Step layout by Lisa Kamphius using the Jillibean Soup collections


If you love small prints than  Jillibean soup is a range you will love. Lisa has done a layout using the below papers and it has turned out adorable!
If you would like to purchase any of these papers please click HERE
 Here is a couple of the papers Lisa has used in her layout...

Sideways Ponytail using Jillibean soup papers by Lisa Kamphius

1.        Use the Kraft  coloured   cardstock as your base
2.       Cut “ brown rice” red side to  10 inches x 5 inches. Distress edges

 3.       Take “ red peppers”  paper and cut to 4 inches by 8 inches
Distress edges
4.       Use cherry  side of “brown rice paper and matt your photo
5.       I have used a  2 inch  strip  of  red  peppers – the  striped side and  used a scallop border punch.  Or  you can handcut your own.


6.       I have taken 2 strips of red twine and tied them together at the ends and attached across  the bottom of the photo
7.       I have used a white floral spray at the left side of the photo and attached  a  small cluster of  flowers at the top right  side of the photo
8.       I have punched a  butterfly  from the  scraps and doodled  a trail behind her.
9.       Add title and  journalling

This is amazing Lisa and thankyou heaps for sharing with us. Hope Lisa's layout inspires you to have a go using these lovely papers.
till next time
enjoy your day
luv tanXx