I have a new blog!

If you want to see only my creations please come and check out and follow my new blog http://www.tanyah-payne.blogspot.com

Thursday, December 31, 2009

Layout by Leanne Stamatellos and a sketch

Today we have a wonderful layout by Leanne Stamatellos.

With Christmas just gone by you may have lots of pages to do now!
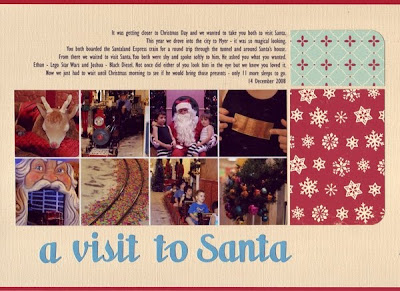


I love how Leanne can fit so many photos on one A4 page! it is amazing and love how it is always so neatly placed together!

If you would like to see more Christmas layouts by Leanne ... CLICK HERE!

Thanks Leanne for sharing with us xx


Here is a sketch if you would like to have a go at creating your own layout... and as a further challenge try using these colours for something a little different!

  • cream
  • teal
  • red


If you are having trouble uploading, this gallery requires pictures to be reduced to 100k in size and we have a script code to stop spamers! Annoying I know, but a must in the world we live in.

We would love to hear from you if you have any questions... email us at admin@scrapncraftwitht.com.au...

We have some Christmas ranges you will love at Scrap N Craft with T...CLICK HERE
also see our Bo Bunny Range 'tis the season' , Fancy Pants paper range 'Frosted' , Cosmo Cricket Range'jolly by golly' .

Thanks for sharing Leanne and we can't wait to see what you all come up with this sketch.
luv tanXx

Wednesday, December 30, 2009

Today I wanted to share with you another Distressed Ink Technique, This can be done with other inks too if you want to give it a try...


There are new distressed inks on the market and we will get them in as soon as they arrive in Australia!

Step one
  • Choose what colour distressed inks you would like to use
  • Spread the pad over the top of the soft craft sheet
  • Try not to let the colours touch each other
  • NOTE: you can do the same with re-inkers if you want to
.

Step two
  • Lightly spray some water over the top of the ink
  • NOTE: only light...
  • Now you have some droplets on the craft sheet
  • Place the doily/paper over the craft sheet and slide one way...


Step three
Ink around the edges using your sponge


have fun!
Luv tanXx


Remember to check out our specials at the moment, you will find some bargins you can't resist in the special section!...
http://www.scrapncraftwitht.com.au/

Tuesday, December 29, 2009

MEGA SALE at Scrap n Craft with T... papers as low as 55c and MORE!!!


To CELEBRATE THE NEW YEAR come and

check out our
special section!

you won't be dissapointed there will be bargains gallore!....


We are adding more and more, check frequently to see what bargains we have for you!... This sale will end 31 January 2010.....

Be quick to grab the best products on sale!

WE WILL PLACE A FREE GIFT for all orders over $20 whether they are items on special or not!...


Please note:
  • We are unable to combine vouchers and specials together
  • All orders with sale items will be charged $8.50 postage.
  • Thankyou for understanding
See you there and have fun!

luv tanXx

Monday, December 28, 2009

THE THOUGHT BEHIND THE PROCESS

Hi Everyone,

No doubt you are still recovering from a fabulous Christmas and looking forward to Thursday nights celebrations and bringing in 2010 with a hip hip hooray.

This week i  found myself creating - i have no idea how i found the time, but i squeezed it in. I had some pictures that i really wanted to use but the only piece of Kraft cardstock that i had was crumpled on the edges. Don't you find that annoying when your papers and cardstock get destroyed on the edges from all the handling.

So i decided that i would create a feature for this page using a rolling technique on the edges to hide the crumpling. Its very easy to do -  i just worked my way around each edge and rolled the edge between my fingers, back and forward until i achieved what I was happy with.

I then found a cardstock strip, and layed my photos out. I started wanting to use stamps, but then changed my mind after i had stamped the image, I still used the image but only a portion of it. I placed a Prima flower just off the stamped image and then  accentuated it using some Basic Grey rubons. I added my title with some thickers and my page was done.

I never think of a piece of work or paper as being unable to be used. Even 'mistakes' can be fixed, and slight alterations can  be made if i change my mind too. Overall i was happy with the simplicity of the layout.

have a great New Years celebration
tracey

Sunday, December 27, 2009

Family Pics to share!

We had a wonderful Christmas day with family, It was the first time in a very long time we were all together on my husbands side. Then followed with an amazing tea at my nana's joined by mum, aunties and uncle and my cousins. Was an unreal to see everyone and catch up on past year advents.

Here is some pics to share of my own family.... took the oportunity all dressed up to take some pics....hehe!!!


3 gorgeous people in my life....


our amazing kiddies...


katie in her hat!..


Ben growing up way too fast...


Ben having fun with his army man!...


Ben's new rocket toy!


katie and bella watching hannah mantana dvd


Hope everyone had a wonderful few days and thanks for popping in.....


At scrap N Craft with T we have Bella papers as low as 55c if you would like to check them out... sale ends tomorrow! have fun

luv tanXx

Thursday, December 24, 2009

Thankyou everyone for your support


At Scrap N CRAFT with T...we would like to wish everyone a wonderful Christmas and a safe NEW YEAR and hope 2010 brings you lots of joy and happiness.

Thank you to everyone that did Guest Design Team Positions for me this year, your work has been amazing. We have some of you back again this year for some more amazing work and some new ones... so keep popping in and seeing what we are up to.

Thank you to everyone that has posted comments on our blog and gallery we are very appreciative of your sweet and kind comments.

Huge thank you to all my customers that have supported me throughout the year.

We have had some
  • wonderful specials through out the year
  • fantastic competition giving away lots of prices
  • Lots of design Team kits for you all to enjoy
  • heaps and heaps of blog posts for your enjoyment and inspiration!....

we hope to bring this all to you again in 2010 and MORE!!!!!!!

We won't be posting anything tomorrow and hopefully will have something for you on Saturday to enjoy!

have a wonderful day
luv tan and my wonderful team xxoxoxoxx

Wednesday, December 23, 2009

Distress Technique Lesson 2

DISTRESSED INK.................

These inks are a lot of fun, they are a die ink and so much fun to play with. I love the colours in the ranger ranges. We stock these inks in our store at www.scrapncraftwitht.com.au if you would like to check them out!


We will do a few techniques using these and we also do these in a local class....

Here is the Second one we will make today!...


Step 1
Find your paper and which coloured distressed Inks you would like to use. You will need a soft sponge or Tim Holtz has a tool made from Ranger that does this perfectly. I have used a doilie for my sample.

Step 2
  • Place your work on a soft mat/craft sheet (made by Ranger)
  • Using your sponge
  • Dab into your ink
  • Start on the soft mat and work your way in onto the doily in a circular motion
  • NOTE: starting off the mat to start with will stop any blotches and heavy ink parts.
  • I have just used one colour around the edge first

Step 3
Use a contrasting colour - I used the blue ( faded jeans Distressed Ink)
Again use a clean sponge and dip your sponge into the ink
Repeat the above circular motion, starting off the paper
Completely cover the intire doily

Step 4
If you want the ink to blend more you can use your POTION #9 and it will blend it beautifully!

Wait to dry or use a heat gun if you want it to dry quickly.

Step 5
Select a STAMPS you would like as a texture... we have LOTS in our Scrap N Craft with T store


Now you have created another amazing master peice that you can build on. We would love to see you use this technique on a project and place it in our gallery!
WE WOULD LOVE TO SEE IT!!!!

till next time
enjoy
luv tanXx

Tuesday, December 22, 2009

Single layout by Michelle Jamieson and a sketch!

Hi everyone!
Hope everyone is up to date with your shopping and getting ready for the big day! hehe!

Today I wanted to show you a sketch created by Tanyah Payne (me) and a gorgous layout by Michelle Jamieson

Chelle used a Carolee Creations Pattern Paper called Doodly-Doo Daisies, it is so soft yet lovely to work with...to check it out in our Scrap n Craft with T shop.. CLICK HERE!


Here is the sketch for you to have a go at and PLACE INTO OUR GALLERY! we would love to see your work their...


Here is Chelle's gorgeous layout to share with you all.... Thanks chelle!


I am sure you will love this
till next time
luv tanXx


Monday, December 21, 2009

THE THOUGHT BEHIND THE PROCESS

Have you ever wondered what the artist was thinking when they created their artwork. Whether it be a textile or mixed media artist, painter, paper arts artist or scrapbooker.

I thought I would take one of my projects or layouts and explain why I put that flower in just that spot, or why I chose to use ‘that’ particular color or why I added no mats to my photos.

It’s quite interesting when you start to dissect your work – or that of artists that you admire.

Pre-making pages with no photos.


This is my first layout that I would like to dissect and share my thoughts about with you. It is titled “A quiet moment”. It was created while at a friend’s house doing some scrapping. I had no photos whatsoever. But thought I can create a layout without a picture with me to use.

I had this beautiful piece of cardstock and then picked out two of the colors on it to go with my project. I had some bling, chipboard and some paper ribbon with me – how could I not create something.

Now down to the creating of the layout. I did not have a sketch to work from but I really wanted to try using a large circle on my layout as i have seen how effective they can be. I created that by using a round dinner plate. I used my corner rounder on the other two square papers to give them a softness and follow with the roundedness of the circle. To give a little depth to the piece i distressed the edges of my papers.

After layering all papers I adhered a couple of rows of the paper ribbon towards the bottom of the layout – making sure I ‘tied in the layers’ by running the ribbon across all layers. Being a pastel/girl layout i wanted to add a little sparkle so bling was added to the arc – mirroring it on the opposite side, top and bottom. At the top of the page I felt that it was not balanced as there was a lot of ‘open space’ so I added two small strips of the paper ribbon, a heart & a chipboard flower – this helped tie in with what was at the bottom of the page as I had no large titles on this layout.

Because I had no pictures at the time – I used two card blanks and popped them in the spots while I decided on placement for the chipboard pieces… sounds too easy doesn’t it. Bling was also added to the chipboard flowers to enhance the 'girly' look of the page.

After about a week I found some pictures that had similar colors as the printed paper and added them. A little journaling by using some small stickers and the layout was all done.


I have been creating a few layouts like this with left over papers and they sit ready for their photo which is usually within the next week or so.

You should give this a go – choose all your papers and embellishments and then wait for the photo to find its way to your layout. You can use this layout as a sketch if you like too.

We would love to see what you can create using this process. Why not pop it in the gallery.
http://www.scrapncraftwitht.com.au/gallery

Products included in this layout are:
You will find these products and more at Scrap N Craft with T....
Have a great week creating
Tracey

Sunday, December 20, 2009

Sunday Gallery Spotlight

Their are some really nice layouts in our gallery this week and thank you to everyone that uploaded their projects. We enjoy seeing your work and I know many enjoy seeing your ideas and projects that inspire us all.

REGISTER TODAY and upload your layouts we would LOVE to see them...

This Weeks Spotlight is ......

Gilly's Graduation Layout....


We have lots of kiddies big or small who are all graduating kindy, highschool, and even Uni...

http://www.scrapncraftwitht.com.au/gallery

Gilly has used a range of papers that can be used for when you kiddies all start school in the new year as well...

This range is in our shop NOW and ready for me to find the spare time to upload them!....


We also have something quite special using this range of papers....

From Leanne stamatellos


Here is Leannes Kit that has instructions via email for you to be ready to scrapbook all your pics about school next year or you can scrapbook your childs graduation....


All products in this kit are included to create this layout are..

  • 2 x Cardstock
  • some yellow and white cardstock
  • Cosmo Cricket pattern paper
  • Adornit Mini alphas
  • 2 x 7 gypsies - embellishments
  • Mini brads
  • 1x aqua flower
  • Bella Journal tags - full pack
  • 1 x small black button
This is at a fantastic price of $11.00... CLICK HERE to go to our ONLINE SCRAPBOOKING SHOP.


Thank you Gilly for sharing your layout it is amazing and I am sure others will enjoy it heaps too!...

till next time
luv tanXx

Saturday, December 19, 2009

Check out Tanyah's Layout on the BELLA BLOG!

If your wondering what the EVER AFTER range of pattern cardstock looks like in a layout!....

One of my layouts is displayed on the Bella Blog.... CLICK HERE to check out and would love to hear what you think.....


If you would like these papers we have them in stock and have at the above of the range patten papers that match for your ease of mind.

CLICK HERE to go to our Online Scrapbooking Store and check out the EVER AFTER RANGE...

Also below the layout titled 'one of a kind' is a card i created using the fundamental cardmaking range......

We have some of these in stock too .. the ribbons, rubons, chip shapes are gorgeous!

Thanks for checking in today and hope everyone has finished their Chrissy shopping

take care
luv tanXx

Thursday, December 17, 2009

Sketch by Tanyah Payne

Hi Everyone
I do apologise for not having a post yesterday!.... I know so many of you pop in and see what is happening on our blog and we love you checking it out and hope it inspires you to create and have heaps of fun doing so.

Today I have created another Digi sketch for you to have a go at, hope you like...


PLEASE!!!! remember to post your layouts in our gallery! we love seeing your work and your comments.

Also we are looking every week for a layout that can be focused on Sundays! so another reason if you would like to be in the spotlight .. to go to our gallery CLICK HERE!

At Scrap N Craft with T we have the NEW RANGE ' EVER AFTER' arrive... all pre-orders will be packed first... This range is very hard to see how nice it is online but is gorgeous in real life. I have worked with it and have used it for many different titles and themes

To check out the new Bella ever after range... CLICK HERE!

Thanks for looking
till tomorrow
luv tan

Tuesday, December 15, 2009

single sketch and a layout!

Today I have done a simple sketch for you to scrapbook in your free time....I am laughing here free time at this time of year... i am not sure if that exist....lol!

If you would like to place your layouts in our gallery we would love to see them...

SCRAP N CRAFT WITH T gallery.... http://www.scrapncraftwitht.com.au

Here is the sketch i have created.....


Here is a layout I have created using kasiercraft papers ....

Checkout our site for our kaisercraft range is on Special.. pattern papers from 50c, bling from 65c....


Thanks for looking
till next time
Luv tanXx

Monday, December 14, 2009

Christmas made gifts - Leanne Stamatellos

This is my favourite time of the year to make things and receive things that are handmade.
Throughout the year I create my layouts and the occasional birthday card but at Christmas time I get to have the most fun doing special things for family and friends.
This year, I made these jars full of layers of ingredients that when mixed in a bowl with some butter and vanilla and rolled into balls and baked, you get the most delicious Reindeer Cookies.


I'd love to hear what you do at Christmas time with all your creative energy. Or maybe you've received something wonderful that you can share. Post a pic in the gallery if you can - it really is the loveliest time of the year isn't it?
Merry Christmas to everyone and all the Best for a safe and Happy New Year - Leanne

Sunday, December 13, 2009

Sunday Gallery Spotlight

Today's Layout that has captured my attention is by Dorothy Clements....

Dorothy is a true example of my classes can help you be an individual and independent scrapbooker. Dorothy came to my main 3 classes and then decided to go onto harder techniques and styles.

This is one of Dorothy's layouts I have seen IRL (in real life) and WOW am I impressed at how much she has grown so quickly as a scrapbooking and producing incredible layouts.....

Hope you enjoy and thanks for sharing with us Dorothy

luv tanXx

Saturday, December 12, 2009

FREE Alcohol Ink blending solution.... read on to see how!...

The new Bo bunny papers - frosted and vintage valentines ranges have arrived in our store... all back orders will be sent out on Monday....

If you would like your own.....
CLICK HERE to go to our ONLINE SCRAPBOOKING STORE in LISMORE


We also have now in the NEW complete set of Alcohol inks of 'BRIGHTS' and 'LIGHTS'...
CLICK HERE to go to our ONLINE SCRAPBOOKING STORE....

Because it is almost Christmas and we want to give you all something FREE......

If you purchase 12 alcohol inks (any colours) you will receive the blending solution FREE automatically while stock lasts.....

enjoy shopping where you will find a BARGIN!

till next time
luv tanXx