I have a new blog!

If you want to see only my creations please come and check out and follow my new blog http://www.tanyah-payne.blogspot.com

Friday, July 16, 2010

Scrap n Craft with T's winner for week 5........is......

Yes we all are waiting to find out who has won this week...


I would like to congrat everyone that has done this challenge,your work has been very inspiring.

The winner this week is..... 

Annie! 

congrats and will send you a voucher shortly.


If you are elliminated please dont give up, keep going! Its all for fun and trying new things.

Those who are going onto round 6 are:
Annie
belynda
Chrissy
Goddessjodi
kath parker
Kirsten
Lauren.
Leish
Lexie
Pauly
Rachwa
scrapmanda
scrappinkym@yahoo.com.au
sharms
silvercat
Tiff
Vintagej
xoxAlyssaxox
sueat17

well done everyone and our next challenge will be up at midday

have a wonderful day & enjoy creating
luv tan & Team xx


Thursday, July 15, 2010

WEBSITE & GALLERY

We are up and running now if you have any questions please email me at cardartbytanya@yahoo.com.au

so sorry for any inconvenience this has caused

luv tan xx

One sketch; two layouts by Ingeborg Dijkstra

If I am stuck for inspiration I sometimes use a sketch to get me started. Today I want to show you a sketch I made (it is only the second or third time I ever made a sketch, so please forgive me my 'beginner style')). I also would like to show you the two layouts that I made using the same sketch. You can safely download a larger picture of the sketch HERE (of course it is free, but feel free to email me a picture of your layout if you have used my sketch ... )

The photos of both layouts are made on the same day; the day our boys had a 'fancy dress' day at school. I don't mind using the same sketch more than once, especially if the layouts end up in different albums! Our son Tom dressed up as a soldier and our son Rick dressed up as a rock star. I have taken photos of the different stages of the layouts.

First I cut the patterned papers and put them on the layouts.

I used a new set of Tim Holtz stamps in the corners of both layouts. The sketch shows flourishes, but obviously you can be creative and use different shapes too!

I added a border using a template and I added the photos and a title.

I added journaling and some more embellishments and this is the end result of both layouts:

And two close up pictures of the journaling:

Wednesday, July 14, 2010

Cuttlebug technique - using ink on your embossing folders


I Love my   distress inks and I love my cuttlebug and  when you put the two  together  there are  endless  opportunities to create  something  different and unique.

For this  technique you will need
cardstock
ink
embossing folder
cuttlebug


1.  Open the  emboss folder and  swipe ink pad over  the  embossed   folder


2.  Enclose  cardstock to  be  embossed


3.  Run through  machine


4.  Cool ink effect   - can be used for cards or layouts -


all items are available  in store

Monday, July 12, 2010

THE THOUGHT BEHIND THE PROCESS

Monochromatic Magic


This layout that I am sharing today is called the Purrfectchild. Sometimes we have not so pleasant photos that just need to be scrapped, and sometimes we have the perfect title to go with them also.

With this layout I was lucky enough to have some great A2Z Scraplets that were created by Kylie Abel on Tanyahs Design Team.  Kylie did a great job in designing this border strip as it has worked in perfectly with my title, thanks Kylie.


I decided upon a monochromatic scheme using pink in creating this layout. It went great with the tones of my daughters skin, the carpet in the background and that huge tongue of hers... cheeky little peep she is... by the way ... this is a self portrait that she took of herself, scary isn't it?

The photo has a stitched border of pale pink which is offset to the left of the page. This left me enough room to add the feline border strip and the title. In coloring the A2Z scraplet borderstrips I mixed my own color from the white and burgundy tubes. Firstly they were undercoated and then the other color was blended over the top. In my stash of embellishments i found the perfect colored buttons to add a little dimension to the paghe and then I added my title.

I hope you enjoy my layout this week, sometimes its better to look at the KISS principle on things by not overcrowding the page, leaving just enough interest by allowing whitespace and to make things even more simple using a monochromatic color scheme.

enjoy your week.
tracey

Saturday, July 10, 2010

Saturday Scrapping Stimulus...

Saturday is here again! I hope you're all staying nice and cosy and warm through this cold winter!

Today's quote made me giggle...

"Can you imagine a world without men? No crime and lots of happy fat women."
~Attributed to both Marion Smith and Nicole Hollander


A perfect quote for photos of you and your girlfriends!

Have a great weekend!

Kylie

Friday, July 9, 2010

Embellish This - Week 5... On a roll!

oooops  so so sorry everyone for being late with this weeks challenge!


Congratulations again to those of you who are still with us in the competition. The gallery looks amazing and we are thrilled with the effort everyone has been putting into their entries, keep up the awesome work!


This week's challenge is set by Melinda Spinks (winner of the 'Embellish It' competition in 2009)

Melinda's challenge is to create a layout using the following criteria:
  • Layout to be any shape but square!
  • Monochromatic Colour Scheme (With a hint of one other colour only!)
  • Paper Rolling or Quilling must be used on your layout!
  • Stamping to be used on your layout and be a prominant feature (not just a little stamp in the corner).
  • An embellishment to be made using acetate/transparency (you can also include any of the above criteria on your embellishment).
This week is about thinking 'outside the box' and creating a layout that does not use the standard 12 x 12 square cardstock for your background. Melinda has created her layout based on a circular background which she has also used a paper rolling technique to enhance the edges giving it a stand-out feature! Paper rolling and quilling aren't the easiest of techniques, however this is round 5 so we are trying to add another level of difficulty to your project, and possibly something that you haven't done before, or haven't done in quite some time!


Melinda has used the colour pink in varying shades for her monochromatic theme with just a touch of brown. You can incorporate small amounts of one other colour, but remember... white and black are classed as colours so you cannot use them unless they are your nominated colour.

Your embellishment this week is to incorporate clear acetate or a transparency, if you don't have either of these at home then you might be able to use clear packaging of some kind. Melinda has used the clear cover of a shirt box to make the angel wings and used a white paint pen to draw the definining lines. She has also used another form of paper rolling for the large heart on her embellishment.

So... time to get creative and get rolling!
We hope you enjoy round 5 of the competition and look forward to seeing your creations in the gallery!


Luv Tan & My Design Team Xx

Embellish it competiton - end of week 4...

wow you all did amazing! and love everyones creations, i am thrilled that the elliminated people are still having a go and doing beautiful work.

PLEASE REMEMBER IF YOU ARE ELLIMINATED ..............please keep going!!!


The winner is Sue Smith...... congrats sue your project is amazing!


who is making it to round 5


Annie
belynda
blondone
Chrissy
Goddessjodi
kath parker
Kirsten
Lauren.
Leish
Lexie
MichelleW
mum2-3
Pauly
Rachwa
scrapmanda
scrappinkym@yahoo.com.au
sharms
silvercat
Tiff
Vintagej
xoxAlyssaxox
sueat17


look forward to see what you all come up with this week!
remember its all about fun and tring new things!
luv tan & team xx

Thursday, July 8, 2010

Alcohol ink background by Lisa Kamphius

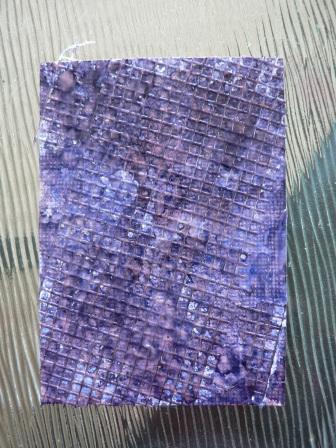
Again this technique can be used for ATCs , cards or even layouts. I have used it for ATCs......


What you will need

  • ATC sized cardstock ( 2.5 inches by 3.5 inches)
  • alcohol inks
  • applicator ( available in store - very cool!)
  • sticky tape
  • masking tape
  • sequins
  • mesh
  • pretty much anything you can think of with some texture.
  • PVA glue


Step 1

Take your cardstock - ATC size for the example and randomly place bits of sticky tape, masking tape, sequins mesh - you can cover the card as much or as little as you like


Step 2

Paint the entire card in PVA glue and set aside to dry. This acts like a barrier between the card and the alcohol ink

Step 3


When the card is dry take your selected colours of alcohol ink and apply ink to the felt on the applicator and with firm strokes - dab this up and down on the card until it is entirley covered.


Step 4


You can add additional colours or you can make it lighter by using the alcohol blending solution. This will lighten your colour and also blend the colours ifyou have used more than one.


Step 5

This dries really quick - you now have a cool background for your ATC or card etc

This is the  ATC  I made


Thanks for reading and hope you have a go
have a wonderful and safe day
luv tanxx

Wednesday, July 7, 2010

ALSTONVILLE QUOTA CLUB CRAFT FAIR..... its on again!!!!

Our local Quota club is holding their annual craft show in Alstonville  on 28th - 29th August 2010.

Its a brillant weekend with  so much to check out and see.

We will be their again this year only we will be at the back of the hall where we hope to have more open space and light!

We look forward in seeing you their I am sure you wont be disappointed! we will have a raffle, gooddie bags, lucky dips, and make n takes for you to enjoy and to thank you for you support!


place in your diaries and see you their!
luv tan xx

Tuesday, July 6, 2010

Product Spotlight - 7 Gypsies Avignon Range paper

Today the spotlight is on two papers from the 7 Gypsies Avignon paper range.

Avignon ORCHESTRA paper


Avignon ECRITURE paper
These papers have proven to be very popular and for very good reason too - they are double-sided and they have such a range of uses.  Perfect for vintage projects but can just as easily be used for other projects as well.
Tanyah will be stocking these papers in bulk to keep up supply.

Here are a couple of sample uses...

Handmade flowers.


'Vintage' style projects.

Layouts  (I've glimmermisted the paper to change the colour to suit)

Hope these have given you a couple of ideas....

Happy scrapping!!!

Monday, July 5, 2010

THE THOUGHT BEHIND THE PROCESS

Texture Paste

One of my favourite mediums to use is Texture Paste and I am sure I have discussed it before in previous posts.  It is used to add depth and texture to most craft projects, layouts, cards, OTP, canvasses, ATC's sand many more. You can add paint, ink and other mediums to it prior to application or you can paint over it once you have applied it to your project.

The following project was one I created as part of the ScrapChat 52 week challenge.


I started the project with cardstock. I have a lot of cardstock that I probably will never use as it came in packs and the colors are not something I generally use so it was perfect to use for this application. 

The first thing i prepared was my texture paste. On a palette i added a few scoops of texture paste and then added my paint, it was mixed together and then adhered to the cardstock using a palette knife. You can also use a butter knife to give you some great texture lines if you did not want to purchase a palette knife. I picked up blobs of the paste and smeared it onto the page, leaving all the ridges and if i was unhappy with the look I went over it again until i was happy with the patterns I was creating.

The rest of the layout just came together with the bits and pieces I had laying around on my desk. The words were by Little Davis, the owl tag i created using water colors and then stamping the owl in brown Staz On ink, the pink mesh was care of the wonderful Alz on the design team, and the acetate black squiggle was a piece of an EK Success page addition. I added most things by sewing on them or staples. 

I hope you will start creating some fun textured designs using texture paste.

tracey
xox

Saturday, July 3, 2010

Saturday Scrapping Stimulus...

Yay for the weekend! I hope you get spend yours with family and friends and having fun getting messy with your scrapping!

Today's quote is about enjoying your art and how it creates a permanent memory of the joy...

"I cannot see that art is anything less than a way of making joys perpetual."
~ Rebecca West

Have a lovely day, and I hope your week is a wonderful one!

Kylie

Friday, July 2, 2010

Embellish it competiton - week 4 challenge! have fun...

We would love for everyone to have a go at this one! it will be exciting to see what you all come up with!...

For those who have been eliminated PLEASE keep going we love to see your beautiful work.


This weeks Challenge is brought to you by Lisa Kamphuis...
Anyone that knows Lisa's work, will know she is the vintage queen! and to challenge you she is looking for the following  criterion for the 'Vintage it' ........

1. Must be vintage style using lace and ribbon
2. creative use of rubons and paint
3. something for practical use
4. Must have included a distressing technique


Enjoy and have fun, remember to have your project/layouts up by midnight wednesday!
luv tan & Team Xx

Embellish it competiton - winner for week 3...

WOW the gallery is looking amazing and you all are doing brilliant work!...
It has come around again where we need to eliminate 3 more people....Please don't be discouraged if you are!.... your work is amazing and being a comp it is all part of the process and the Design Team work hard to work out these scores. Remember to keep going in the challenge section to go into the draw for 2 other prices!

Here is the list of people go through to the next round.
  • Amanda73
  • Annie
  • belynda
  • blondone
  • Chrissy
  • Goddessjodi
  • kath parker
  • Kirsten
  • Lauren.
  • Leish
  • Lexie
  • malinda
  • MichelleW
  • mum2-3
  • Pauly
  • qldscrapper
  • Rachwa
  • scrapmanda
  • scrappinkym@yahoo.com.au
  • sharms
  • silvercat
  • Tiff
  • Vintagej
  • xoxAlyssaxox
  • sueat17

AND THE WINNER IS....

BELYNDA!... 

A voucher will be coming your way very soon lyn ... 

congrats xoxoxox


IF YOUR NOT ON THE ABOVE LIST DON'T GIVE UP, KEEP GOING!.... To go into the draw to win one of 2 prizes....

Thankyou for such beautiful work for us to admire!
Our next challenge will go up at 12.00pm...
have fun!
luv tan &Team Xx

Thursday, July 1, 2010

'Vintage Style' Birthday Calendar by Ingeborg Dijkstra


If you're anything like me, you love the look of all the vintage layouts and projects that you see in magazines and galleries, but you're too scared to make one yourself. Well ... that's me too! But ... due to a challenge at a Dutch site I have tried my very first vintage style layout a few weeks ago and I wanted to have a go at it again.
So ... I used the gorgeous 'Nature's StoryBook' collection from Webster's Pages. The collection also has some beautiful journaling cards. Whilst I haven't used those on my Birthday Calendar, the cards inspired me to make a calendar in the first place. Here is a picture of the cards:

And these are the five doublesided patterned papers I have used:

'Nature's Manuscript':

'Plant & Nurture':

'Soar Blue Skies':
'Violette Wings':

'Wishes Come True':

The images on these papers are just perfect for cutting out, so I started looking on each side of each paper to find images I wanted to use for my calendar. I only cut images from the sides, to keep a lot of the paper for later use.

In Publisher I made a text file to use for my calendar. I converted it to a pdf file, which you can safely download HERE. I printed the document on off white paper to match with the patterned papers I used.

I used 6" x 6" chipboard covers as my base and cut six more pages out of kraft cardstock. I only needed six kraft pages, since I use both sides. I cut 12 (one for each month) slightly smaller squares out of the patterned papers. Some papers are scraps from other lines. I put the patterned paper squares on the kraft paper.

Using my Basic Grey 'Flourish Edges' stamps I stamped flourishes in the corners and at the borders of each page.

I added about two of the cut images to each page. I also stamped a line of Scripture on pieces of Kraft cardstock to have something inspirational on the page each month. The pages look like this:
Using my Bind-It All machine I punched holes and added binding rings at the top. The calendar can stand on its own. The pages are being flipped at the top. I added the words 'birthday calendar' with foam Thickers from American Crafts.

Here are two of the finished pages:

I think a birthday calendar makes a great gift (or you can just keep it for yourself) ... Happy crafting! x
Ingeborg.