I have a new blog!

If you want to see only my creations please come and check out and follow my new blog http://www.tanyah-payne.blogspot.com

Friday, December 11, 2009

Waterfal Card by Lisa Kamphuis

Today Lisa Kamphuis has designed a waterfal card for you all to have a try at if you wish.... She has also used


These you will find in our shop...http://www.scrapncraftwitht.com.au/


1. Cut grey cardstock to 8 and a half inches to 4 and a 1. quarter inches.

2. Mark out 2 inch and one eighth and 6 inch and 3 eighths and score

3. From grey scrap cut out a 3 x 3 inch square.

4. From the Sassafrass lass bike paper cut one piece 1 an a half inch and 4 and a quarter inch .
Cut one piece 2 ¼ inch x 4 ¼ inches

5. Ink edges and adhere to 2 sides of grey front
6. Adhere paper and mesh to 3 x 3 square

7. Decorate 3 x 3 square as you like. Ive used striped paper, red mesh, 3 buttons, robot cutouts.
8. I have added large orange bling to the corners.

9. Inside card I have cut the blue paper 4 inches x 4 and a quarter inches. Ink edges, doodle around edges


hope you like and thank you lisa for this lovely card
till next time
luv tanXx

Thursday, December 10, 2009

New 30min LO for Christmas

It's getting so close to Christmas, and we're all running out of time to get everything done. And then AFTER Christmas there's always so much to do too.

If you need a kit that'll give you a beautifully easy Christmas LO in under 30 minutes, you're in luck! All you need to add is a 5"x7" portrait photo, and if wanted, some dymo tape or strip journaling.

This super-quick Christmas kit includes...

1x cardstock
1x patterned paper
1x Kaisercraft word bling
1x Kaisercraft bling
You can pick up this kit from Scrap N Craft With T for the bargain price of $4! Get in quick - at that price they'll be walking out the door. You can find the kit HERE.

STEP 1:

Mat your photo on the pink cardstock, with a scalloped edge on the right of the paper. You can use a punch or, as I did, trace around the edge of a 5c piece.

STEP 2:

Use a scalpel or blade to cut around the edges of the Christmas trees on the patterned paper. Stick the matted photo behind the trees as shown in the photo.

STEP 3:

Stick the Kaisercraft bling word "Believe" overlapping the photo slightly, and in line with the green stripe on the pattered paper. These words can be really hard to work with sometimes. What I find the easiest is cutting each letter off the backing sheet individually. It hasn't failed me yet!

STEP 4:

Use the smaller of the pink Kaisercraft bling to cover every second dot in the scallops of the patterned paper. I covered the red and blue spots, leaving the pink and green ones showing.

STEP 5:

Now to add a little bit of journaling. I used a dymo labeller wit a blue tape in it for mine, but you could also use some of the leftover pink cardstock and write your journaling.

They won't last long at only $4 a kit. Grab one for yourself HERE.

Remember to upload your LOs in the gallery to be featured on this blog this Sunday in our Spotlight. Good luck!

Wednesday, December 9, 2009

Double LO Christmas Kit and step-by-step by Kylie Abel


Just in time for Christmas, an action-packed double LO using Kaisercraft's new range "Christmas Carnival". This paper range is really fun to work with - it's not a traditional colour range for Christmas, but the images used are perfect for Christmassy LOs.

This double LO kit for TWELVE photos includes...

2 x pattern papers
3 x cardstock
1m sheer white ribbon
1 x Bella bling (clear)
1 x Carolees Creations red sleek alphas
1 x Carolees Creations tiny red alphas
1 x Bella rub-ons
1 x Yillup Designs beaded flower

You can purchase this kit through Scrap N Craft With T HERE
To save you time and effort, the step-by-step instructions to create the sample LO - "Decorate the Tree" will be included here...
STEP 1:
Cut the blue cardstock into 2 squares 6"x8". Stick them at the middle line of the 2 pieces of red cardstock as shown in the photo, approximately 1" from the edge.
STEP 2:
Cut the wavy line from one of the Kaisercraft Christmas Carnival papers, and cut it in half. Stick the 2 pieces on opposite sides of the double LO as shown in the picture.
STEP 3:
Using sharp scissors or a scalpel, cut 7 "baubles" from one of the patterned papers. Use a small hole punch (or scissors) to cut the small hole from the circle hanger on each bauble, and thread some of the sheer ribon through . I used double-sided tape in a long line to attach the ribbons and the baubles to my page. The baubles who's ribbons appear to end in the middle of the page will be coming from behind a photo in an upcoming step...
STEP 4:
Add some of the white Bella rub-ons to the edges of the blue cardstock. I cut the border strip in half and placed one at the top of the page, and one at the bottom.
STEP 5:
Now add your 12 photos. I printed mine with a small white border around the edges to help them stand out against the busy background. My photos are all approximately 2.5"x3.25" - they print from my printer at 9 to a page. There is one photo that is a traditional-sized 4"x6" and is the focus photo.
STEP 6:
Now you get the fun of journaling! The Carolees Creations sleek alphabet stickers included in this kit give you enough letters to create a long title, and the tiny letters have plenty of multiples that make them perfect for many spots of journaling. I included journaling in 4 different places across the whole LO - labelling individual photos and telling the story.
STEP 7:
What's a Christmas LO without some bling? In this kit you get 2 forms of blinginess. There's some beautifully sparkly Bella bling, and an exclusively created Yillup Designs beaded flower that you can only get in this kit. Position the beaded flower at the top left of the LO and use the Bella bling to create circles across the LO. I used the bottom of a Kindyglitz bottle and the inside of my double-sided tape to create templates for circles. To recreate a bit more of the Christmas feeling, I used small clusters to the white Bella rub-on flowers throughout the LO too.
And there you have it - a double LO that includes enough photos that you won't have to try and choose just one that illustrates your Christmas fun.
This kit has heaps and heaps of leftovers too - perfect for adding some Christmas cheer to gift cards, Chrstmas cards or other LOs. I will be adding another step-by-step next week that will show you how to create some beautiful gift cards with what's left over.
Remember, to purchase one of these great value kits from Scrap N Craft With T, you will need to go HERE. They are sure to sell fast at this time of the year!

Tuesday, December 8, 2009

Single Layout Sketch by Tanyah Payne & a Layout by Chelle

Today we have another sketch for you designed by me (Tanyah Payne). This sketch can be as simple or complicated as you would like.
Those who don't know we are a LISMORE SCRAPBOOKING SHOP.... Northern New South Wales. Locals are welcome via appointment over the Christmas period.... see our online store for contact details...


Now here is a layout using the Bliss Range from Crate paper...


This range has sold extremely well and I am sure you will love it too.... to check what we have left CLICK HERE!


Michelle Jamieson has designed a layout using the above Bliss range of papers... hope you love as much as i do....


Thanks so much chelle for sharing
luv tanXx

Monday, December 7, 2009

Single Layout Sketch by Tanyah Payne

Hello again

Hope you have a wonderful day today and can excape the bussieness at the moment and do some scrapping.... for me that isn't going to happen in a hurry but if you get a quiet moment and would love to have a go at my next scketch I would truely love to see it in our gallery

htt p://www.scrapncraftwitht.com.au/gallery


I have an added twist for you to try today...
  • Try these colours
  • Title your layout 'Balance is beautiful'
Cant wait to see how you go....

these sketches are to help inspiration and just for fun if you wish to have a go.

We will start our monthly prizes again next year!
enjoy and have fun creating
luv tanXx

PS Please don't forget we do have gift vouchers available for thouse wanting an easy way of giving someone special a gift this Christmas. Feel free to email me at admin@scrapncraftwitht.com.au if you need any help xx

Sunday, December 6, 2009

Sunday Gallery Spotlight

Hello everyone

Christmas is creeping up way too fast as we are all rushing around going to functions, purchasing gifts and so much more!

Our‘Sunday Gallery Spotlight’ today is Sandy Brimelow’s layout ‘life is a journey’

I adore her use of the Bo bunny papers – Gypsy range. It is adorable and thankyou for sharing with us sandy.

Sandy has used one of my sketches for this layout that i designed for the retreat recently. I also love her use of paper string and journalling in a circle. Gorgeous Layout, thank you sandy.

If you would like your layout to be in the spotlight please place them in the gallery..

http://www.scrapncraftwitht.com.au/gallery

To check out the Bobunny- Gypsy range CLICK HERE

Hope your Sunday isn’t too busy and is a wonderful one

Luv tanXx

Saturday, December 5, 2009

Saturday Scrapping Stimulus...

Kylie's back again. Welcome to another Saturday here with the crafty girls of Scrap N Craft With T. Hope you're enjoying your weekend. I certainly am! I have my car back! YAY! I've been doing a little happy dance since I got it back on Thursday.

So I thought this week I thought I'd include a nice cheeful and funny quote.


I am not one of those who do not believe in love at first sight, but I believe in taking a second look.
~H Vincent


I hope it triggers some happy scrappy inspiration for you this weekend!

Kylie

Friday, December 4, 2009

Single Layout Sketch by Tanyah Payne

Today we have for you a Sketch for you to have a go at. I have used elements from Pickleberrypop.com

WE REALLY WOULD LOVE TO SEE YOU UPLOAD YOUR LAYOUTS IN OUR GALLERY!!!!! http://www.scrapncraftwitht.com.au/gallery/

We enjoy seeing everyones work and would love to see yours in their!.... If at any time you would like to delete your project from the gallery please let us know for we really don't mind at all.


We have uploaded NEW stock at.. http://www.scrapncraftwitht.com.au
including...

Remember we have a $5 for every first order per customer....
Gift vouchers are available...
Enjoy creating and shopping....

Luv tanXx

Thursday, December 3, 2009

NEW! fanty Pants Ranges......

These are delish and LOVE the bright colours in the frosted range...
We have these ready for purchasing if you would like to check out our shop ......CLICK HERE!!!

We also have Gift certificates available if you can't decide what to get someone special for christmas.... CLICK HERE!!


love to hear what you think of these....
Check out the Fancy Pants blog for ideas and inspiration using this range...CLICK HERE!

till next time
luv tanxx

Wednesday, December 2, 2009

Single Step by Step Layout by Lisa Kamphuis

Today we have a wonderful layout designed by Lisa amazing boy layout using the Sassfrass and we r memory keepers papers.

Hope you enjoy....

Products Used
You can check out these products in our shop... http://www.scrapncraftwitht.com.au

Step by Step........

1. Cut geohectic paper to 6 3/4 inch by 10 inch
2. Adhere to blue cardstock 1 inch in from left side .Ink edges
3. Take sassafrass Lass robot paper and cut to 6 inches by 8 inches. Ink edges.
4. From the robot scraps cut out a large robot and handcut some stars . You can use chipboard as a template
5. Using the chipboard templates cut some stars from the paper scraps , mesh and even a flower
6. Adhere robot paper 4 and a half inches from left.
7. Place black and white zigzag strip and adhere at bottom of robot paper
8. Select photo - I have used a 6 x 4 portrait. Adhere
9. Attach selection of handcut embellishments and buttons
10. Attach title - I have used chipboard letters and a Kaiser rhinestone word.
11. A little tip for attaching the rhinestone word ( cos they can be tricky) is to lightly place some sticky tape across the top of the word and gently lift as you place it on yor desired spot.
12. Add any finishing touches - journalling , dooodling etc


thank you Lisa for sharing with us
Luv TanXx

Tuesday, December 1, 2009

Welcome to December! Advent Calendar step-by-step

Wow, is it REALLY December already? I can hardly believe it! I bet there are heaps of you running around doing all that shopping and making wonderful presents for your friends and family. I just thought I'd inspire you to spend today creating something that can be treasured at this time of the year for years and years to come...
An Advet Calendar!

Kaisercraft have released a beautiful calendar with 24 boxes and a space for a photo or decorations, PERFECT for this time of the year. Not only does it come with the frame and the little boxes, but it also has all the numbers you need to count down to Christmas (plus some extras in case you muck them up... LOL). This calendar is wonderful for my family, as we all like a little treat for each day of the festive season - so it has got 4 chocolate coins in each drawer, one for each of us...

MATERIALS:

Kaisercraft Advent Calendar kit
5/6 sheets of double-sided Christmas-themed paper (I used Kasiercraft and Basic Grey)
Chipboard frame
Double-sided tape or mod-podge (or similar)
Red paint
Off-white paint
Kindyglitz (crystallina)
Glossy Accents or similar strong glue
Brown ink
Red ink
1 small clip
1 roll of wide ribbon

STEP 1:

This is the not-so-fun part... Pull all the bits of the kit apart and spend some time cutting the extra tabs off. Be sure you lightly sand the corners once you're done to make sure it's all smooth. This can take a little while - I did it while watching the TV...
Step 2:

Using the red paint, paint all the pieces (including the edges). I used a red paint with some glitter in it - just a little bit extra Chrsitmassy! Don't go too overboard on the paint, particularly on the tabs. They're already pretty tight to fit together, and adding paint can make it very hard to fit the tabs together.

STEP 3:

Assemble the calendar. I found I had to use a hammer for most of the assembly. To protect the soft wood from the hammer I used the scrap piece of wood that came in the kit over the top.

STEP 4:

Decide which paper you want to use for the centre of your calendar, and cut a 22cm square out of it. Cut the remaining papers into strips 5cm wide and 20cm long.

STEP 5:

I used double-sided tape to cover my boxes, but you can use mod-podge or something similar if you prefer. Wrap the tap around a little box and position it so the top of the box lines up wth the long edge of the paper.

STEP 6:
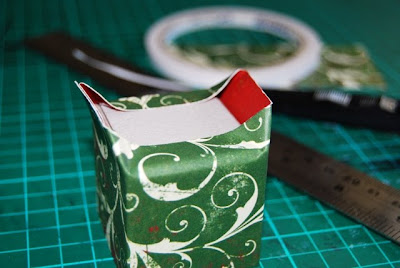
Fold the bottom of the paper over the bottom of the box, and use a 4.5x4cm piece of matching paper on the bottom to cover the edges.

STEP 7:

Cut the notch out of the fronts of the boxes.

Now repeat this process 23 more times to cover all of the boxes. Alternate between the fronts and backs of the papers to add variety in the boxes.

STEP 8:

Using some wide ribbon, wrap it around the outside of the calendar, and tie it into a bow at the top left. I held mine down with some double-sided tape, just to make sure it stayed where I wanted it to...

STEP 9:
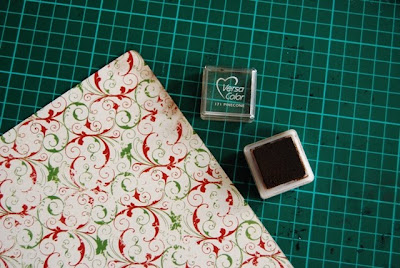
Round the corners and ink the edges of he 22cm square you cut out before. Use some strong glue to stick it to the inside square of the calendar, and stick a small clip with the strong glue to the top middle (this is so you can add a different photo each year if you want to...).

STEP 10:

Paint the letters and chipboard frame (cut in half at the corners) with the off-white paint, and ink the edges with red ink. Stick them to the calendar with strong glue (I used Glossy Accents - LOVE that stuff). Then use Kindyglitz to make them sparkle. I also used kindyglitz on all of the dividers between the boxes.

So that's it - a beautiful keep-sake that you can use again and again each year. Much better than those chocolate calendars you can buy at the shops, PLUS you can put whatever you want in the boxes - even decorations or small presents!

I considered getting 2 of these kits from Scrap N Craft With T - one as a traditional Advent Calendar, and one to use for storage in my scrap area. I can just picture it painted to match my scrapping area and filled with brads, buttons and small flowers...

I hope you enjoy your start to the festive season!

Kylie