I have a new blog!

If you want to see only my creations please come and check out and follow my new blog http://www.tanyah-payne.blogspot.com

Tuesday, June 30, 2009

Kaisercraft NEW PRODUCT LAUNCH

As some of you know Scrap N Craft with T were able to have our Design Team Member Alison Callcott and Sandy Brimlow to attend the
KAISERCRAFT NEW PRODUCT LAUNCH!...


Sandy is in the circle!
Alz is in the square!

Thanks girls for doing this you did a wonderful job of buying up big for everyone to enjoy these products that will be in our store on the 1July!.... yep thats right....
THAT IS TOMORROW !......


We are all very excited of this new release for the packaging is all enviroment friendly and able to be reused rather than throwing away like the old days.... a very clever idea i must say!.....

All ranges will have coloured, black/white rubons, embroided badges, brads, stamps, die cut elements, alpha stickers that go perfectly with the NEW alpha chipboard range. Also each range will have 6 double sided pattern papers at the same thickness as previous ranges along with their fantastic prices will stay the same!

Here are the NEW RANGES...


Alison and Sandy have been working very hard to produce samples and kits in these ranges for this month for you all to enjoy!....


Hope to see you around my shop tomorrow and would love to hear your feed back on what you think of these new ranges.

till next time
luv tanXx

Monday, June 22, 2009

WOW .... cool embossed BAZZILL cardstock

JUST ARRIVED TODAY!!!....

Only a limited amount of these beautiful EMBOSSED CARDSTOCKS!

We have only white at the moment for you can colour it yourself using inks/paints/daubers etc, but if you would like other colours please email me and I am more than happy to them in for you... my next order will be mid next month (july)

This cardstock would be lots of fun to cover and embellish your chipboard shapes, and words and OTP abums. When inked or painted they look amazing and the imbossed image will become more noticeable and have a WOW affect!...

hope you enjoy
till next time
TanXx

Tuesday, June 16, 2009

Bella's BLOG - check out my layout!

How exciting it is to have your layouts on wholesale blogs. I am fortunate to be able to have another of my layouts displayed using their Ruby Rocket vintage beauty range..... love using this range...

We have this range in our store (scrap n craft with t) but has quickly been moving and not much left.


PLEASE FEEL FREE TO CHECK OUT MY LAYOUT AT BELLA

FREE scrapbook layout class by Kylie Abel


"Look at me"
...............Designed by Kylie Abel


FEEL FREE TO CLICK ON THE LINKS BELOW - if you would like to purchase and create this beautiful LAYOUT

Materials:

STEP 1


Take your piece of Elizabeth paper (9.5x9.5) and distress the edges with either an edge distresser or scissors. Be rough. You want it to tear in places. Choose 3 places in a visual tringle to tear even further. Using a crop-a-dile or a hole punch, punch 4 holes on the sides of each tear and re-enforce these with a large gold eyelet. Thread lengths of the pink ribbon through the holes and tie in a double knot.


***************************************

STEP 2

Adhere your piece of Elizabeth paper in the centre of the pink American Crafts cardstock.


**************************************

STEP 3

Use a scalloped ruler or a coin to draw a scalloped edge on the back of the 7x7 piece of black American Crafts cardstock. Cut this out and adhere in the middle of the flocked Elizabeth paper.


*********************************************

STEP 4


Adhere your 4x6 photograph to the left of the scalloped cardstock. Adhere the A2Z Scraplets corners to frame the photo and the cardstock.


*********************************************

STEP 5


Finish your LO off with a journalling spot tucked under the right of the photo, a title using foam Thickers overlapping the top right edge of the photo and a line of buttons around the edge of the pink cardstock.


Hope you enjoy and create your own...
Thank you Kylie for creating this amazing layout


luv tanXx

Fun Scrapbooking Day - Helensvale - Gold Coast

YOUR ALL INVITED TO COME AND JOIN US.........

This saturday 20th of June Scrap Chat is holding a scrapbooking day to come and meet some new friends and scrapbook together

Where: 31 Discovery Drive, Helensvale, is just off the highway at Helensvale... CLICK HERE to find out where it is!
TIME: 10am - 5pm
COST: $10 to cover hall costs and bring a plate to share for lunch.

Will be bring along stock from Scrap N craft with T ... so you can all save on postage for orders made before hand and pic up on the day.

Will be bringing along NEW relases not yet online to purchase if anyone is interested!...

HOPE TO SEE YOU THEIR!

Luv tanXx

Monday, June 15, 2009

SCRAPBOOKING BARGINS - cheap supplies...STOCK NEEDS TO GO!

Being our BIRTHDAY MONTH... we decided to have a HUGE HUGE HUGE sale!!!

WE ALL LOVE A SALE SPECIALLY A BARGIN ........

BARGIN scrapbooking products atUnbelievable prices you just can't miss and come to check out!......
  • Until Stock lasts
  • Please remember that discount coupons/ gift certificates are not available with this offer.

CHECK OUT OUR SPECIAL SECTION
CLICK HERE!
AT SCRAP N CRAFT WITH T TODAY......


ALL ORDERS GO INTO A DRAW THIS MONTH
TO WIN A $50 VOUCHER!


Feel free to email me if you would like to ask any questions
enjoy
xoxo
.......

Saturday, June 13, 2009

some items i have for sale at trash & treasure day!...

here are som more items for sale Scrap chats Autions....http://scrapchat.net.au/auction


HOPE YOU CAN COME AND JOIN IN OUR FUN!.....

Friday, June 12, 2009

I did some scrapping....

Yep it is only one Layout but hey that is amazing for me... and scrapping for me is just amazing...LOL!

FUN TO BE WITH... this Pic was taken in brissy of leanne, chelle and me!


Also it may surprise you but their is WHITE SPACE.... yep i accually can do it!...LOL!.... i was inspired by chelle at Warana to do the funky doodling using your white gel pen and black felt journaling pen. And also inspired by Tracey with the way i have done the lines of the doodling in one of her layouts she did at warana.....


Products i have used....
hope you enjoy.... luv tanXx

Trash & Treasure ... starts

If you want to sell some goodies please come along, regeter and upload..... ITS FREE!!!


The aution will kick off at 4am 13th of june and go for 2 days.......

come and check it out!

here are some samples of what you will find.... enjoy!


Monday, June 8, 2009

Brisbane Scrapbooking Convention...June 09

Wow how much fun was this.... a must go and see advent and to put on your calendar for next year if you didn't make it this year....

The classes are fantastic, make and takes, information and so much inspiration everywhere..... I LOVE IT!!!!!!

I completed 2 classes and am very happy with my half done projects... now need to find some time to finish them....yummy papers though!...

Also meeting up with my DT Leanne & Chelle was a real treat and can't thank them enough for spending time with me.....I loved every minute we had together!


Also was very special meeting up with shaz, Lisa, and Jill.. This was a delight and so honoured to meet up with you all


................Jill & I

Shaz has a pic of us and i will share when she is ready to pass it onto me.


till next time

luv tanXx

Friday, June 5, 2009

We have a NEW Design Team Member and our FIRST digital freebie!

This month we have on board our team is... Kylie Abel....


Kylie is very clever with Digi and traditional scrapbooking and will bring to you lots of


  • FREE digi designs and


  • digi kits in our shop soon.


  • Also will do traditional kits for you all to enjoy.
I am sure you will love her work as much as i do!....
~~~~~~~~~~~~~~~~~~~~~~~~~~~~~~~~~~~~~~~~~~~~~~~~~~
As a special treat to celebrate our birthday this month (on top of all the great specials in the store!), we are offering you a free digital kit Kylie has created for us!
The kit is called "Birthday Party" in honour of Scrap N Craft With T's 1st birthday celebrations.
It contains 2 papers, 5 buttons, a scalloped 5x7 frame and a 6x6 stitched circle.

You can pick it up from HERE.

Let us know if you have used the kit so we can see your great creations!

May/ June Challenge

for those that have not got speakers and have not been taught the gift of lip reading - this is the challenge:

  • scrap a layout with a picture of your front door.
  • choose one of the color sets in the above video and base your layout on that
  • you can use any embellishments you choose to make your masterpiece
  • please email Tanyah your entry before the end of the month

Enjoy!


WE HAVE EXTENDED THIS CHALLENGE AND OPEN TO EVERYONE...... WOULD LOVE TO SEE WHAT YOU ALL COME UP WITH.....


LUV TANxX

Thursday, June 4, 2009

Scrap N Craft with T - IS TURNING ONE!

Can you believe it has been one year since we have started online and has been a huge success with many thanks to all of you that have supported me along this wonderful hardworking journey...


We have lots of Things happening and would love it if you shared it with us.......

  • If you could copy and paste the birthday logo onto your blog
  • Pass this logo onto 5 more people and then
  • email me at admin@scrapncraftwitht.com.au
  • with your name,
  • blog (where you advertised us)
  • and email details
  • to go into a draw to WIN $50 voucher from scrap ncraft with T

This month if anyone advertises our site on their blog/website/facebook where ever and email us where you have placed this, YOU WILL GO INTO a DRAW to WIN $50 voucher to spend at scrapn craft with t, (this voucher excludes specials)

This draw will be drawn on the 1 July 2009 and I will announce a winner!
****************************

HOPE YOUR AS EXCITED AS WE ARE.....

HAVE FUN!
THANK YOU FOR YOUR SUPPORT
LUV TANxX

Wednesday, June 3, 2009

FREE scrapbooking Layout CLASS - by Rachel Zammit

Here is a Step by step Layout from Rachel Zammit...

Using papers from the Creative Imagination - Ooh La La Collection.


Materials


Step 1
Use cardstock as base
************


Step 2
Distress edges of all pattern paper used by opening the scissors and gently running along the papers edge
***************


Step 3

Use Parisian Boarder reverse side, cut a large square withthe measurements 23.5cm x 23.5cm - distress edges and place on cardstock 3.5cm from all eges

************


Step 4

Using pattern paper from French Patch, Distress edges and place on a slight angle overlapping each other as shown

***********


Step 5
Place photo straight 7cm from Right hand side

*************


step 6
Use pink ribbon 28cm in length and center on layout directly under photo


***********


Step 7
Cut out 3 dresses from Dress Forms pattern paper and using foam tape, place onto a large flower. And using foam tape stick flwoer on the bottom left hand side of photo.

****************


Step8

Put heading on the left hand side of photo
*******


Step 9
Place flourish on the right hand side of photo

***************


Step 10
Use rubons on the corners of parisian Boarder pattern paper on your layout.
**************************************************

hope you have enjoyed this layout! xx

Tuesday, June 2, 2009

JUNE CHALLENGE KITS!!!!!

Last month we started our challenge kits......

The winner from last month is... Carmel Lehtola .
You have won a free kit this month and will send it out to you shortly.
Please check out her layout HERE!

Please feel free to comment and add your beautiful projects/layouts in our gallery.
We love to have feedback or comments on our work and can give us a smile for the day!
http://www.scrapncraftwitht.com.au/gallery/


You can purchase a kit from last month and this month to win a FREE challenge KIT next month to the same value or below.

Your allowed to add any alphas you wish to your projects.
Must use all of the kit in your layout/project.
SEE DETAILS HERE

JUNE CHALLENGE KITS.....


JUNE challenge KIT 1 - $5.00.... to purchase.............. CLICK HERE


JUNE challenge KIT 2 - $9.00.... to purchase........... CLICK HERE


JUNE challenge KIT 3 - $9.00.... to purchase ...........CLICK HERE


GOOD LUCK EVERYONE.....

DIGI/SCRAP Layout - Designed by Kylie Abel.

This month Kylie Abel has done a digi/scrap STEP by STEP for you..... We have a kit to purchase if your interested..... CLICK HERE..

CHALK ARTISTS.....designed by Kylie Abel


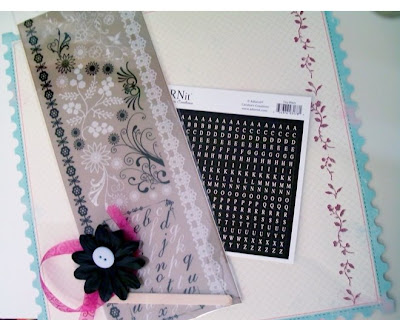
Materials List:
  • Cream (not sure of exact name) cardstock
  • Making Memories PP Delany
  • Bella Rub Ons Grace
  • Carolee Creations letters Tiny Black
  • Green Tara flower Black
  • Pastel Blue button
  • Pink ribbon
  • Zig writer


YOU CAN PURCHASE THIS KIT TO CREATE YOUR OWN.................CLICK HERE The kit price is.......$8.50

INSTRUCTIONS FOR PHOTO COLLAGE

In your photo editing program (I used Photoshop Elements 5.0, but the actions are relatively similar for all programs), create a canvas that is 5 inches by 7 inches and has a resolution of 300.


**********

Open a variety of photos that you want to use in your collage. The easy way to make them fit the 5x7 size you have created is to crop them to the perfect size. To do this, use your "crop" tool (mine looks like 2 right angles crossing each other), and use the settings at the top of the screen to crop to the precise measurements. For my collage I used 7 photos that were cropped to 5x2, 5x1, 1.5x4, 1x2, 2.5x2, 1.5x2 and 2x2 (all measurements in inches).


*********

Using the "move" tool (that looks like a pointer with a cross with arrows on the ends), drag your chosen images onto the 5x7 canvas you created. If you are finding it hard to position the photos, Go to "view" and click on "grid". A whole lot of fine lines will appear on your screen, and when you move things they should "snap" to these lines easily. This makes placing things a lot easier.


**********

This collage looks great, but in many cases all your photos will tend to blend together because there are similar colours. To fix this you need a space around each photo. One way of doing this pretty easily is to use the "stroke" function. This outlines the images. My stroke function is under "edit" and "stroke(outline) selection", but this can be different for different programs (Photoshop 7.0 you could access the "stroke" function as a blending option by right-clicking on the layer in the layers pallette). For my collage I used a white colour (you can change it by clicking on the rectangle with the current colour on it) and 20 pixels and set it as "centre". Feel free to change the settings if you want a bigger or a smaller gap.


*********

Once you have done that, save your collage and print it!

INSTRUCTIONS FOR LO

Cut your Making Memories Delany paper a couple of inches from the decorative edge on one side, and about 4-5 inches from the non-decorated edge (enough that when the 2 pieces are put together it will be a mat for your 5x7 photo collage)


**************

Use a blade to cut along the decorative edge on the paper for approximately 7 inches (enough to insert your photo collage into the cut).


**************

Stick the pieces of Delany paper down on the right of the cream cardstock, making sure you line the scalloped edges up with each other. Stick the photo down to the very edge of it is under the decorative edge you have cut. Use the black Grace rub ons to decorate along the bottom of the photo. Using the Carolees Creations tiny black alphas, create a title at the bottom left of your photo collage.


**********
To tie all the colours in the LO together, use a black Green Tara flower, a pastel blue button threaded with a deep pink at the bottom right of the photo collage.


THANKS FOR LOOKING...
HOPE YOU HAVE BEEN INSPIRERED TO GIVE THIS A GO.....
ENJOY......
Xx

**************************************************************

Monday, June 1, 2009

Sneak Peeks of the June kits....

Hi everyone...Chelle here!!

I've just finished putting the kits together for June and thought you might like a peek at them!

Next month's kits feature the very bold and bright Lime Rickey paper range from Basic Grey.
It's a very versatile range for lots of different themes. My layout is all about friends and my cards can be used for both male and female...apart from the butterflies of course!

Here's a sneak peek of the June Layout kit...


The Layout kit includes:

1 sheet x Cherry Cola patterned paper
1 sheet x Sarsparilla patterned paper
1/2 sheet x Fuzzy navel patterned paper
Navy blue felt
Yellow felt
1 sheet x Lime Rickey Element stickers
1 x Acetate swirly frame
Buttons

CLICK HERE TO PURCHASE THIS KIT ....
you won't be disappointed and at a fantastic price of $13.95

Feel free to use the step by step instructions provided through email or create your very own projects that perfectly co-ordinate together.

Here's a sneak peek of the June Card kit...


The Card kit includes:

1 sheet x Fruit Fizz patterned paper
1 sheet x Orange Cream patterned paper
1/2 sheet x Fuzzy navel patterned paper
3 Glittered butterflies
Kaiser pearls - Black
Lime green spotty ribbon
1 pack - American Crafts foam alphas - Rockabye (white)
Navy blue felt
Orange felt
Lime green felt
Dark Green felt
2 x A4 sheets of white cardstock
2 x Trifold cards (white)

I made 7 cards with this kit and I still have leftovers to make more...

You can purchase this kit for $17.50... CLICK HERE to go to shop.

Enjoy!

Chat soon,
Chelle XX